Do you have a question about the Powermatic PWBS14 and is the answer not in the manual?
Details on service and repair options for Powermatic products, including contact information for authorized repair stations.
Outlines the 1-year limited warranty, exclusions, and limitations of liability for Powermatic products.
Essential safety rules for operating the band saw, covering personal protective equipment, work area, and tool usage.
Specifies the correct gauge and length of extension cords for safe and efficient power tool operation.
Recommendations on appropriate clothing, footwear, and eye protection for safe operation.
Safe practices for maintaining tools, disconnecting power, using accessories, and feeding the workpiece.
Information on health risks associated with dust, chemicals, and recommended protective measures.
Explains the meaning of "CAUTION" and "WARNING" labels used throughout the manual.
Details the critical safety instructions presented on the machine's warning decal.
Explains the necessity of grounding for operator protection and the proper connection of the grounding plug.
Details how to connect the saw for 115V operation and the use of adapters with grounded outlets.
Step-by-step instructions for converting the bandsaw from 115V to 230V operation.
Emphasizes the importance of ensuring the electrical receptacle is properly grounded for both voltage configurations.
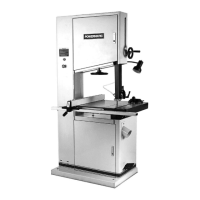
Provides key technical details like cutting capacity, blade size, dimensions, motor, and weight.
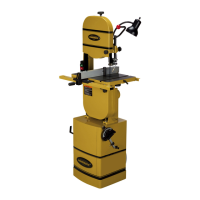
Visual representation of the band saw's physical dimensions, including height, width, and depth.
Instructions for checking the shipping container for damage and verifying contents upon delivery.
Lists the necessary tools for the installation and assembly of the band saw.
Guidance on placing the cabinet stand upright, securing it, and locking casters if applicable.
Step-by-step guide for lifting and securing the heavy saw body onto the stand.
Instructions for routing motor cords, aligning pulleys, and installing the v-belt.
Procedure for correctly tensioning the v-belt using the motor mounting bolts.
Steps for attaching the pulley cover and the trunnion support to the saw body.
Process for attaching the main table to the trunnion support using lock knobs.
Instructions for mounting the extension table and securing it with screws and spacers.
How to adjust the extension table to be level with the main table using set screws.
Steps for connecting the air hose to the saw body and blade guide assembly for dust collection.
Instructions for attaching the work lamp to the saw body for improved visibility.
Attaching the blade tension lever and mounting storage hooks for miter gauge and rip fence.
Instructions for attaching the rear and front rails for the rip fence assembly.
Securing the front and rear rails to the table and guide rail using hex cap screws.
How to attach the fence to the fence body and place it onto the table and guide rail.
Adjusting the rear hook and ensuring proper gap between fence and table for smooth operation.
Using a square to verify the fence is perpendicular to the table top for accurate cuts.
Adjusting the fence to lightly contact the blade and aligning the pointer with the zero mark.
Instructions for tilting the table to a 45-degree angle using lock knobs.
How to set the table stop to ensure accurate 90-degree cuts relative to the blade.
Step-by-step guide for safely removing and installing a new saw blade, including tensioning.
How to set the correct blade tension using the tension lever and gauge for optimal performance.
Steps to ensure the blade runs true and centered on the wheels for accurate cuts.
Positioning the upper blade guide assembly to be just above the material being cut.
Fine-tuning the position of guide wheels and support bearings relative to the blade.
Setting the lower blade guide wheels and support bearing for proper blade support.
Instructions for installing and using the miter gauge for angle cuts and storage.
Solutions for problems related to the saw not starting or stopping unexpectedly.
Troubleshooting guide for inaccurate angle cuts, blade wandering, and unsatisfactory cut quality.
Addressing issues like excessive vibration or the blade not reaching proper operating speed.
Catalog of various bandsaw blades offered as optional accessories, detailing specifications.
Information on how to order replacement parts or contact the service department for assistance.
Detailed list of parts for the main body assembly, including part numbers and descriptions.
Continuation of the parts list for the body assembly, detailing more components.
The final section of the parts list for the main body assembly, covering remaining components.
List of parts that make up the miter gauge assembly, including part numbers.
Detailed list of parts for the table and trunnion assembly, including part numbers and descriptions.
List of parts constituting the blade tension lever mechanism, with part numbers and descriptions.
Comprehensive list of parts for the closed stand assembly, including part numbers and quantities.
List of parts for the fence and rail assembly, including part numbers and descriptions.
| Type | Band Saw |
|---|---|
| Blade Length | 93.5 inches |
| Blade Width | 1/8 to 3/4 inches |
| Motor Power | 3/4 HP |
| Table Size | 14 x 14 inches |
| Cutting Capacity Height | 6 inches |
| Weight | 172 lbs |
| Voltage | 115V |
| Blade Diameter | 14 inches |
| Blade Speed | 3000 FPM |
| Cutting Capacity Width | 13.5 inches |