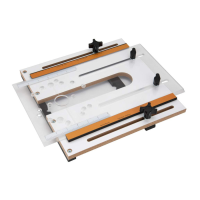
TABLE ASSEMBLY
7
IMPORTANT: Store the router sub-base in a convenient place.
It will be needed when removing router from the router table and
for handheldrouting.
2. Using the screws that attached the sub-base to the router,
attach the router base to the insert plate (MM).
NOTE: Depending on the thickness of your router sub-base, it
may be necessary to purchase longer screws. Make certain that
the screws are long enough to fully thread into the router base.
If you are mounting a fixed-base router, install the motor unit in
the routerbase.
Figure 10
3. Place the insert plate, with the router attached, into the table
opening, resting it on the adjustment screws (JJ). Using an
M6 hex wrench, adjust the adjustment screws through the
holes in the insert plate. Use a straight edge to verify the
insert plate is ush with the tabletop. Once ush, tighten nuts
(KK). If not ush, ne-tune the adjustment screws until the
insert plate is ush with the tabletop.
4. Thread the four at head screws (LL) through the
countersunk holes in the insert plate and into the center
hole on each adjustment screws and tighten, locking the
insert plate in place. Some adjustment of the lock down
screws and adjustment screws may be necessary to ne-
tune the alignment.
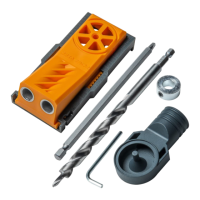
5. Choose the reducing ring appropriate for the job and attach
it to the insert plate using the three set screws (OO). When
needed, thread the starting pin (PP) into the threaded hole in
the insert plate and tighten.