18 11
1. Adjust all amplifier input gain controls to just above minimum sensitivity (fully
counterclockwise).
2. Using the cleanest music source (CD) playing, turn up the head unit source
volume until you can hear distortion. Now turn it down a bit until you cannot hear
the distortion (u s u a l l y just below full volume).
3. Increase the Amplifier gain (clockwise) until the onset of audible distortion.
Then decrease the gain to the point just before the distortion starts. This setting
minimizes background noise and prevents overload.
4. Repeat step 3 for any remaining amplifiers in the system.
The New! PCX™ amplifiers mass has been increased by 2 lbs. per linear foot
over last years P O W E RC L A S S ™ amplifiers, resulting in far superior heat
dissipation. The unique heatsink on your PCX™ amplifier has been designed with
fins on the inside of the aluminum extrusion. This allows for the transfer of heat
from the circuitry to the heatsink fins and out through the vents in the endplates.
Be sure you have ample space around the amplifier for cooling; at least 2" on all
sides.
Your multi channel PCX amplifier can use both front and rear outputs from your
head unit to maintain the ability to fade front to rear, or you can run a single set
of RCAs to the front inputs and push in the Rear Input INT/EXT switch on the
amplifier endplate to route the front signal to the rear channels as well.
PCX 440
1
2
3
4
5
6
7 8
20
9
10
11
12
13
14
15
16
17
18
19
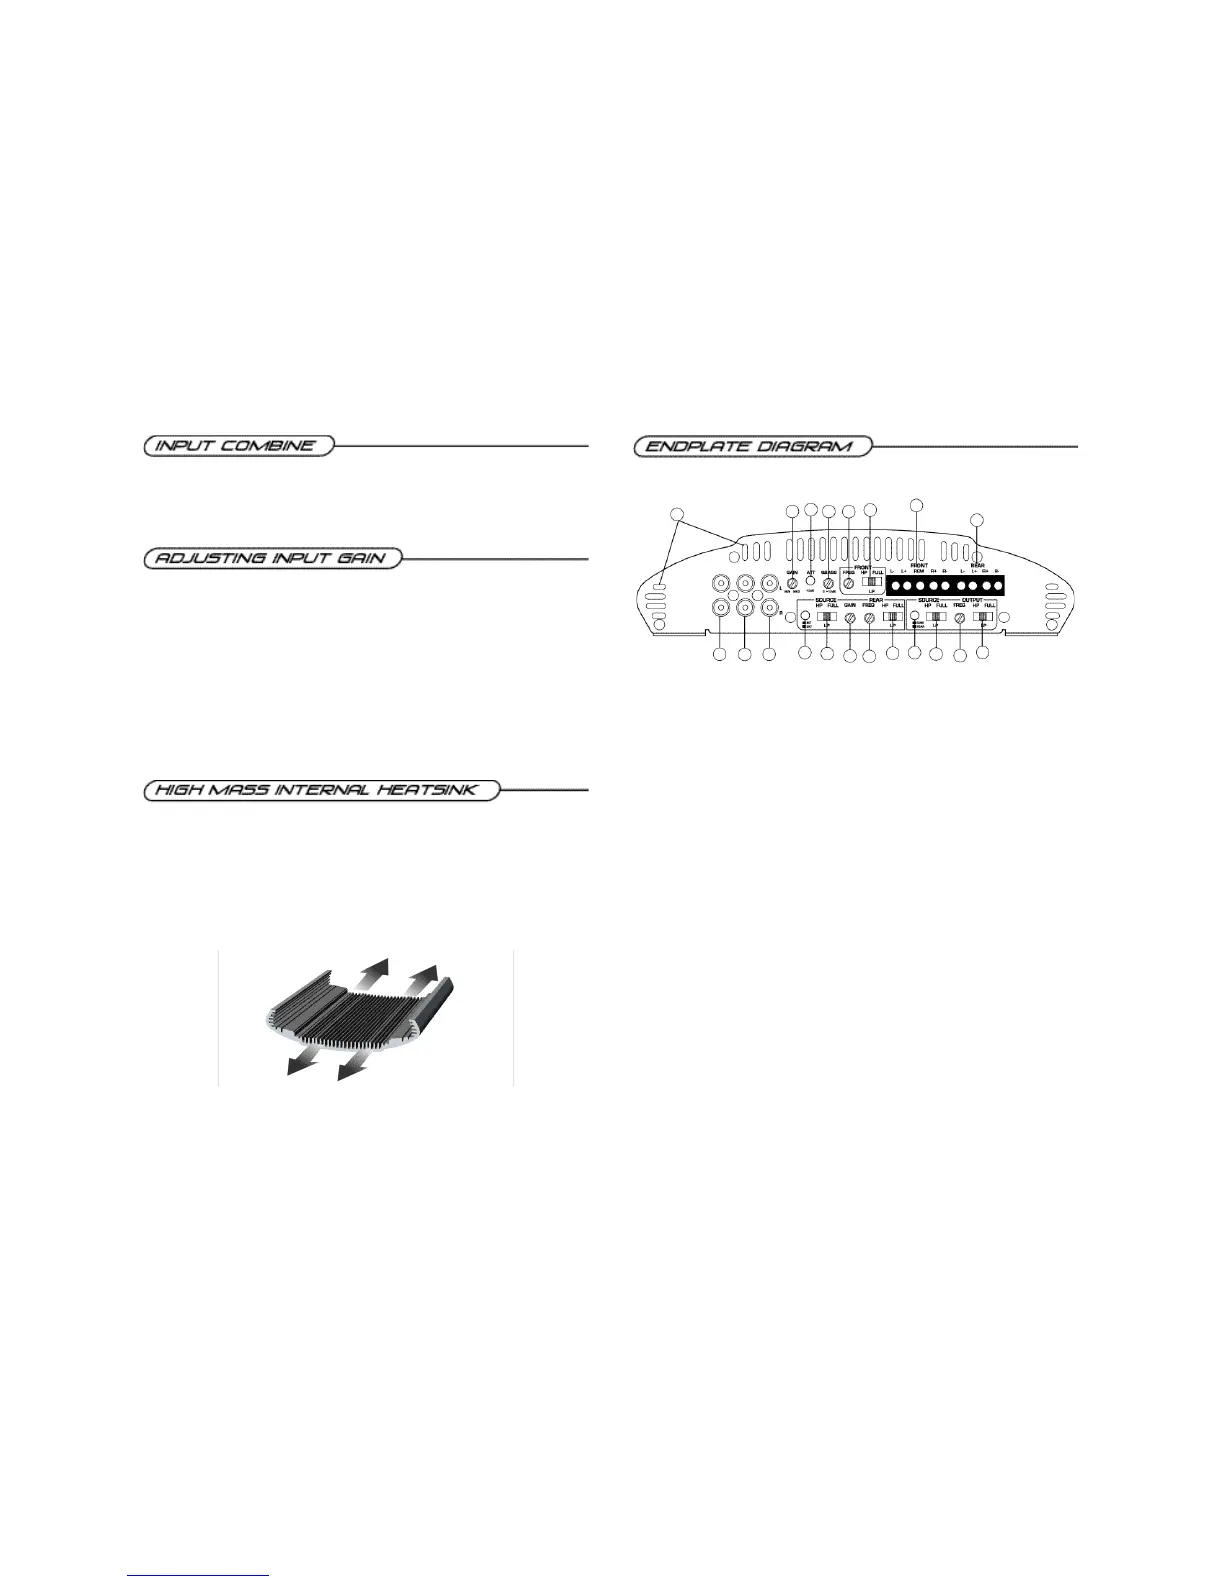
1. Cooling Plenums: Maintain a minimum 2” clearance around cooling plenums for proper amplifier
cooling.
2. Front Inputs: Plug in the front RCAleads from your source unit here.
3. Rear Inputs: Plug in the rear RCAleads from your source unit here.
4. RCAoutput: RCAoutputs provide HP/LP/FULL30-4kHz signal to another amplifier.
5. Front Gain: Use this control to match the output level of the source unit to the front channel of the
amplifier.
6. -12dB: Push this switch ‘ I N ’ for high voltage input (4V-12V) capability. This button pushed ‘ I N ’ must be
used for speaker level input on common ground head-units or for high voltage line drivers.
7. QBASS™ Level Control: Controls Bass Boost centered at 40Hz by up to 12dB.
8. Front Freq. Control: Move this detented control in a clockwise rotation to adjust the front
crossover frequency from 30Hz to 4kHz. (See Crossover frequency chart pg.17)
9. Front HP/LP/FULL S w i t c h : Select the desired crossover setting, HP/LP/FULLfor the speaker output
signal of the front channel.
10. Front Speaker/Remote Connector: Plug in the PowerLock™ connector here.
11. Rear Speaker Connector: Plug in the PowerLock™ connector here.
12. Rear Input INT/EXT Button: Select the in, ‘INT’position if you want to use the internal signal
path from the front crossover for the rear input, or the out, ‘EXT’position to use the external rear RCA
input.
13. Source HP/LP/FULLSwitch: Select the desired crossover setting, HP/LP/FULLfor the internal
signal from the front channel to the rear channel when not using an external Rear RCAinput.
14. Rear Gain: Use this control to match the output level of the head unit to the rear channel of the
amplifier.
15. Rear Freq. Control: Move this detented control in a clockwise rotation to adjust the rear
crossover frequency from 30Hz to 4kHz. (See Crossover frequency chart pg.17)
16. Rear HP/LP/FULL S w i t c h : Select the desired crossover setting, HP/LP/FULLfor the speaker output
signal of the rear channel.
17. Source Sum/Rear Button: Select the in, ‘SUM’position if you want to use the RCAoutput information
summed from the front and rear audio channels, or the out, ‘REAR’position to select the input off of
the rear channel only for bandpass capability.
18. Source HP/LP/FULL Switch: Select the desired crossover setting, HP/LP/FULL for the output
signal of the rear channel when not using the ‘SUM’source input.
19. Output Freq. Control: Use this to adjust the rear high pass crossover frequency from 30Hz to
4kHz. (See Crossover frequency chart pg.17)
20. Output HP/LP/FULLSwitch: Select the desired crossover setting, HP/LP/FULLfor the signal of
the output RCA.
 Loading...