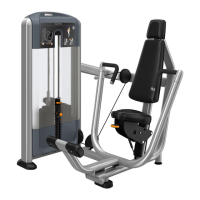
Level the treadmill
IMPORTANT Adjust only one rear foot at a time. DO NOT extend the adjustable feet more than
3/4-inch (2 cm). Adjusting the rear feet cannot compensate for extremely uneven surfaces. If
you cannot make the running surface level and stable, move the treadmill to a level surface.
1. Use a 3/4-inch open-end wrench to loosen the jam nuts on the rear feet and
adjust as needed to level the treadmill (Figure 25). Then retighten the jam
nuts.
2. Plug the power cord into an appropriate outlet. IMPORTANT The treadmill
requires a 20-amp individual branch circuit grounded per NEC (National Elec-
tric Code) guidelines or local region electric code.
Figure 25
Check running belt alignment
IMPORTANT Failure to align the belt may cause the belt to tear or fray, which
is not covered by the Precor Limited Warranty.
1. Turn on the treadmill.
2. Standing beside the treadmill (not on it), press GO or QuickStart on the console.
3. Press SPEED UP until the console shows a speed of 3 mph (5 kph).
4. Observe the belt from the rear of the treadmill for a few minutes. The belt should remain
centered along the running bed. If it drifts off center, adjust it by following the procedure
in the Adjusting the Running Belt section.
5. Press STOP to stop the belt.
6. Turn off the treadmill.
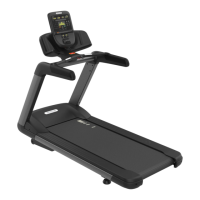
Adjust running belt tracking
1. Start the treadmill and set the speed to 3 mph (5 kph).
2. Observe the running belt tracking while verifying that the belt
remains centered:
Figure 26
If... Then...
If the belt starts to drift
toward the right
Slowly and manually turn the right side take-up roller
mounting bolt clockwise in quarter-turn increments until
the drifting stops.
If the belt starts to drift
toward the left
Slowly and manually turn the right side take-up roller
mounting bolt counter-clockwise in quarter turn
increments until the drifting stops.
3. Increase the speed to 9 mph (14 kph) and then 12 mph (19 kph), making any small adjust-
ments as needed.
IMPORTANT During this functional test, if there is noticeable hesitation of the running belt
with each foot plant, check the Running Belt Tension procedure in the Maintenance Guide
that came in your treadmill box or on our website at www.precor.com.
4. Press Stop to stop the belt.
5. Turn off the treadmill.
NOTE The tracking adjustments should only be done in quarter turn increments. ONLY use
the right side take-up roller mounting bolt to adjust tracking. ONLY use hand tools to adjust
tracking.
Test safety features
IMPORTANT Before any exerciser uses the treadmill, verify that the STOP button, reset
switch, and Auto Stop™ feature are all working correctly.
Test the Stop button:
1. Start any workout on the treadmill.
2. Press STOP once. The console indicates that the workout is paused.
3. Press STOP again. The console displays a workout summary.
To test the reset switch:
1. Start any workout on the treadmill.
2. Give the safety clip lanyard a slight tug. The reset switch pops up and the treadmill should
slow to a stop immediately.
3. Press the reset switch back into its normal position. The console should reset itself and
return to the Welcome screen or banner.
Test treadmill Auto Stop
Auto Stop™ (Automatic Stop) is a feature designed to bring the treadmill to a gradual stop after
two minutes, when it is not in use. This might occur if an exerciser steps off the treadmill before
the end of a workout and leaves the treadmill running. The default setting for this feature is ON.
An administrator can turn off this feature in the System Settings; however, Precor recommends it
remain ON.
Test Auto Stop™:
1. Start any workout on the treadmill, but DO NOT step onto the running belt.
2. Wait two minutes without stepping onto the running belt. At this point or shortly before-
hand, the treadmill should slow to a stop and the console should ask the previous user to
confirm that he or she is still present.
3. If there is no confirmation, the console returns to the Welcome screen or banner and it is
safe to step onto the running belt.
Safety code
Activate a safety code to prevent unauthorized use of the treadmill. This setting requires the
exerciser to enter a code (1 2 3 4) on the keypad before the treadmill will operate.
Activate a safety code for your setting:
1. Enter code 5651565 to go to Club Settings.
2. Press the up/down arrows to scroll to the Safety Code setting.
3. Press OK for Safety Code setting.
4. Use the up/down arrows to enable the setting.
5. Press OK to save the setting.
6. Test the Safety Code.
NOTE If the safety code is properly enabled, you will be prompted to enter a safety code (1
2 3 4) on the keypad before you can begin a workout.
To properly maintain the equipment, refer to the Cardio Equipment Maintenance Guide at
www.precor.com.
©2020 Precor Incorporated |Treadmill 600-700 Assembly Guide | P/N 305285-101C | 23 October 2020| 4
 Loading...