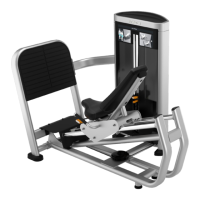
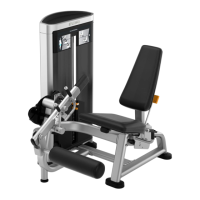
The Precor Resolute™ Strength Selectorized Line Leg Extension RSL 605 is a piece of fitness equipment designed for strengthening the quadriceps muscles through a leg extension exercise. This assembly guide provides detailed instructions for setting up and maintaining the equipment, emphasizing safety and proper installation.
Function Description:
The Leg Extension RSL 605 is a selectorized strength machine, meaning it uses a weight stack and a pin to select the desired resistance level. The user sits on the seat, places their shins behind a padded lever, and extends their legs against the resistance of the weight stack. This movement primarily targets the quadriceps femoris muscle group, which includes the rectus femoris, vastus lateralis, vastus medialis, and vastus intermedius. The machine is designed to provide a controlled and isolated movement, making it suitable for users of various fitness levels, from beginners to advanced athletes. The selectorized nature allows for quick and easy weight adjustments, facilitating progressive overload and efficient workouts.
Important Technical Specifications:
The assembly process for the Leg Extension RSL 605 is estimated to take approximately 90 minutes for first-time assemblers. It requires at least two people for safe assembly, and Precor recommends bolting all strength equipment to the flooring at all anchoring points for stability and safety.
Key components and their quantities are detailed in the parts list:
- Frame Components: Seat frame (1), Main frame (1), Upper cross brace (1), Lower cross brace (1), Back brace (1), Weight stack tower frame (1), Kick plate (1).
- Weight Stack Components: Weight plates 10 lb (4.5 kg) (23), Add-on weight 5 lb (2.2 kg) (1), Add-on weight spacer, 5-inch (1), Weight stack spacer, 3-inch (1), Guide rods (2), Guide rod with cap (1), Top plate assembly (1), Weight labels (1).
- User Interface Components: Arm assembly (1), Handlebars (1), Roller pad cap ring (1), Roller pad cap (1), Roller pad (1), Seat pad (1), Back pad (1).
- Shroud Components: Shroud, crown (1), Shroud, rear upper (1), Shroud, front upper placard (1), Shroud, rear lower (1), Shroud, front lower (1), Shroud, rear middle (1), Shroud, front middle (left/right) (2), Shroud, top tray (1), Shroud, lower pulley cover (1).
- Cable System Components: Cable retainer pin (1), Bumpers (4).
- Fasteners and Miscellaneous: Various socket head cap screws (SHCS), button head cap screws (BHCS), flat head cap screws (FHCS), hex head screws, washers (domed, 9mm, 11mm, 13mm, silver 13.5mm ID x 35mm OD), rubber washer, nylon lock nuts (M10, M12), end cap (1), hole plugs (4), retaining rings (small, large).
Required tools for assembly include:
- Torque wrench with a range to at least 150 ft-lb (206 N-m) and hex bits (6, 8, 10 mm).
- Socket wrench sets (metric and standard) plus extensions.
- Open-end wrench sets (metric and standard).
- Hex wrench sets (metric and standard) plus extensions.
- Box cutter.
- Rubber mallet.
- Retaining ring pliers (large, medium, small).
- Pliers (large, medium, small).
Specific torque values are provided for fasteners:
- M12 fasteners: 55 ft-lb (75 N-m).
- M10 screws (guide rod bolts): 32 ft-lb (43 N-m).
- Cable locking bolt against select stem: 50 ft-lb (81 N-m).
- Shroud crown bolts: 25 ft-lb (34 N-m).
The cable system requires careful routing and tensioning. The distance from the underside of the jam nut to the top of the washer on the cable bolt should be no more than 1.61 inches (41mm) to ensure proper operation and engagement of the add-on weight.
Usage Features:
- Selectorized Weight Stack: Allows for quick and easy adjustment of resistance levels using a pin, accommodating users of different strength capabilities. The weight stack includes 23 ten-pound plates and an additional 5-pound weight, offering fine-tuned resistance.
- Add-on Weight Handle: Facilitates incremental resistance adjustments, which is crucial for progressive training.
- Adjustable Seat and Arm Assembly: The back frame connects to the seat frame, and handlebars connect to the underside of the seat frame, allowing users to find a comfortable and biomechanically correct position for the exercise. The seat pad is attached with its narrow edge towards the back pad, indicating a specific orientation for optimal support.
- Roller Pad: The roller pad slides onto a shaft and is secured with a retaining ring and roller cap, providing a comfortable point of contact for the shins during the exercise.
- Cable System: The cable is routed around multiple pulleys and connected to the weight stack, ensuring smooth and consistent resistance throughout the range of motion. Proper cable routing and tension are critical for the machine's functionality.
- Stability: The equipment is designed to be assembled on a solid, flat surface and must be bolted to the floor at all anchoring points for maximum stability and safety during use. Round feet on the frame can be adjusted to level the equipment.
Maintenance Features:
- Lubrication: Guide rods and chrome pad adjustment tubes should be lubricated with a Teflon-based lubricant (e.g., Tri-Flow Superior Lubricant). Excess lubricant should be removed with a clean cloth or tissue. This ensures smooth movement of the weight stack and adjustable components, preventing wear and tear.
- Fastener Checks: All fasteners and the cable retention nut must be checked for tightness and torqued to the specified values. This prevents components from loosening over time, which could compromise safety and performance.
- Cable Inspection: Cables should be regularly inspected to ensure they sit fully in cams and pulleys and move without rubbing. Any issues with cable routing or movement should be addressed immediately to prevent damage and ensure smooth operation.
- Adjustment Pin Verification: For all movable arm and pad frames, the adjustment pin should fully engage and insert freely into each position. This ensures that the machine can be safely adjusted and locked into place for different users.
- Selector Pin Verification: The selector pin must be verified to insert into each weight plate easily and to be placed into the holder on the top plate assembly when not in use. This ensures proper weight selection and prevents the pin from being lost.
- Weight Stack Operation: Users should perform the exercise slowly to verify that the cable moves freely without any binding and that the selector pin engages correctly. The top weight should separate from the second weight, and the add-on weight should engage when the latch is in the down position.
- Label Adhesion: Weight labels should be properly aligned and firmly pressed onto the weights to adhere. This ensures clear visibility of weight values for users.
- Regular Cleaning: While not explicitly detailed in the provided text, general fitness equipment maintenance typically includes regular cleaning to maintain hygiene and appearance.
- Professional Consultation: Precor emphasizes consulting a licensed contractor for proper bolting techniques and appropriate fastener types, as floor materials and industry standards can vary. This highlights the importance of professional installation and adherence to local safety regulations.
- Maintenance Guide: Users are directed to refer to the separate Maintenance Guide for more detailed information on maintaining the equipment, indicating that comprehensive care instructions are available.