EasyManua.ls Logo

Prevue Hendryx Charming Aviary F035 User Manual

Prevue Hendryx Charming Aviary F035
9 pages
To Next Page IconTo Next Page
Page #1 background imageLoading...
Page #1 background image
FRIEND ME!
5...
6...
7...
8...
9...
10...
F035+F036— 12/18USL.1 Made in China for Prevue Pet Products, Inc., 224 N Maplewood Ave, Chicago IL 60612 USA • www.prevuepet.com • 1 [312 ] 243-3624 • customerservice @ prevuepet.com
For assembly of your Charming Aviary MODEL #F035 (Large) / #F036 (Extra-Large)
Follow this flight path
INCLUDED
READ THESE INSTRUCTIONS!
Assembly for the #F035 or #F036 Aviary cages are the same. The only
difference is the size and dimension of parts.
These assembly steps have been compiled to lead you to a successful
assembly. If you still have questions, please call our Prevue Customer
Service line at 1 (312) 243-3624.
HELPFUL TOOLS
An allen wrench is included with the hardware.
You will need a small adjustable wrench for the roof assembly.
FINDAFRIEND (or GOIT ALONE—both are OK)
If you follow these steps, cage assembly will be easy for one person. But you
may find a second person’s assistance useful in some steps. Look for this
symbol:
REVIEW ALL PARTS & HARDWARE
After unpacking all components, review all parts and count the contents of
the screw packets and compare the quantities against the Hardware List on
the Parts List page.
Please contact Prevue if any problems or issues arise.
READ!
READ!
READ!
1
2
3
4
EASY AS 1-2-3 !
NEEDED
Question and Answer IconNeed help?

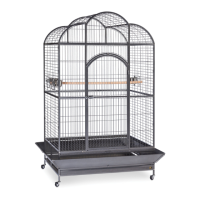
Do you have a question about the Prevue Hendryx Charming Aviary F035 and is the answer not in the manual?

Prevue Hendryx Charming Aviary F035 Specifications

General IconGeneral
BrandPrevue Hendryx
ModelCharming Aviary F035
CategoryPet Care Product
LanguageEnglish

Summary

Read These Instructions!

Review All Parts & Hardware

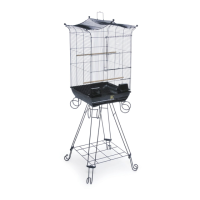
Check all components against the parts list and hardware list; contact support for issues.

Assemble the CAGE FRAME

Attach Frame Rails

Connect front/back panels with LS1/RS1 rails using long screws.

Assemble the cage SIDES

Install Left Side Panels

Guide LS2, LS3, LS4 panels and LS5 rail, securing with screws.

Install Right Side Panels

Follow the same method for RS2, RS3, RS4, RS5 panels and frame rails.

Assemble the ROOF

Position Assembled Roof

Tip roof into position, catching R3 brace under front panel rail.

Final Roof Placement

Ensure the back vertical panel slips into place on the interior side of the frame.
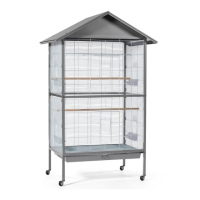
Related product manuals