EasyManua.ls Logo

Prevue Hendryx Hamster Haven User Manual

Prevue Hendryx Hamster Haven
2 pages
To Next Page IconTo Next Page
Page #1 background imageLoading...
Page #1 background image
C
USTOMER SUPPORT
For assistance or replacement parts,
please contact Prevue Pet Products:
PHONE
1 (312) 243-3624
ONLINE
www.prevuepet.com
EMAIL
customerservice @ prevuepet.com
2003+98005 03 /20 A4 Made in China for Prevue Pet Products, Inc., 224 N Maplewood Ave, Chicago IL 60612 USA • 1 [312] 243-3624 • www.prevuepet.com • customerservice @ prevuepet.com
98005
Instructions online at www.prevuepet.com
MODEL #
Hamster Haven/small
ASSEMBLY
1
PIECES
2
PIECES
Starting from the bottom, pull the extended hooked
wires of the side panel onto the back panel. The
middle wire hooks under the corresponding horizontal
wire on the back panel.
Link one complete seam together, then finish with the
remaining seam.
Set the assembled mesh into the base and
attach with the clips. Hook the base clips
onto the horizontal wire and clip it onto the
base by pushing down until it “clicks”.
2003
MODEL #
DETAIL OF INSIDE BACK, LEFT CORNER
Question and Answer IconNeed help?

Do you have a question about the Prevue Hendryx Hamster Haven and is the answer not in the manual?

Prevue Hendryx Hamster Haven Specifications

General IconGeneral
Product TypeHamster Cage
Suitable forHamsters, Gerbils, Mice
Assembly RequiredYes
MaterialPlastic, Wire
Included AccessoriesExercise Wheel, Food Dish, Water Bottle

Summary

Assembly Step 1: Connecting Panels

Connecting Side and Back Panels

Connect side panel hooks to back panel wires, ensuring middle wire hooks under horizontal wire.

Assembly Step 2: Attaching Mesh to Base

Attaching Mesh to Base

Set assembled mesh into base and attach with clips, ensuring clips click onto horizontal wire.

Assembly Step 3: Installing Wheel and Platforms

Wheel Installation

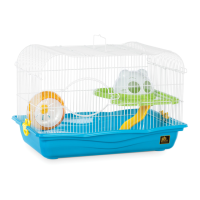
Position wheel, insert handle through wires, and rotate 90° to secure.

Platform Installation

Install lower platform with slide, then upper platform with dome and slide.

Assembly Step 4: Attaching Rooftop

Attaching Rooftop

Catch rooftop center tabs at front/back, then secure roof ends to side panel tabs.

Cleaning and Maintenance

Care Instructions

Use soft cloth/pad with mild, pet-safe soap and warm water. Rinse and dry thoroughly.
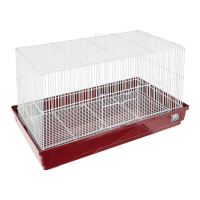
Related product manuals