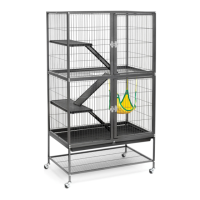
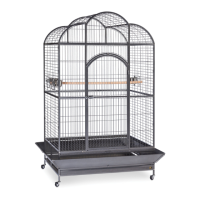
The Feisty Ferret Home, Model #485(B), is a multi-level enclosure designed to provide a spacious and engaging environment for ferrets and other small animals. This comprehensive guide outlines the assembly process, key features, and maintenance aspects of the cage, ensuring a comfortable and secure habitat for your pet.
Function Description:
The primary function of the Feisty Ferret Home is to offer a secure, multi-tiered living space that encourages activity and exploration for ferrets. Its design incorporates multiple levels, ramps, and platforms, mimicking a naturalistic environment where ferrets can climb, play, and rest. The cage is equipped with various access points for easy interaction with pets and for routine cleaning. The inclusion of a deep tray and a wire bottom grille facilitates waste management, contributing to a hygienic living space. The overall structure is robust, designed to withstand the energetic nature of ferrets, while also providing adequate ventilation and visibility.
Usage Features:
The Feisty Ferret Home is designed with several features to enhance usability for pet owners and comfort for ferrets:
- Multi-Level Design: The cage features three distinct levels: a ground floor, a mid-level floor, and a roof level. These levels are connected by ramps, allowing ferrets to move freely between floors, promoting exercise and preventing boredom. The mid-level floor (CM) includes a removable divider door, offering flexibility in configuring the internal space or for separating animals if needed.
- Spacious Interior: With its generous dimensions, the cage provides ample room for ferrets to roam, play, and house accessories such as food bowls, water bottles, and toys. The open wire design ensures good air circulation, which is crucial for the health of small animals.
- Easy Access Points: The cage incorporates multiple doors for convenient access. The roof panel (CR) features an attached wire access door, allowing for top-down interaction or placement of larger items. The front and back panels also include doors (F2, B2, F3, B3) at different levels, making it easy to reach pets, clean specific areas, or add/remove accessories without disturbing the entire cage.
- Integrated Ramps and Platforms: The cage comes with ramps that hook onto the wire loops of the platforms, facilitating movement between levels. The platforms provide resting spots and additional surface area for exploration. The design allows for the replacement of the mid-level divider door with a ramp, offering customization options for the internal layout.
- Hammock Inclusion: A hammock is provided, offering a cozy and elevated resting spot for ferrets, which they typically enjoy.
- Removable Tray and Grille: A deep, pull-out tray (CT) is located at the bottom of the cage, designed to collect waste and bedding. Above the tray, a wire floor grille (CG) prevents pets from coming into direct contact with their waste, promoting cleanliness and hygiene. The tray slides out easily for quick cleaning.
- Casters for Mobility: The cage is equipped with four casters, allowing for effortless movement and repositioning. This feature is particularly useful for cleaning around and under the cage, or for relocating it within a room.
- Secure Locking Mechanisms: The cage features secure locking mechanisms on its doors and a windbell lock to keep the tray in place, ensuring that pets remain safely inside the enclosure.
- Durable Construction: Made from sturdy wire and metal components, the Feisty Ferret Home is built to last. The materials are chosen for their durability and ease of cleaning, ensuring a long-lasting habitat for your pet.
Maintenance Features:
Maintaining a clean and hygienic environment is crucial for the health of ferrets, and the Feisty Ferret Home is designed with several features to simplify this process:
- Pull-Out Tray (CT): The deep, removable tray at the bottom of the cage is a key maintenance feature. It slides out effortlessly, allowing for quick disposal of waste and soiled bedding without needing to dismantle any part of the cage or disturb the pets. The smooth surface of the tray makes it easy to wipe clean.
- Wire Floor Grille (CG): The wire grille above the tray keeps pets elevated from their waste, preventing direct contact and maintaining a cleaner living surface. This grille can also be removed for thorough cleaning if necessary.
- Multiple Access Doors: The various doors on the front, back, and top of the cage provide easy access to all levels and corners, facilitating spot cleaning and full cage wipe-downs. This multi-point access means less effort is required to reach every part of the interior.
- Smooth Surfaces: The metal and wire construction of the cage features smooth surfaces that are easy to wipe down with pet-safe cleaners. This prevents the accumulation of dirt and bacteria in crevices.
- Casters for Mobility: The casters not only aid in repositioning the cage but also make it easier to move the entire unit for cleaning the area around and underneath it. This ensures a comprehensive cleaning routine for the pet's living space.
- Removable Platforms and Ramps: The platforms and ramps can be unhooked and removed, allowing for individual cleaning and ensuring that no part of the cage harbors dirt or debris.
- Durable Materials: The robust construction materials are resistant to rust and corrosion, ensuring that the cage remains hygienic and structurally sound over time, even with regular cleaning and exposure to pet waste.
- Ventilation: The open wire design ensures excellent ventilation, which helps to reduce odors and maintain a fresh environment within the cage. Good airflow also aids in drying after cleaning, preventing mold and mildew growth.
In summary, the Feisty Ferret Home is a well-designed, functional, and easy-to-maintain habitat that provides a stimulating and secure environment for ferrets, making it a practical choice for pet owners.