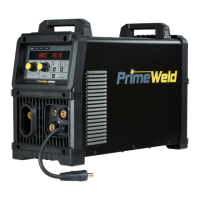
Press and release the button to change the selected operating mode of the trigger. The
selected mode can be either “2T” (unlatched) or “4T” (latched) operation. The red indicator
next to the button will illuminate to identify which mode is selected (2T or 4T). In the 4T
mode once the weld has been started you can release the trigger and continue welding until
the trigger is activated again or the welding arc is broken to stop the welding arc.
2T/4T Selector
Press and release this button to change the selected weld process mode from MIG to LIFT
TIG to STICK. The weld process will change to the next process in the sequence each time the
button is pressed and released. The red indicators next to the button will illuminate to
identify MIG or LIFT TIG or STICK process mode.
MIG/LIFT TIG /STICK Selector
Long press the Advanced Features button for 3 seconds to enter or exit from the advanced
programming mode. To exit, simply long press the button for 3 seconds again. Any changes
made are saved. The advanced programming menu items are described in detail for each
welding mode in Advanced Features Details.
Advanced Features Selector
This digital meter is used to display the Welding Output Terminal Voltage in STICK / LIFT TIG
modes during non-welding or welding. This value can not be adjusted by varying the Right
Knob.
STICK and LIFT TIG Modes
This digital meter is used to display the pre-set (preview) Voltage in MIG mode and actual
welding voltage of the power source when welding. At times of non-welding, the digital
meter will display a pre-set (preview) value of Voltage. This value can be adjusted by varying
the Right Knob.
When welding, this digital meter will display actual welding voltage in all modes. At the
completion of welding, the digital meter will hold the last recorded voltage value for a period
of approximately 7 seconds in all modes. The voltage meter will hold the value until; (1) any
of the front panel controls are adjusted in which case the unit will revert to preview mode, (2)
welding is recommenced, in which case actual welding amperage will be displayed, or (3) a
period of 7 seconds elapses following the completion of welding in which case the unit will
return to preview mode.
MIG Mode
Right Multifunctional Data Display