20
5
Thank you for selecting the revolutionary PROFORM
¨
600 treadmill. The treadmill combines advanced tech-
nology with innovative design to help you get the most
from your exercise program in the convenience and pri-
vacy of your home. And when youÕre not exercising, the
unique PROFORM
¨
600 can be folded up, requiring
less than half the floor space of other treadmills.
For your benefit, read this manual carefully before
using the treadmill. If you have additional questions,
please call our our Customer Service Department at
0345-089009. To help us assist you, please note the
product model number and serial number before call-
ing. The model number of the treadmill is PETL60000.
The serial number can be found on a decal attached to
the treadmill (see the front cover of this manual for the
location).
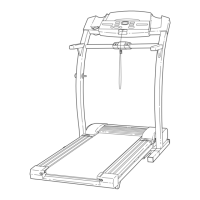
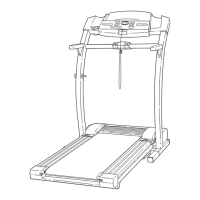
Before reading further, please review the drawing
below and familiarise yourself with the parts that are
labelled.
BEFORE YOU BEGIN
Handrail
Console
Lock Knob
Pulse Sensor
Book Holder
Key/Clip
Circuit
Breaker
On/Off Switch
Walking Belt
Cushioned Walking Platform
Front
Wheel
Foot Rail
Power Cord
Rear Roller
Adjustment Bolts
Water Bottle
Holder (bottle
not included)
RIGHT SIDE
LEFT SIDE
PROBLEM: The walking belt slows when walked on
SOLUTION: a. If an extension cord is needed, use only a 3-conductor, 14-gauge (1mm
2
) cord that is no longer
than 5 feet (1.5 meters).
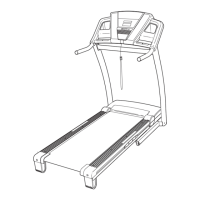
b. If the walking belt is overtightened, treadmill perfor-
mance may decrease and the walking belt may be-
come damaged. Remove the key and UNPLUG THE
POWER CORD. Using the allen wrench, turn both
rear roller adjustment bolts counterclockwise, 1/4 of a
turn. When the walking belt is properly tightened, you
should be able to lift each side of the walking belt 7 to
10 cm off the walking platform. Be careful to keep the
walking belt centred. Plug in the power cord, insert
the key and run the treadmill for a few minutes.
Repeat until the walking belt is properly tightened.
c. If the walking belt still slows when walked on, please call our Customer Service Department.
PROBLEM: The walking belt is off-centre
SOLUTION: a. If the walking belt has shifted to the left, first remove
the key and UNPLUG THE POWER CORD. Using the
allen wrench, turn the left rear roller adjustment bolt
clockwise, and the right bolt counterclockwise, 1/4 of a
turn each. Be careful not to overtighten the walking belt.
Plug in the power cord, insert the key and run the tread-
mill for a few minutes. Repeat until the walking belt is
centred.
b. If the walking belt has shifted to the right, first re-
move the key and UNPLUG THE POWER CORD.
Using the allen wrench, turn the left rear roller adjust-
ment bolt counterclockwise, and the right bolt clockwise,
1/4 of a turn each. Be careful not to overtighten the
walking belt. Plug in the power cord, insert the key and
run the treadmill for a few minutes. Repeat until the
walking belt is centred.
PROBLEM: The walking belt slips when walked on
SOLUTION: a. If the walking belt slips when walked on, first remove
the key and UNPLUG THE POWER CORD. Using the
allen wrench, turn both rear roller adjustment bolts
clockwise, 1/4 of a turn. When the walking belt is cor-
rectly tightened, you should be able to lift each side of
the walking belt 7 to 10 cm off the walking platform. Be
careful to keep the walking belt centred. Plug in the
power cord, insert the key and carefully walk on the
treadmill for a few minutes. Repeat until the walking belt
is properly tightened.
PROBLEM: The incline of the treadmill does not change correctly or does not change when i-Fit.com
CDÕs and videos are played
SOLUTION: a. With the key inserted in the console, press one of the incline buttons. While the incline is
changing, remove the key. After a few seconds, re-insert the key. The treadmill will automati-
cally rise to the maximum incline level and then return to the minimum level. This will recalibrate
the incline.
Rear Roller Adjustment Bolts
7Ð10 cm
b
b
a
a