EasyManua.ls Logo

Propel RC SNAP 2.0 - User Manual

Propel RC SNAP 2.0
13 pages
Print Icon
To Next Page IconTo Next Page
Loading...
Made in China
V1.0
15
INSTRUCTION BOOKLET
WARNING: Never leave product charging unattended for extended periods of
time. Always disconnect the battery from charger immediately after the battery
is fully charged. Please refer to enclosed safety instructions.
PACKAGE CONTAINS:
Colors and styles may vary slightly .
Instruction
Manual
Spare Parts BatteryFoot Pad
SNAP 2.0™
PROPEL
USB Charger 2.4G Wireless
Controller
ON BOARD
HD VIDEO
ON BOARD
HD CAMERA
1280 x 720 pixel
30 frames per second
Phone Holder
CHOKING HAZARD
-
Small parts.
Not suitable for children under 3 years.
WARNING!
FCC Part 15 C Notice
CAUTION: Changes or modifications not expressly approved by the party responsible for compliance could
void the user’s authority to operate the equipment.
NOTE: This equipment has been tested and found to comply with the limits for a Class B digital device,
pursuant to Part 15 of the FCC Rules. These limits are designed to provide reasonable protection against
harmful interference in a residential installation. This equipment generates, uses and can radiate radio
frequency energy and, if not installed and used in accordance with the instructions, may cause harmful
interference to radio communications. However, there is no guarantee that interference will not occur in a
particular installation. If this equipment does cause harmful interference to radio or television reception,
which can be determined by turning the equipment off and on, the user is encouraged to try to correct the
interference by one or more of the following measures:
s2EORIENTORRELOCATETHERECEIVINGANTENNA
s)NCREASETHESEPARATIONBETWEENTHEEQUIPMENTANDRECEIVER
s#ONNECTTHEEQUIPMENTINTOANOUTLETONACIRCUITDIFFERENTFROMTHATTOWHICHTHERECEIVERISCONNECTED
s#ONSULTTHEDEALEROREXPERIENCEDRADIO46TECHNICIANFORHELP
This device complies with Part 15 of the FCC Rules. Operation is subject to the following two conditions :
(1) This device may not cause harmful interference, and
(2) this device must accept any interference received, including interference that may cause undesired
operation.
4HISEQUIPMENTCOMPLIESWITH&##)#RADIATIONEXPOSURELIMITSSETFORTHFORANUNCONTROLLEDENVIRONMENT
This equipment should be installed and operated with minimum distance 20cm between the radiator and
your body.
#ETÏQUIPEMENTESTCONFORMEAUXLIMITESDgEXPOSITIONAUXRADIATIONS&##)#ÏTABLIESPOURUN
environnement non contrôlé. Cet équipement doit être installé et utilisé avec une distance minimale de 20
cm entre le radiateur et votre corps.
CAN ICES-3(B)/NMB-3(B)
This product meets the applicable Innovation, Science and Economic Development Canada
technical specifications.
Compact Folding Drone with HD Camera
This product is manufactured by Amax Group
12645 Memorial Drive Suite F1 #388 Houston, TX 77024
Propel™ and Propel RC™ are the licensed trademarks of Rooftop Group LTD Singapore.
2008 All rights reserved. Visit us at www.propelrc.com
SNAP 2.0
TM
INDUSTRY CANADA NOTICE: CANADA ONLY.
4HISDEVICECONTAINSLICENCEEXEMPTTRANSMITTERSRECEIVERSTHATCOMPLYWITH)NNOVATION3CIENCEAND%CONOMIC$EVELOPMENT
Canada’s licence-exempt RSS(s). Operation is subject to the following two conditions:
1. This device may not cause interference.
2. This device must accept any interference, including interference that may cause undesired operation of the device.
,ÏMETTEURRÏCEPTEUREXEMPTDELICENCECONTENUDANSLEPRÏSENTAPPAREILESTCONFORMEAUX#.2D)NNOVATION3CIENCESET
Développement économique Canada applicables aux appareils radio exempts de licence. L’exploitation est autorisée aux deux conditions
suivantes :
1. L’appareil ne doit pas produire de brouillage;
2. L’appareil doit accepter tout brouillage radioélectrique subi, même si le brouillage est susceptible d’en compromettre le
fonctionnement.
Conforms to safety requirements of FCC, RSS247, RSS210.
Question and Answer IconNeed help?

Do you have a question about the Propel RC SNAP 2.0 and is the answer not in the manual?

Summary

Instruction Booklet Overview

Package Contents

Lists all items included in the SNAP 2.0™ drone package.

Drone Setup and Preparation

Battery Installation and Charging

Instructions for installing batteries in the controller and drone, and charging the drone battery.

Expanding and Folding the Drone

Guidance on how to safely expand and fold the drone's arms before and after flight.

Flight Preparation and Syncing

Flight Preparation Checklist

Essential checks and conditions required before attempting to fly the drone.

Syncing the Drone and Controller

Step-by-step guide to wirelessly pair the drone with its remote controller.

Drone Operation Basics

Drone Orientation and Rotor Control

Identifying the drone's front/rear and manual/automatic methods for starting/stopping rotors.

Flight Modes and Controls

Explanation of speed settings and an introduction to basic flight control.

Flight Maneuvers and Practice

Basic Flight Control Operations

Details on using control sticks for ascending, descending, rotating, and moving the drone.

Flight Practice Exercises

Recommended exercises for mastering drone flight, from basic takeoffs to complex patterns.

Drone Trim and Emergency Procedures

Adjusting Flight Trim

How to correct drifting or spinning by adjusting trim settings for stable flight.

Emergency Stop Function

Procedure to immediately stop drone rotors in case of loss of control.

Calibration and Stunts

Calibrating the Drones Gyro Sensors

Instructions to recalibrate the drone after crashes for improved stability.

Performing 360° Stunt Rolls

Steps to execute aerial flips and rolls using the stunt button and control stick.

App and Connectivity

Live Video Streaming Setup

How to set up the mobile app for live video feed and photo capture from the drone's camera.

App Installation and Pairing

Guide to installing the Propel 1890 app and connecting your mobile device to the drone via Wi-Fi.

App Usage and Troubleshooting

Quick Start with the Mobile App

Initial steps to launch the app, start motors, and control the drone using a mobile device.

Detailed App Overview

Explanation of the app's interface, including home page, control sticks, and help sections.

Troubleshooting and Maintenance

Common Drone Problems and Solutions

A guide to diagnosing and resolving issues like no power, unresponsiveness, or flight instability.

Propeller Blade Replacement

Instructions on how to safely remove and replace damaged propeller blades.

Safety and Battery Information

General Drone Safety Warnings

Important safety precautions for operating the SNAP 2.0™ drone, including hazards and supervision.

Battery Handling and Care

Guidelines for using, charging, and maintaining the drone's rechargeable battery and controller batteries.

Overview

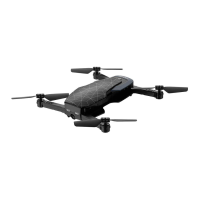
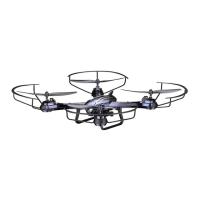
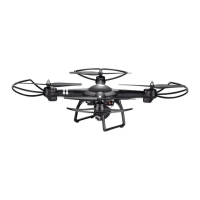
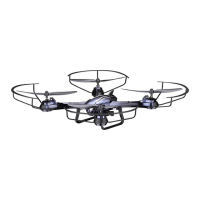
The SNAP 2.0™ is a compact, foldable drone equipped with an HD camera, designed for both beginner and advanced pilots. Its primary function is to provide stable flight for capturing video and still pictures, offering a blend of portability and performance.

Function Description

The core function of the SNAP 2.0™ is aerial photography and videography. It features an onboard HD camera capable of recording video at 1280 x 720 pixels at 30 frames per second. The drone's compact fold-in design enhances portability, making it easy to transport. An air pressure sensor is integrated to lock flight altitude, ensuring stable video footage. For maneuverability and stability, the drone utilizes a 6-axis gyro system. It offers three speed settings, catering to different skill levels, from beginners to more experienced pilots. The wide-range digital radio allows for a flight range of up to 300 feet.

The drone can be controlled using a dedicated 2.4G wireless controller or a compatible mobile device (Apple® iOS or Android™). The mobile app, "Propel 1890," enables real-time video streaming from the drone's camera to the mobile device. Through the app, users can also control the drone's flight, take still pictures, and record videos, which are then stored directly on the mobile device.

Usage Features

Remote Control Battery Installation: The wireless controller requires four "AAA" alkaline batteries. To install, unscrew the battery cover, insert the batteries as shown in the diagram, replace the cover, and push the power button up. A lit power indicator confirms correct installation.

Drone Battery Charging: The SNAP 2.0™ uses a Li-Poly battery. To charge, insert the battery into the charger and connect the USB end of the cable to a computer's USB port or a USB wall charger. The red LED indicator will turn off during charging and light up again when charging is complete. Average charging time is approximately 110-120 minutes via a 5.0V=2A USB wall charger. A fully charged battery provides 5-7 minutes of flight time, depending on environmental conditions and user input. It is crucial to unplug the charging cord when not in use.

Aircraft Battery Installation: Once charged, the battery is inserted into the drone's battery compartment and secured by locking the two ends with the battery locks.

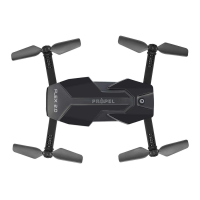
Expanding and Folding the Drone: Before flight, the foldable arms of the SNAP 2.0™ must be expanded. Turn the drone over, bottom side facing up, and carefully pull and expand the four arms until they are fully extended. After flying, the arms can be gently folded back in for storage.

Syncing the Drone with the Controller:

  1. Ensure the drone's power is off, the battery is removed, and there are no other 2.4G devices nearby.
  2. Insert the battery into the drone, place it on a flat, level surface, and press and hold the power button for a few seconds. The red and white LED lights on the drone will flash rapidly.
  3. Quickly turn on the remote control; its top red LED light will also flash, but slower than the drone's lights.
  4. Push the throttle stick all the way up until it stops, then pull it all the way down. You will hear a high-pitched beep both ways. The drone and controller lights will stop flashing and become solid, indicating successful syncing. If syncing fails, repeat the steps. It's recommended to sync indoors or in the shade to better see the LED indicators.

Starting/Stopping Rotors:

  • Manual: To start, move both control sticks down and out simultaneously until the rotors begin spinning. Release the sticks to the neutral position and push the throttle up to take off. To stop, either wait about 10 seconds for automatic shutdown or move both sticks down and out again immediately. After takeoff, pulling the throttle all the way down will land the drone.
  • Auto Start/Land: Press the AUTO START/LAND button on the controller to automatically take off or land. Directional control is still possible during auto start/land to avoid obstacles.

Speed Settings: The SNAP 2.0™ has three speed settings: 1 (SLOW), 2 (MEDIUM), and 3 (HIGH). The default is SLOW. Press the speed setting button to cycle through speeds; beeping sounds will indicate the current setting. Speed can be adjusted before or during flight.

Flight Control:

  • Ascend/Descend: Move the left throttle stick up to increase propeller speed and ascend; move it down to decrease speed and descend.
  • Rotate Left/Right: Move the left throttle stick left to rotate the drone left; move it right to rotate right.
  • Move Forward/Backward: Move the right direction stick up to move forward; move it down to move backward.
  • Bank Left/Right: Move the right direction stick left to bank left; move it right to bank right.

Adjusting Trim: The drone is pre-trimmed and calibrated. However, after crashes or for personalized flight style, trim adjustments may be needed.

  • Forward/Backward Trim: If the drone drifts forward, push the FORWARD/BACKWARD TRIM button down repeatedly until stable. If it drifts backward, push the button up.
  • Bank Right/Left Trim: If the drone banks left, push the BANKS TRIM button right repeatedly. If it banks right, push the button left.
  • Spin Left/Right Trim: If the drone spins left, push the LEFT/RIGHT TURN TRIM button right repeatedly. If it spins right, push the button left.
  • Throttle Trim: If the drone ascends or descends constantly while hovering, adjust the Throttle TRIM button down or up repeatedly until stable flight is maintained.
  • Emergency Stop: Simultaneously press the "speed setting button" and "stunt button" to stop the drone blades.

Calibrating the Drone: If the drone drifts or cannot hold its center position after crashes, recalibration is needed. Place the drone on a flat, level surface, ensure it's on and synced with the controller (but blades not spinning). Move both throttle and control sticks down and to the right corner, holding for 5 seconds. The drone's lights will rapidly flash and then stop, indicating successful calibration.

360° Stunt Rolls:

  1. Hover the drone at least 5 feet above and below, and set the speed to mode 2 or 3.
  2. Press the 360 stunt button; rapid beeping indicates stunt roll mode.
  3. Quickly push the right control stick in the desired flip direction (right or left side roll). To exit stunt roll mode without flipping, press the button again.

Live Video Streaming Setup:

  1. Phone Holder Installation: Insert the phone holder hook into the slots on top of the controller.
  2. App Installation: Download the "Propel 1890" app from the App Store (iOS 7.0 or higher) or Google Play Store (Android OS 4.2.2 or higher).
  3. Pairing with Device: After charging the drone battery, install it. In your device's Wi-Fi settings, turn on Wi-Fi and select "Propel 1890" from the list. Once connected, return to the main menu.
  4. Quick Start (App): Open the "Propel 1890" app and tap "START." You should see real-time video. To activate control sticks in the app, tap the "ON" button. Tap the "LAUNCH/LAND" button to start motors or auto-launch/land. Tap the camera icon to take pictures or the video icon to record. Pictures and videos are stored on your mobile device.

Maintenance Features

Replacing Propeller Blades: The SNAP 2.0™ has four sets of blades, marked "B" and "A" on the front and "A" and "B" on the rear. If a blade is damaged, unscrew and remove it, then replace it with a new blade, ensuring the markings match. After replacing the blade, click the blade guard into place and secure it with a screw.

General Care and Maintenance:

  • Always remove batteries from the wireless remote control when not in use for extended periods.
  • Clean the remote control and drone gently with a clean, damp cloth.
  • Keep the toy away from direct heat or sunlight.
  • Do not submerge the toy in water, as this can damage the unit.
  • Parental guidance is recommended when installing or replacing batteries.

Battery Warnings:

  • The drone uses a Li-Poly rechargeable battery. Dispose of it properly according to local requirements if it no longer holds a charge.
  • The controller requires four "AAA" batteries. Do not mix alkaline, standard, or rechargeable batteries. Do not mix old and new batteries.
  • Non-rechargeable batteries should not be recharged.
  • Rechargeable batteries must be removed from the item before charging and charged under adult supervision.
  • Exhausted batteries should be removed immediately and recycled or disposed of properly.
  • Supply terminals should not be short-circuited.
  • Only use batteries of the recommended type.
  • Insert batteries with the correct polarity.
  • Do not dispose of batteries in a fire, as they may leak or explode.

Safety Warnings:

  • The SNAP 2.0™ is designed for outdoor use.
  • Keep hands, hair, and loose clothing away from propellers when the drone is on.
  • Turn off the transmitter and drone when not in use.
  • The included charger is specifically for the SNAP 2.0™ Li-Poly battery; do not use it for other batteries.
  • New alkaline batteries are recommended for maximum performance in the controller.
  • Parental supervision is recommended when flying.
  • Do not fly in foul weather or strong wind, especially when learning.
  • Always start the drone on a clean, flat, level surface.
  • Avoid flying too high until experienced.

Propel RC SNAP 2.0 Specifications

General IconGeneral
LED LightsYes
Skill LevelBeginner
Camera Resolution720p
Gyro6-axis
FeaturesHeadless Mode
Battery3.7V 500mAh LiPo
Battery Life7-8 minutes
Charging Time60 minutes

Related product manuals