Camera LED Light
Microphone
microSDHC card facing down
microSDHC card
goes in back slot
Diagram U4Diagram U3Diagram U2Diagram U1
11 12
IMPORTANT NOTICE : You can not take photos and videos at the same time. When you are in video mode
your camera/ photo button is disabled. If you want to take photos you must first turn off video mode.
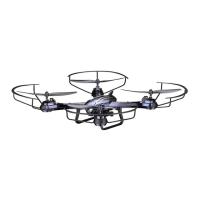
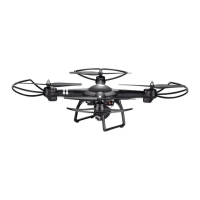
USING YOUR ON-BOARD CAMERA AND VIDEO RECORDER
Your TILT ™ comes equipped with an onboard digital camera(1280x720 pixel, 30 frames per second) that takes
both video and still photographs. Now you can have hours of fun creating aerial photography and videos for family
and friends.
WHAT YOU WILL NEED TO GET STARTED USING YOUR CAMERA
1. One microSDHC card (included)
2. One microSDHC card reader (included)
3. A Computer with a USB port and Windows Media Player or other Media player that can play AVI files(not included).
FORMATTING YOUR MICROSDHC CARD
Before you can begin to take videos or digital photographs you must first format your microSDHC card. To
format your microSDHC card simply place the microSDHC card into the included USB SD card reader and
plug it into your computers USB port (See diagram U1 and U2 below). After a few moments an icon will
appear on your Desktop. Right click on the Icon and follow instructions to format your microSDHC card.
INSTALLING THE MICROSDHC CARD IN YOUR TILT™
•
Place the formatted
microSDHC
card into the back of the
Tilt™
digital camera port (see diagram U3
below).
Push gently until you hear and feel the microSDHC card “click” into the digital camera slot.
• Turn theTILT ™ on and make sure that it is both fully charged and properly synced to the
Controller (see HOW TO SYNC YOUR QUADROCOPTER on page 4 ).
• When you have successfully installed your microSDHC card and your TILT ™’s battery, you will see
a solid red LED light on the camera unit underside (see camera indicator light diagram U4 below).
NOTE: If you see a red LED light flashing this indicates you have not installed your Micro SD card correctly
or there is a problem with your SD card. If this happens please reformat and try again. If you continue to
encounter problems call our customers service line at (949) 566-9573 Ext 1 for assistance.
TAKING DIGITAL PHOTOS
To take photographs quickly press and release the CAMERA button on the top right side of the controller
(refer to CONTROLLER DIAGRAM on pg. 3), when you push the button you will hear a "beep" and the green
led light on the camera will flash 3 times indicating that a picture has been taken.
RECORDING VIDEOS
To begin recording a video depress and hold down CAMERA button for 2 seconds. You will hear two "beeps"
and the green LED light on the camera start flashing to indicate that you are in video mode and the camera
is recording. To stop the video recording, press and hold the CAMERA button a second time, you will hear
two “beeps” to indicating that the video recording has stopped and the Camera is in ready mode again.
TESTING /TROUBLE SHOOTING THE CAMERA BEFORE FLIGHT
It's a good idea to test that your camera is working before beginning flight.
Start by making sure that you TILT ™ is properly synced to the controller (see How to Sync pg 4). Note: there
is no need to start the rotors as the camera function is a separate system. You only need to be synced.
1. Turn the drone upside down (it is recommended to just hold in your hand) and insert a microSDHC card.
The micro SDHC card can only fit in one way so do not force it. When the micro SDHC card is installed all the
way you will hear a “Click” sound and a flashing Red LED light should stay solid on the belly of the camera
(see Camera Diagram W4). The solid red light indicates that you have properly installed the microSDHC card
and are ready for taking pictures and videos. If you don’t see the solid red LED indicator light then start
again. Remember to make sure that the drone and controller are properly synced and that the microSDHC
card is inserted until you hear a “click”
2. Testing the Still Photo Feature: Keeping the drone upside down, quickly depress and release the
CAMERA button on the top right hand side of the controller. A green LED should appear and flash 3x.
Congratulations you just took a picture and tested your camera. If you did not see 3 green lights flash then
you must start again from the beginning.
3. Testing the Video Recording Feature: Keeping the drone upside down, depress and hold down the
CAMERA button for 2 seconds. A green LED light on the camera belly will appear and begin to flash
continuously. This means that you are recording video. To stop recording video simply press and release the
Camera button one more time and the Green LED light should off, indicating that the camera is once again
in ready mode.
REMOVING YOUR MICROSDHC CARD
To remove your microSDHC Card push in gently on the back of the microSDHC card with your thumb or
forefinger until you hear and feel a “clicking sound”. The microSDHC card will “pop-out” slightly and is ready
for removal. Simply grab and pull gently away from the Tilt™’s camera port to remove the card. Always store
your microSDHC card in a clean, safe and cool environment.
DOWNLOADING AND CLEARING SPACE ON YOUR MICROSDHC CARD
Plug your microSDHC card into the microSDHC card reader and connect to your computer. It is best to
always download all your videos and pictures on to your computer and not store this data on your
microSDHC card. After downloading your photos and videos , follow your computers instructions to “delete”
files on your microSDHC card.
IMPORTANT NOTICE: When your microSDHC card is full the indicator light on the bottom of your
helicopter will not flash when you press the photo or video record buttons. This indicates that its time
to put a new microSDHC card in your Tilt™ or download files and clear space for future photos and
videos.
 Loading...