▒
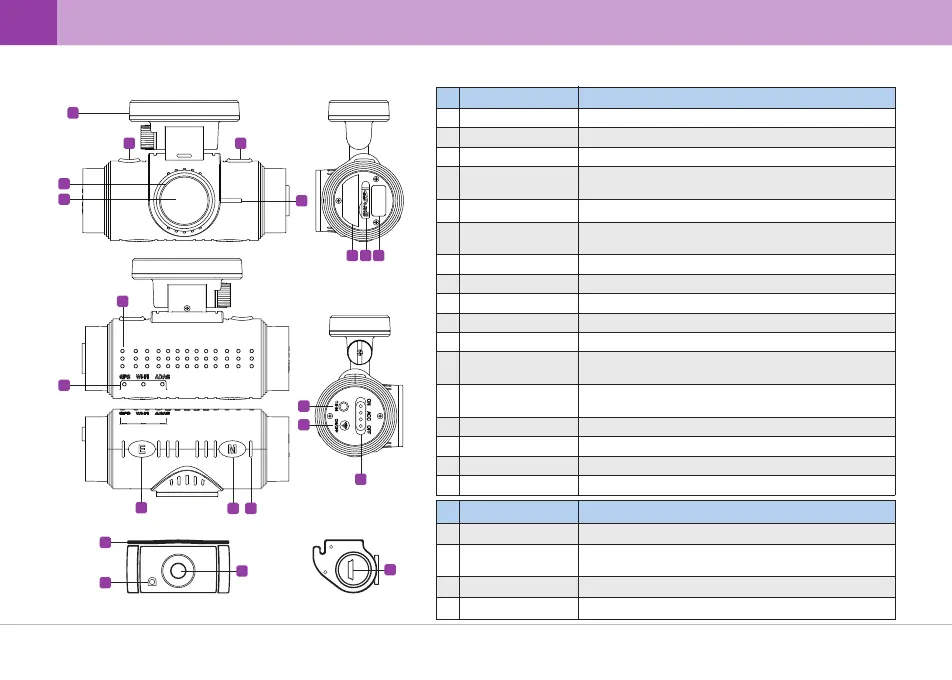
3-2. Names & Functions of Each Part
▒
Name Function
1
Attach this part on the windshield & Receives GPS info
2
3
4
6
8
7
11
12
9
14
15
13
16
17
Stand & GPS(Built-in)
30mm UV Filter
Emergency Recording
(E) Button
S/N Label
Security LED
Used to protect lens through UV protection filter and
lengthen sensor lifespan
5
Camera Lens Video signal input (CMOS Digital Sensor)
Device model name & serial number
Displays device operational status.
Visually indicates that the vehicle is equipped with dash cam.
Name Function
1
Stand
Attach this part on the rear window
2
Security LED
3
Cable Connection Front/Rear connection cable terminal
4
Camera Lens Video signal input
3
1
2
4
MIC
LED
Power Switch
microSD Slot
CAM-IN
Voice signal input
Speaker Audio output
LED lights for GPS, Wi-Fi, ADAS
Device power supply switch (ON/ACC/OFF)
For inserting & removing a microSD card
Wi-Fi Wi-Fi Dongle
Rear camera input connection
10
DC-IN Supplies power to dash cam through power connection.
12 ... QVIA Dash Cam
Emergency Recording upon pressing the button.
(a 30-second video file is created in the microSD card)
TS-IN Connects T/S cable and Vibrator
Wi-Fi Button
Wi-Fi ON/OFF button (Wi-Fi can be connected in Driving Mode)
Audio Recording
(M) Button
- Press longer than 3 sec : Initiate ADAS Calibration
- Press shorter than 2 sec : Voice Recording ON/OFF
Displays device operational status.
Visually indicates that the vehicle is equipped with dash cam
1
2 3
5
4
6
7 8 9
10
11
12
13 14
15
16
17
 Loading...