EasyManua.ls Logo

QualGear QG-KIT-CA-3IN-W - User Manual

QualGear QG-KIT-CA-3IN-W
6 pages
Print Icon
To Next Page IconTo Next Page
Loading...
Slide projector assembly into the
projector plate until you hear a click.
Projector
Tighten the screws using Allen Key (H)
as shown on the right.
Allen Key (H)
Projector Mount
Projector Plate
Click!
11
Hanging the Projector Assembly onto the Projector Plate
7
Version: November 2017
QG-KIT-CA-3IN-W
1 Year Limited Warranty
Scan the QR Code™ below
for more info about this product:
PROJECTOR MOUNTING KIT
CAUTION!
Do not exceed the maximum rated weight
specified. Otherwise, serious injury or
property damage may occur.
(70lbs)
32kg
Rated
(70lbs)
32kg
Rated
gap
Question and Answer IconNeed help?

Do you have a question about the QualGear QG-KIT-CA-3IN-W and is the answer not in the manual?

Summary

Hanging the Projector Assembly

Slide Projector Assembly into Plate

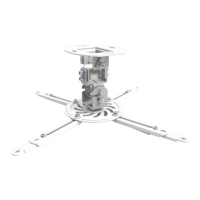
Connect the projector assembly to the projector plate, ensuring it clicks into place for secure mounting.

Tighten Mounting Screws

Secure the projector assembly by tightening screws with the provided Allen Key (H).

Important Safety and Usage Warnings

Installation Requirements

Product requires installation by experienced personnel understanding construction and manual instructions.

Usage Precautions

Adhere to safety guidelines for lifting, screw tightening, indoor use, weight limits, and correct hardware placement.

Mounting to a Wooden Ceiling

Find and Mark Stud Centerline

Locate stud edges using a stud finder and mark the centerline of the stud for precise mounting.

Mark Mounting Locations

Use the wall marking template to mark the exact positions on the stud centerline for drilling.

Mounting to a Concrete Ceiling

Installing Pipe and Decorative Cover

Connecting Pipe to Projector Plate

Making Adjustment for Mounting

Attaching Projector Mount to Projector

Mount Projector

Attach the projector mount to the projector and tighten using Allen Key (H or I), using washers for specific screws.

Overview

The QualGear QG-KIT-CA-3IN-W is a projector mounting kit designed to securely attach a projector to a ceiling, providing a stable and adjustable solution for various installation needs. This kit is suitable for both wooden joist/stud ceilings and concrete ceilings, offering versatility in its application.

Function Description:

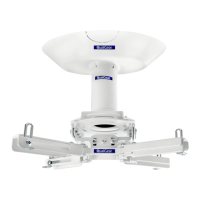
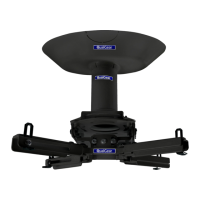
The primary function of the QualGear QG-KIT-CA-3IN-W is to provide a robust and adjustable mounting system for projectors. It consists of a projector mount, an adapter plate, a 3-inch NPT pipe, and a decorative cover, along with all necessary hardware for installation. The system allows for the projector to be securely fastened to the ceiling, with options for adjusting the projector's position and orientation. The design includes extension brackets that can be adjusted to fit various projector models, accommodating different mounting hole patterns. The NPT pipe connects the adapter plate (mounted to the ceiling) to the projector plate (attached to the projector mount), allowing for a clean and professional installation. A decorative cover conceals the adapter plate and pipe connection for an aesthetically pleasing finish.

Important Technical Specifications:

  • Model: QG-KIT-CA-3IN-W
  • Compatibility: Designed to be compatible with standard 1.5" NPT pipes.
  • Mounting Surfaces: Suitable for wooden joist/stud ceilings and structural concrete ceilings.
  • Weight Capacity: The kit has a maximum rated weight capacity of 32kg (70lbs). Exceeding this limit can lead to serious injury or property damage.
  • Drill Bit Sizes for Wooden Ceilings: 5/32" (4mm) diameter wood drill bit for pilot holes.
  • Drill Depth for Wooden Ceilings: 2.5" (65mm) depth for pilot holes.
  • Drill Bit Sizes for Concrete Ceilings: 1/4" (6.0mm) diameter masonry drill bit for anchor holes.
  • Drill Depth for Concrete Ceilings: 1.5" (38mm) depth for anchor holes.
  • Hardware: Includes various screws (F, L, M, J, O, P, Q), washers (K, N), metal expansion anchors (G), Allen keys (H, I), and a marking template (B).
  • Components: Projector Mount (A), Marking Template (B), Decorative Cover (C), 3-Inch NPT Pipe (D), Adapter Plate (E).

Usage Features:

  • Versatile Installation: The kit provides detailed instructions for mounting on both wooden and concrete ceilings. For wooden ceilings, a stud finder is used to locate studs, and the adapter plate is secured with screws. For concrete ceilings, metal expansion anchors are used.
  • Adjustable Extension Brackets: The projector mount features extension brackets that can be adjusted in length and height by sliding them in and out, or up and down, using an Allen Key (H). This flexibility ensures compatibility with a wide range of projector models and their unique mounting hole patterns.
  • Three-Hole Projector Compatibility: If a projector model has only three mounting holes, the fourth extension bracket can be easily removed using Allen Key (H).
  • Secure Connections: All connections, including the pipe to the adapter plate and the pipe to the projector plate, are secured with set screws tightened using Allen Keys (I). This ensures a stable and rigid installation.
  • Aesthetic Integration: The decorative cover (C) slides up the NPT pipe to conceal the adapter plate and pipe connection, providing a clean and finished look.
  • Directional Arrow: A helpful tip indicates that one of the arrows on the projector mount should point towards the projector screen, aiding in correct orientation during installation.
  • Click-in Mechanism: The projector assembly slides into the projector plate with an audible "click," indicating a secure connection.
  • Easy Disconnection: The projector plate can be easily slid out from the projector mount to disconnect the projector assembly when needed, facilitating maintenance or replacement.
  • Indoor Use Only: All QualGear products, including this mounting kit, are intended for indoor use. Outdoor use voids the limited warranty.

Maintenance Features:

  • Regular Security Checks: Users are advised to check the ceiling projector mount at regular intervals to ensure it remains secure and safe for use.
  • Hardware Integrity: The installation manual emphasizes the importance of tightening screws firmly but not overtightening, as this can damage components and reduce holding power.
  • Warranty Information: The product comes with a 1-year limited warranty. For warranty information, users can visit http://www.qualgear.com/warranty.php.
  • Customer Support: For any questions regarding instructions, warnings, or missing/damaged parts, US customers can contact QualGear customer support via email at support@qualgear.com. International customers should contact their local distributor.
  • Professional Installation Recommended: The manual states that the product requires installation by someone with experience in basic building construction and a full understanding of the instructions, highlighting the importance of proper installation for safety and product longevity.
  • Weight Limit Adherence: A crucial maintenance aspect is to never exceed the maximum rated weight specified (32kg/70lbs) to prevent serious injury or property damage. Installers must verify that the supporting surface can safely support the combined weight of the equipment and all attached hardware.

QualGear QG-KIT-CA-3IN-W Specifications

General IconGeneral
BrandQualGear
ModelQG-KIT-CA-3IN-W
CategoryRacks & Stands
LanguageEnglish

Related product manuals