EasyManua.ls Logo

QualGear QG-PRO-PM-SCA2-W - User Manual

Default Icon
4 pages
Print Icon
To Next Page IconTo Next Page
Loading...
1.5" NPT Pipe
(not included)
IMPORTANT!
Do not loosen screws
all the way when
making adjustments,
this will disconnect the
parts and may cause
injury or property
damage.
r.
June 2016
CAUTION!
Do not exceed the maximum rated weight
specified. Otherwise, serious injury or
property damage may occur.
27.2kg
(60lbs)
RATED
5 Year Limited Warranty
Version June 2016
5 Year Limited Warranty
QG-PRO-PM-SCA2-W
Attaching the 1.5" NPT Pipe to the Suspended Ceiling Adapter
4
To connect the 1.5" NPT pipe (sold separately) to the ceiling adapter, twist the male threaded
end into the female thread of the adapter. Then secure the position with screws (F or G) using the
allen key (I).
Alley Key
(I)
OR
(G) x 2
(F) x 2
© 2016
QualGear LLC
Question and Answer IconNeed help?

Do you have a question about the QualGear QG-PRO-PM-SCA2-W and is the answer not in the manual?

Summary

Attaching NPT Pipe to Ceiling Adapter

Attaching the 1.5 NPT Pipe

Connects the 1.5" NPT pipe to the ceiling adapter using screws (F or G) and an Allen key.

Parts Checklist

General Safety Warnings

Maintenance

Mounting the Suspended Ceiling Adapter

Mounting to Wooden Joist;Stud Ceiling

Guides installation on wooden joists or studs using a stud finder and specific drill bits.

Mounting to Concrete Ceiling

Details drilling and anchor placement for concrete ceiling mounting using specific drill bits.

Joining and Attaching Ceiling Plates

Mounting to a Truss

Instructions for securing the adapter to a truss using wire.

Joining the Ceiling Plates

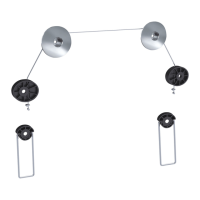
Connects ceiling plates A and B using screws and nuts.

Attaching Joined Plates to Ceiling

Attaches suspended wires and turnbuckles to the joined ceiling plates for leveling.

Overview

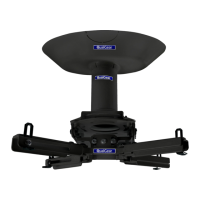
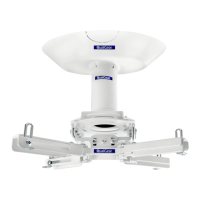
This manual describes the QualGear Suspended Ceiling Adapter (QG-PRO-PM-SCA2-W), a device designed to facilitate the mounting of a 1.5" NPT pipe (not included) to various ceiling types, including wooden joists/studs, concrete, and trusses. It serves as an installation manual, providing detailed instructions and warnings for safe and proper setup.

Function Description:

The QualGear Suspended Ceiling Adapter acts as an interface between a ceiling structure and a 1.5" NPT pipe, which is typically used to suspend equipment like projectors or other devices. The adapter consists of two main ceiling plates (A and B) that are joined together to form a stable mounting platform. This platform is then suspended from the ceiling using wires and turnbuckles, allowing for leveling adjustments. The adapter is designed for indoor use only.

Important Technical Specifications:

  • Rated Weight Capacity: 27.2 kg (60 lbs). It is crucial not to exceed this maximum rated weight to prevent serious injury or property damage.
  • Compatibility: Designed to be compatible with all standard 1.5" NPT pipes (pipe not included).
  • Mounting Surfaces: Supports mounting to wooden joists/studs, concrete ceilings, and trusses.
  • Hardware Included:
    • Ceiling Plate A (x1)
    • Ceiling Plate B (x1)
    • Concrete Anchors C (x4)
    • Eye Bolts D (x4)
    • Turnbuckles E (x4)
    • M5 x 4mm Security Screws F (x2)
    • M5 x 4mm Screws G (x2)
    • M4 Allen Key H (x1)
    • M2.5 Allen Key I (x1)
    • Wire J (1.5 x 6100mm) (x1)
    • Screws M6 x 10mm K (x4)
    • M6 Nuts L (x4)
  • Drill Bit Requirements (for wooden joist/studs): 5/32" (4mm) wood drill bit.
  • Drill Depth Requirements (for wooden joist/studs): 2" (51mm).
  • Drill Bit Requirements (for concrete): 1/4" (6.0mm) masonry drill bit.
  • Drill Depth Requirements (for concrete): 1.5" (38mm).
  • Warranty: 5 Year Limited Warranty.
  • Version: June 2016.

Usage Features:

  • Versatile Mounting Options: The adapter provides instructions for three common ceiling types:
    • Wooden Joist or Wooden Stud Ceiling: Involves locating studs with a stud finder, marking the centerline, drilling pilot holes (5/32" diameter, 2" depth), installing eye bolts (D), and looping wire (J) through them.
    • Concrete Ceiling: Requires marking locations, drilling holes (1/4" diameter, 1.5" depth) with a masonry drill bit, inserting concrete anchors (C), and securing wire (J) to the anchors. It emphasizes ensuring holes are free of dust for proper anchor setting.
    • Truss Mounting: Involves looping wire (J) directly around the truss and twisting it to secure.
  • Adjustable Leveling: Turnbuckles (E) are used to connect the suspended wires to the joined ceiling plates, allowing for fine adjustments to ensure the ceiling tray is perfectly leveled.
  • Secure Pipe Attachment: The 1.5" NPT pipe (not included) twists into a female threaded adapter on the ceiling plate and is then secured with M5 screws (F or G) using an allen key (I). This ensures a stable connection between the pipe and the adapter.
  • Clear Installation Steps: The manual provides a step-by-step guide with illustrations for each mounting method and assembly stage, making the installation process straightforward.
  • Safety Warnings: Prominent warnings are included throughout the manual, emphasizing the importance of not exceeding the weight capacity, tightening screws firmly but not over-tightening, using an assistant or mechanical lifting equipment, and ensuring the supporting surface can safely bear the combined load. It also warns against loosening screws all the way when making adjustments to prevent injury or property damage.
  • Hardware Identification: A detailed "Parts Checklist" with illustrations helps users identify and verify all included hardware components before starting installation.

Maintenance Features:

  • Regular Security Checks: The manual recommends checking that the ceiling adapter is secure and safe to use at regular intervals. This proactive maintenance helps ensure long-term safety and stability of the installed equipment.
  • Customer Support: Users are advised to contact their local distributor or QualGear technical support via email (support@qualgear.com) for any questions regarding instructions, warnings, or if any parts are missing or damaged. This ensures that assistance is readily available for troubleshooting or replacement parts.

QualGear QG-PRO-PM-SCA2-W Specifications

General IconGeneral
BrandQualGear
ModelQG-PRO-PM-SCA2-W
CategoryRacks & Stands
LanguageEnglish

Related product manuals