Do you have a question about the QualGear QG-PM-002-WHT and is the answer not in the manual?
Loosen screws with Allen key, adjust projector position, then tighten screws.
Use an assistant to hold projector; do not loosen screws all the way to prevent damage.
Periodically check mount security and contact support for questions.
Understand instructions, use qualified installers, ensure support surface, use assistant, proper tightening.
Confirm all parts are included before starting installation to avoid delays or issues.
Lists various screws, washers, and Allen keys required for installation.
Assemble the inner and outer extension columns, insert decorative cover, and adjust height.
Loosen/tighten screws, run cables through inner extension column, secure clamp plate.
Ensure correct installation direction of the decorative cover for proper function.
Locate stud, mark centerline, drill pilot holes, and secure plate with lag bolts.
Mark holes using template, drill with masonry bit, insert anchors, secure plate with lag bolts.
Attach adapter bracket to projector mounting holes using appropriate screws and washers.
Guide hook slots onto bars, secure adapter bracket, adjust height, and attach decorative cover.
Ensure projector is properly hooked and all screws are tightened securely before releasing.
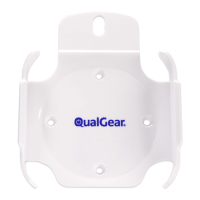
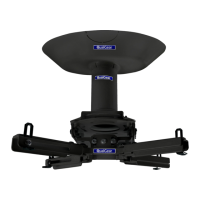
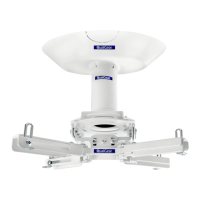
The QualGear QG-PM-002-WHT is a projector ceiling mount designed to securely hold and position a projector from the ceiling, offering flexibility in placement and adjustment. This device is engineered to provide a stable and reliable mounting solution, enhancing the viewing experience by allowing optimal projector alignment.
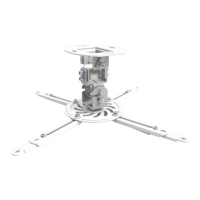
The primary function of the QualGear QG-PM-002-WHT is to suspend a projector from a ceiling, enabling precise positioning and adjustment for an ideal projection angle. It consists of several interconnected components that work together to achieve this. The mount features a ceiling plate that attaches to the ceiling, an adjustable extension column that allows for height customization, a pivot bracket for angular adjustments, and an adapter bracket that connects directly to the projector.
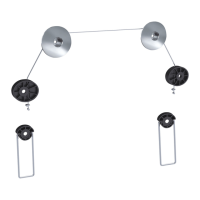
The adjustable extension column is a key feature, allowing users to set the desired height for their projector. This column comprises an inner and outer section, which can be separated and reconnected to achieve various lengths. Cable management is integrated into the design, with channels within the extension column to route projector cables, ensuring a neat and organized installation. A decorative cover further enhances the aesthetic appeal by concealing the cables and the internal structure of the extension column.
The pivot bracket provides crucial angular flexibility, allowing the projector to be tilted up to 15 degrees in any direction (from -15° to +15°). This adjustment capability is essential for correcting keystone effects and achieving a perfectly rectangular image on the screen, even if the projector is not perfectly centered or level with the screen. The adapter bracket, which attaches to the projector, is designed to accommodate various projector models, offering multiple mounting hole configurations and extension brackets to ensure compatibility.
The installation process is structured to guide users through mounting the ceiling plate to different types of ceilings, including wooden studs, wooden beams, solid concrete, and brick. Specific hardware and instructions are provided for each ceiling type to ensure a secure and safe installation. Once the ceiling plate is mounted, the adjustable extension column is attached, followed by the pivot bracket and the projector with its adapter bracket.
The QualGear QG-PM-002-WHT offers several features designed to enhance its usability and adaptability in various home or commercial environments.
Adjustable Height: The extension column allows for significant height adjustment, enabling users to position their projector at the optimal distance from the screen for the desired image size and clarity. This adjustment is made by loosening and tightening a clamp plate screw on the inner extension column, allowing the inner column to slide within the outer one.
Cable Management: Integrated cable management within the extension column helps to keep cables organized and out of sight. Cables can be run through the inner extension column, contributing to a clean and professional installation. A decorative cover snaps into place around the extension column, further concealing the cables and the internal mechanism.
Angular Adjustment: The pivot bracket provides a wide range of angular adjustments, allowing the projector to be tilted up to 15 degrees in any direction. This feature is critical for fine-tuning the projection angle and correcting image distortions, ensuring a perfectly aligned picture on the screen. Adjustments are made by slightly loosening screws on the pivot bracket, positioning the projector, and then re-tightening the screws.
Versatile Mounting Options: The mount is designed for installation on various ceiling types, including wooden studs, wooden beams, solid concrete, and brick. Specific hardware, such as lag bolts for wooden ceilings and concrete anchors for concrete/brick ceilings, is provided to ensure a secure attachment regardless of the ceiling material. A marking template is included to assist with accurate hole drilling.
Projector Compatibility: The adapter bracket system is designed to be highly compatible with a wide range of projectors. It includes multiple extension brackets and various screw sizes (M3, M4, M5, M6) and washers to match different projector mounting hole configurations. Users can select the appropriate screws and brackets based on their projector's specific requirements. If a projector has fewer than three mount holes, the manual explicitly advises against using this mount, highlighting a safety consideration.
Ease of Adjustment: While initial installation requires careful attention, subsequent adjustments to the projector's angle or height are designed to be relatively straightforward. Loosening a few screws with the provided Allen keys allows for repositioning, which can then be secured by re-tightening. However, it is strongly advised to use an assistant when making adjustments to hold the projector securely, preventing accidental drops or damage.
Safety Warnings: The manual emphasizes several critical safety warnings throughout the installation and adjustment process. These include not exceeding the maximum rated weight, ensuring all screws are tightened firmly but not overtightened, using an assistant for projector handling, and verifying that the supporting surface can safely bear the combined weight of the equipment. It also warns against loosening screws all the way during adjustments to prevent parts from disconnecting.
The QualGear QG-PM-002-WHT is designed for durability and long-term performance, with maintenance primarily focused on ensuring continued safety and stability.
Regular Security Checks: Users are advised to regularly check that the projector mount is secure and safe to use. This involves visually inspecting the mount for any signs of loosening, damage, or wear. Periodically re-tightening screws, if necessary, can help maintain the mount's stability over time.
Cleaning: The mount can be cleaned with a soft, dry cloth to remove dust and maintain its appearance. Avoid using harsh chemicals or abrasive cleaners that could damage the finish or materials.
Troubleshooting and Support: In case of any questions regarding the instructions or warnings, or if any issues arise, users are encouraged to contact their local distributor or QualGear technical support via email. This ensures that professional guidance is available for any maintenance or operational concerns.
Hardware Integrity: The manual stresses the importance of using all specified bolts and screws at their designated points during installation to prevent property damage or personal injury. This implies that maintaining the integrity of the hardware, by ensuring no parts are missing or damaged, is a crucial aspect of the mount's long-term maintenance. If any parts are missing or damaged during initial setup, users are instructed to contact support for replacements before proceeding with assembly.
Indoor Use Only: The product is designed for indoor use only, and any outdoor use voids the limited warranty. This specification is a maintenance feature in that it guides users on the appropriate environment for the product, thereby preventing premature wear or damage that could result from exposure to outdoor elements.
Warranty Information: The product comes with a 1-year limited warranty, providing assurance of quality and support for any manufacturing defects during this period. This warranty encourages proper installation and use, as improper installation or use may void the warranty.
In summary, the QualGear QG-PM-002-WHT projector ceiling mount is a robust and versatile solution for suspending projectors, offering extensive adjustability for optimal viewing. Its design prioritizes ease of installation, flexible positioning, and integrated cable management, all while emphasizing critical safety precautions and straightforward maintenance to ensure long-term reliability.
| Color | White |
|---|---|
| Material | Steel |
| Mounting Pattern | Universal |
| Mounting Options | Wall |
| Wheeled | No |
| Adjustable Shelves | No |