Do you have a question about the Quoizel CCR8410CU and is the answer not in the manual?
Turn off electricity at circuit breaker or main fuse box before installation. Consult a licensed electrician if in doubt.
Lists all parts included in the package: Crossbar Assembly, Mounting screws, Fixture Body, and Glass Panels.
Secure the Glass Panels into the slots on the bottom of the fixture cage using the tabs.
Attach the Crossbar Assembly to the Outlet Box using Outlet Box Screws.
Fit the backplate and Fixture Body onto the Crossbar Assembly, adjusting mounting screws for a snug fit.
Connect fixture wires to outlet box wires using standard connectors and tape.
Position the backplate and Fixture Body onto the Crossbar Assembly and secure with mounting balls.
Screw in the bulb and apply exterior grade caulk around the top and sides of the backplate for drainage.
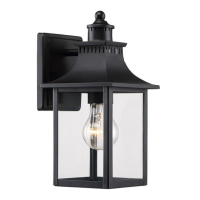
This document describes the assembly and installation of the Quoizel outdoor wall lantern, model CCR8410CU, finished in Copper Bronze. This fixture is designed to provide outdoor illumination and enhance the aesthetic appeal of a building's exterior.
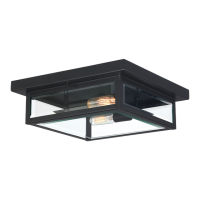
The Quoizel CCR8410CU is an outdoor wall-mounted light fixture that uses three B10 Candelabra Base bulbs, with a maximum wattage of 60W each, to provide ambient or task lighting for exterior spaces. It is designed to be securely attached to an existing outdoor electrical outlet box on a wall. The fixture features a durable construction suitable for outdoor environments, incorporating glass panels to protect the bulbs and diffuse light, and a metal fixture body with a decorative finish. The design allows for the fixture to be mounted in a specific orientation, as indicated in the instructions, ensuring proper light distribution and aesthetic alignment. Its primary function is to illuminate outdoor areas such as porches, patios, or entryways, contributing to both safety and curb appeal.
The installation process for the CCR8410CU is designed to be straightforward, with an estimated assembly time of 20-30 minutes, though professional installation by a licensed electrician is strongly recommended for safety and compliance. The fixture's design incorporates a crossbar assembly that mounts directly to a standard outdoor outlet box, providing a robust foundation for the fixture body. The crossbar assembly includes adjustable mounting screws, allowing for a snug fit against the wall, which is crucial for outdoor installations to prevent moisture ingress. Alternate shorter mounting screws are also provided for situations where a shorter mounting screw is required.
A key feature of this fixture is the inclusion of glass panels, which are inserted into the fixture body during assembly. These panels are secured using a U-shaped foam end that fits into a slot at the bottom of the cage and tabs at the top edge, ensuring they remain in place and protect the internal components from the elements. The fixture body then attaches to the crossbar assembly using decorative mounting balls, which are hand-tightened to secure the fixture firmly against the wall. This design not only provides structural integrity but also contributes to the fixture's aesthetic appeal.
Electrical connections are made using standard wire connectors (not included), following typical wiring conventions: white to white, black to black (or red), and ground to ground. The instructions emphasize twisting connectors until wires are tightly joined and wrapping each connection with approved electrical tape, a critical step for outdoor fixtures to prevent short circuits and ensure long-term reliability in varying weather conditions. All connected wires are then carefully tucked into the outlet box before the fixture body is secured.
Once installed, the fixture accommodates three B10 Candelabra Base bulbs, which are screwed snugly into their sockets. The maximum wattage per bulb is 60W, allowing for ample illumination. The fixture's dimensions are approximately 10 inches square at the top, 7.5 inches square at the bottom, 11 inches wide, and 23.5 inches high, making it a substantial and noticeable addition to an outdoor space. The Copper Bronze finish provides a classic and elegant look that complements various architectural styles.
Maintenance for the Quoizel CCR8410CU is designed to be minimal but essential for its longevity and performance, particularly given its outdoor application. The instructions highlight the importance of applying exterior grade caulk around the top and sides of the fixture backplate after installation. This caulking creates a watertight seal between the fixture and the wall surface, preventing moisture from penetrating behind the backplate and into the electrical outlet box, which is crucial for preventing electrical hazards and corrosion. Importantly, the bottom of the fixture backplate should not be caulked, as this allows for proper moisture drainage, preventing water from accumulating within the fixture. Before applying caulk, it is advised to ensure that both the exterior wall surface and the fixture backplate are clean and free of dirt, which helps the caulk adhere effectively.
For general cleaning, users are directed to the Quoizel website (www.quoizel.com) for product cleaning tips, specifically under the "Care + Maintenance" section. This suggests that specific cleaning agents or methods may be recommended to preserve the Copper Bronze finish and the clarity of the glass panels without causing damage. Regular cleaning would likely involve wiping down the exterior surfaces to remove dirt, dust, and environmental buildup, which can accumulate on outdoor fixtures.
Replacing bulbs is a straightforward process, but safety precautions are emphasized: the fixture must be disconnected from the power source before replacing bulbs, and bulbs should be given sufficient time to cool down before removal to prevent burns. This ensures user safety during routine maintenance tasks. The durable construction of the fixture, including its metal body and glass panels, is intended to withstand typical outdoor weather conditions, reducing the need for frequent repairs or replacements of structural components. However, periodic inspection for any signs of wear, damage, or compromised seals would be prudent to ensure continued safe and effective operation. In case of missing or damaged parts during initial inspection or for any assistance with parts or assembly, Quoizel customer service is readily available via phone or online, ensuring support for the product's lifespan.
| Category | Outdoor Light |
|---|---|
| Finish | Copper |
| Material | Metal |
| Bulb Quantity | 1 |
| Voltage | 120V |
| Color Temperature | 3000K |
| CRI | 80 |
| Dimmable | Yes |
| Wet Location Rated | Yes |
| Energy Star Certified | No |
| Bulb Type | LED |
| Light Source | LED |
| Lumens | 800 lumens |