EasyManua.ls Logo

Quoizel NY8318AC - User Manual

Default Icon
6 pages
Print Icon
To Next Page IconTo Next Page
Loading...
Part
Description
Quantity
A Crossbar
1pc.
1pc.
2 pcs.
2 pcs.
2 pcs.
2 pcs.
Fixture Body
B
C
D
E
F
Hex Nut
Lock Washer
Package Contents
Quoizel, Inc.
6 Corporate Parkway
Goose Creek, SC
29445
Customer Service
Phone 631.273.2700
Fax 631.231.7102
www.quoizel.com
Warnings and Cautions
Turn off electricity at circuit breaker or main fuse box before installation. Consult a licensed electrician if in doubt.
These instructions are provided for your safety. It is very important you read them completely before installing
the fixture. We strongly recommend that a licensed, professional electrician perform the installation.
Disconnect fixture from power source before replacing bulbs. Make sure bulbs are given sufficient time to cool
before removal. Do not subject glass parts to any shock while in operation or shattering may result.
2012 Quoizel Inc.
Mounting Ball
Mounting Screw
Assembly Instruction Sheet #IS-NY8318AC
For Style NY8318AC
1of6
A
B
C
D
E
6 CORPORATE PARKWAY
GOOSE CREEK SC 29445
www quoizel com
,.
..
F
G
3 pcs.
G
Candle Cover
Pleasegoto forproduct cleaning tips. Go to the
selection.
www.quoizel.com Care+ Maintenance
ToolsRequired: Flatheadscrewdriver,Phillips screwdriver,pliers, wirecutters, wire
strippers,electrical tape,safety glasses.
EstimatedAssemblyTime: 20-30 minutes
Preparation:Identify andinspect allparts beforebeginning installation.Check package
contentlist anddiagrams belowto besure allparts arepresent. Ifany parts are missing
ordamaged, donot attemptto assemble, install, or operate the fixture. Contact customer
servicefor replacementparts.
LightSource: (3) 60WMaximumCandelabraBase
RevisedDate: 2016-09-13
Thank you for purchasing a Quoizel product.
Need assistance with parts or assembly? Call Quoizel customer service at 1-800-645-3184
or visit us on-line at www.quoizel.com
Question and Answer IconNeed help?

Do you have a question about the Quoizel NY8318AC and is the answer not in the manual?

Summary

Warnings and Cautions

Package Contents

Assembly Steps

STEP 1 - Attach Mounting Screws, Lock Washers and Hex Nuts to Crossbar

Attach mounting screws, lock washers, and hex nuts to the crossbar before proceeding.

STEP 2 - Attach Crossbar to Outlet Box

Secure the crossbar to the outlet box using outlet box screws.

STEP 3 - Make Wire Connections

Connect the fixture wires to the supply wires using standard wire connectors.

STEP 4 - Attach Fixture Body to Mounting Screw

Mount the fixture body onto the mounting screws using mounting balls.

STEP 5 - Attach Candle Cover to Socket Assembly

Place the candle cover over the socket properly.

STEP 6 - Install Bulb

Install the appropriate bulb into the fixture socket.

STEP 7 - Apply Silicone Sealer to Mounting Balls

Apply silicone sealer to mounting balls to prevent moisture.

STEP 8 - Apply Silicone Sealer to Backplate

Apply exterior grade caulk to the backplate edges for sealing.

Overview

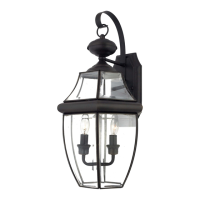
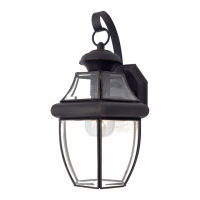
This document is an assembly instruction sheet for the Quoizel outdoor fixture, model NY8318AC, which features an aged copper finish. It provides comprehensive guidance for installing and maintaining the fixture, along with important safety warnings and technical specifications.

Function Description:

The Quoizel NY8318AC is an outdoor wall-mounted light fixture designed to provide illumination and enhance the aesthetic appeal of exterior spaces. It features a classic lantern-style design with a decorative backplate and a glass enclosure for the light source. The fixture is intended for permanent installation on an exterior wall and requires connection to a standard electrical outlet box.

Important Technical Specifications:

  • Style Number: NY8318AC
  • Finish: Aged Copper
  • Light Source: (3) Candelabra Base 60W Maximum bulbs.
  • Dimensions:
    • Overall Height: 22.5 inches
    • Overall Width: 12.25 inches
    • Projection from wall: 11.5 inches
    • Backplate dimensions are not explicitly stated but are implied by the overall fixture dimensions.
  • Electrical Requirements: Standard household electrical supply (requires connection to an outlet box).
  • Materials: The fixture body is depicted as metal with glass panels enclosing the light source.
  • Mounting: Wall-mounted using a crossbar and mounting screws, secured to an existing electrical outlet box.
  • Safety Certifications: While not explicitly stated, the presence of detailed assembly instructions and warnings implies compliance with relevant electrical safety standards.

Usage Features:

  • Outdoor Application: Specifically designed for exterior use, capable of withstanding outdoor elements when properly sealed.
  • Decorative Design: The aged copper finish and lantern style contribute to a traditional or rustic outdoor aesthetic.
  • Easy Bulb Replacement: Bulbs are inserted from the bottom of the glass frame, suggesting a straightforward process for changing bulbs.
  • Standard Bulb Type: Utilizes common candelabra base bulbs, making replacements readily available.
  • Adjustable Mounting: The crossbar allows for some flexibility in aligning the fixture with the outlet box during installation.

Maintenance Features:

  • Cleaning: The manual advises users to visit www.quoizel.com for product cleaning tips, indicating that specific cleaning instructions are available to maintain the fixture's appearance and longevity.
  • Bulb Replacement: Instructions are provided for safely replacing bulbs, emphasizing disconnecting power and allowing bulbs to cool.
  • Silicone Sealer Application: A crucial maintenance step involves applying exterior-grade silicone sealer around the mounting balls and the backplate to prevent moisture intrusion into the wire compartment. This is essential for the fixture's durability and electrical safety in outdoor environments. The instructions detail how to apply the caulk, specifically noting not to caulk the bottom of the backplate to allow for proper moisture drainage.
  • Part Replacement: The document includes a package contents list with part descriptions and quantities, which is useful for identifying and ordering replacement parts if needed. Quoizel customer service contact information (phone and website) is provided for assistance with parts or assembly.

Assembly Process Overview:

The assembly process is broken down into eight steps:

  1. Attach Mounting Screws, Lock Washers, and Hex Nuts to Crossbar: This involves securing the mounting hardware to the crossbar, aligning it with the fixture's backplate.
  2. Attach Crossbar to Outlet Box: The crossbar is then attached to the existing electrical outlet box on the wall using screws (not supplied).
  3. Make Wire Connections: This critical step involves connecting the fixture's wires (white, black, and ground) to the corresponding supply wires from the outlet box using standard wire connectors and electrical tape.
  4. Attach Fixture Body to Mounting Screw: The fixture body's backplate is placed over the mounting screws and secured with mounting balls.
  5. Attach Candle Cover to Socket Assembly: The candle covers are placed over the sockets.
  6. Install Bulb: Candelabra base bulbs are inserted and screwed snugly into the sockets from the bottom of the glass frame.
  7. Apply Silicone Sealer to Mounting Balls: Silicone sealer is applied to the threaded side of the mounting balls before they are installed to prevent moisture entry.
  8. Apply Silicone Sealer to Backplate: Exterior-grade caulk is applied around the perimeter of the backplate where it meets the wall, ensuring proper sealing while allowing for moisture drainage at the bottom.

Safety Warnings and Cautions:

  • Electrical Disconnection: Emphasizes turning off electricity at the circuit breaker or main fuse box before installation or bulb replacement.
  • Professional Installation: Strongly recommends that a licensed, professional electrician perform the installation.
  • Bulb Handling: Advises allowing bulbs sufficient time to cool before removal and avoiding shock to glass parts.
  • Part Inspection: Instructs users to identify and inspect all parts before beginning installation and to contact customer service if any parts are missing or damaged.
  • Wire Connections: Highlights the importance of tightly joining wires and wrapping connections with approved electrical tape.

The document is well-structured with clear diagrams and step-by-step instructions, making it accessible for both DIY enthusiasts and professional installers, provided they adhere to the safety guidelines.

Quoizel NY8318AC Specifications

General IconGeneral
BrandQuoizel
ModelNY8318AC
CategoryOutdoor Light
LanguageEnglish

Related product manuals