Do you have a question about the Retrax ONE and is the answer not in the manual?
Position and tighten clamps using 9/16" or 1/2" wrench, ensuring rail tilt for water intrusion.
Details on positioning adjustable-back clamps, tucking jaws, and re-tightening screws for secure fit.
Adjust stand-off bolt until bumper contacts bed wall, then re-tighten jam nut.
Measure distances at points A, B, and C to ensure rails are parallel within ±1/16".
Use 6mm Allen wrench to adjust rail spacing by turning screws counter or clockwise.
Verify cover closure and latching, adjusting rails for even weatherstrip exposure.
Insert drain tubes into canister and route them out of the truck bed for water drainage.
Ensure cover rolls freely, tailgate operates, rails are level, and all clamps are tight.
Open the lock cover and press the button at the latch center to pop the handle.
Push down on the lock handle end and insert key to lock or unlock.
Adjust set-screw on lock arm with 3/32" Allen wrench to modify latching pressure.
Secure cargo with straps; latch handle against large items to keep them in place.
Clean with mild soap and water; never use lubricants or cleaners in rails.
Defines coverage for RetraxPRO (lifetime) and RetraxONE (1 year), voided by misuse.
Warranty is for the initial consumer purchaser only and is non-transferable.
Lists conditions like proper cleaning, cargo securing, and clamp checks that must be met.
Outlines repair/replacement options and the process for obtaining a Return Material Authorization.
This document provides installation, usage, and maintenance instructions for RetraxONE and RetraxPRO retractable bed covers. These covers are designed to secure and protect cargo in a truck bed.
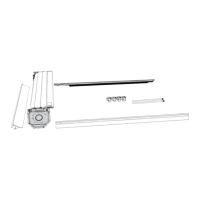
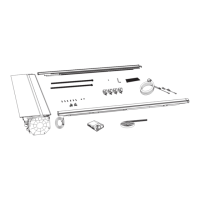
The Retrax retractable bed cover system consists of a spiral canister, two side rails, a front cover, and a rolling cover. The rolling cover retracts into the spiral canister, allowing for full access to the truck bed. When extended, it provides a secure and weather-resistant barrier over the cargo area. The system is designed to be installed on the truck bed rails, with clamps securing the rails to the truck bed. Drain tubes are included to manage water runoff from the cover.
Installation: The installation process begins with unpacking the components and removing shipping materials. It's crucial to retain the packaging until installation is complete and to avoid removing protective films from the cover and canister prematurely. The use of lubricants or thread-locker adhesive on the rolling cover is explicitly prohibited as it voids the warranty.
The first step involves installing the rails to the canister. The lock cover is lifted, and the lock is opened by pressing a release button. The rolling cover is then pulled out 6 to 8 inches from the canister and guided into the rail channels. The front and rear rail attachment tabs are aligned with the corresponding canister holes.
Next, the rails are fastened to the canister using four 10-32 x 7/16" canister mounting screws. These screws should be tightened to 32 in-lbs.
The front cover is then slid under the rails and attached with two 10-24 x 3/4" front cover screws, tightened to 32 in-lbs using a 1/8" Allen wrench. The weather strip on the front cover should face outwards.
Before placing the cover on the truck bed, it may be necessary to notch drop-in style bed liners in the front/cab end corners to provide clearance for the canister. These notches should be approximately 3" wide x 10" deep. Any protrusions or logos in the bed liner that might interfere with the cover's operation should also be addressed.
With two people, the cover is lifted and placed onto the truck bed, positioning the canister near the bulkhead. The front seal of the cover should lay flat and forward. It's important that the front seal does not extend past the bed rail cap; if it does, it should be trimmed.
The rails are then positioned by moving the cover back towards the tailgate. A shipping bracket is used as a spacer to ensure both rails are 1/8" from the tailgate.
Clamps are installed between the adjustment screws on the rails. For standard installations, a 9/16" or 1/2" wrench is used to tighten the clamps. During tightening, it's crucial to push down on the rail and simultaneously tilt it up approximately two degrees. This action helps position the rail to minimize water intrusion.
For XR Rail system clamp installation, a specific assembly process is followed. This includes threading a stand-off bolt into the lower flange of the clamp, threading a stand-off jam nut onto the bolt, and sliding a stand-off bumper onto the bolt. The adjustable-back clamp is designed for extra loads and must be positioned correctly under the truck bed rail. The adjustable top jaw of the clamp must be tucked firmly into the top and inside corner of the sheet metal of the truck bed rail. If the jaw does not contact firmly, the clamp should be removed, screws loosened to adjust the jaw, and then re-tightened, ensuring lock washers are fully engaged. The clamp is then replaced between the adjustment screws, and the jaw seating is rechecked. The clamps are tightened while pushing down and tilting the rail to minimize water intrusion.
The rail clamp stand-off bolt is then tightened. After the rails are adjusted to be even, the jam nut is loosened, and the stand-off bolt is tightened until the bumper firmly contacts the truck bed wall. The jam nut is then re-tightened, taking care not to overtighten the bolt.
The distance between the rails is measured at the front cover and above each clamp. These measurements must be consistent within ±1/16". If the rails are not parallel, adjustment is needed.
To adjust the distance between the rails, the clamps are removed, and the white adjustment screws are turned with a 6mm Allen wrench. One complete turn adjusts the rail by 1/16". Turning screws counter-clockwise moves rails closer, and clockwise moves them farther apart. After adjustment, the clamps are replaced.
Finally, the fit between the front cover and the rolling cover is checked. If there is uneven weatherstrip exposure when the cover is closed and latched, the rail needs adjustment. The clamps are loosened, the rail is moved forward or toward the cab, and then rechecked for equal spacing before tightening all clamps.
The protective plastic film is removed from the canister, and drain tubes are inserted into the canister on both sides. The fitting should click twice when secure. The drain tubes are routed through existing holes in the factory bed plug or through new holes drilled with caution to avoid damaging underlying lines. For optimal water drainage, the drain hose should be routed in the most direct line possible.
Operation: To open the cover, the lock cover is opened, and the button at the center of the latch is pressed to pop open the handle. To close and lock the cover, the lock handle is pushed down firmly anywhere along the rail. The key is inserted and turned to lock or unlock.
Securing Cargo: Retractable covers help transport loose and large cargo. Cargo should always be secured to the truck bed to prevent it from coming loose. For items too large to fit under the cover, the lock handle can be latched shut against the item to help keep it in place.
Cleaning and Care: The cover should be cleaned with mild automotive soap and water only. Strong chemicals, cleaners, or gasoline should not be used, as they can damage the cover. Waxing the Retrax cover is not recommended. The weather stripping may absorb soapy residue from car washes, so wiping down the inside of the rails periodically is advised.
Lubrication: It is critical never to spray any lubricant or cleaner in the rails, as this will void the warranty. The ball bearings are sealed and do not require lubrication. If the rails feel sticky, rubbing paraffin wax along the rail can help until they wear in.
Periodic Checks: Periodically, the cover should be opened and closed to ensure it rolls without rubbing or binding. The tailgate movement should also be checked. On some models, adjusting the rear of the rails slightly up or down may improve the fit with the tailgate. All remaining protective film should be removed. All clamps should be rechecked for tightness periodically throughout the use of the cover. The rails should be checked to ensure they are level and evenly spaced, and adjusted accordingly. Before operating the cover, any snow or foreign matter should be removed.
It is recommended to periodically check that the cover is securely attached to the truck bed. Inspect the clamps and front mounting bolts to ensure they are properly installed and have not come loose or knocked out of adjustment. Covers used frequently or subjected to vibrations from rough roads may require adjustment.
Safety Instructions: The vehicle should not be towed from the rear with the cover on. If rear towing is necessary, the cover must be removed and properly stored. Gasoline should not come into contact with the cover. All large and heavy cargo must be secured with straps. Children or pets should never occupy the truck bed while the cover is closed. The cover is not airtight, so special care is needed to keep cargo clean and dry. Tonneau covers do not prevent theft of contents inside the truck box.
XR Trax Rail System Information: For XR Trax Rail Systems, the truck owner's manual should be consulted for load ratings. The Retrax cover with a rack system has a weight capacity of 125 lbs. For rack system installation instructions and load ratings, refer to the rack system's manual. The vehicle manufacturer's weight capacity should be checked in the owner's manual. For a 2024 Ranger, the Retrax cover on-road carrying capacity is 500 lbs.
Caution for Cargo Loading: To prevent damage or loss of cargo, cross bars and cargo must be securely fastened. Loading cargo on the roof rack raises the vehicle's center of gravity. High speeds, sudden starts, sharp turns, sudden braking, or abrupt maneuvers should be avoided, as they can lead to a loss of control. When driving long distances or at high speeds, the vehicle should be occasionally stopped to ensure cargo remains in place. The maximum vehicle capacity must never be exceeded when loading the vehicle.
| Operation | Manual |
|---|---|
| Warranty | Limited Lifetime Warranty |
| Product Type | Retractable Tonneau Cover |
| Compatibility | Varies by truck make and model |
| Drainage | Built-in drainage system |