EasyManua.ls Logo

Retrax Powertrax User Manual

Retrax Powertrax
12 pages
To Next Page IconTo Next Page
Page #1 background imageLoading...
Page #1 background image
ELECTRICAL PARTS
INCLUDED IN YOUR KIT
1x Split wire loom
1x Fuse holder
2x 10 amp fuses
1x Wire harness
10x Wire ties
1x Electronics
1x LED lamp
2x Key fobs - transmitters
1x Electric cover accessory packet
NOTE: Please read all instructions before assembling the bed cover.
Keep the boxes and packaging until the installation is complete. Unpack carefully to prevent scratching. DO NOT remove any
protective lms from the cover and canister until after the installation is complete. DO NOT USE A LUBRICANT OR THREAD-
LOCKER ADHESIVE ON THE ROLLING COVER. USE OF THESE WILL VOID THE WARRANTY. See the maintenance page
for proper care.
A
B
COVER PARTS
INCLUDED IN YOUR KIT
1x Front cover
1x Driver side rail
1x Passenger side rail
(Rail is designated by a green sticker)
1x Spiral canister
4x Canister mounting screws (10-32 x 7/16”)
2x Front cover mounting screws (10-24 x 3/4”)
4x Clamps (6x for 8’ beds)
2x Drain tubes
1x 1/8” Allen wrench
1x 6mm Allen wrench
Page 9 Top
Page 9 Middle
O C
O C
O C
Page 10 Top
Page 10 Bottom Right
Page 10 Bottom Left
INSTALLATION SHEET
Any damaged or missing parts?
Parts will be shipped to you directly.
Call 800-206-4070 Mon - Fri, 8:30 a.m. - 5:00 p.m. CST
or email retrax@retrax.com
E
B
C
D
A
H
F
C
D
E
F
G
H
I
G
I
Driver Side
Spiral Canister
Electric Cover
Accessory Packet
Retrax • 917 S. 46th St., Grand Forks, ND 58201 • 800-206-4070 © Retrax is Retrax Holdings, LLC, 2023
4000-175 IR-RTP-01 Rev. 10.17.23
J
K
L
M
N
O
P
Q
R
S
M
P
R
TOOLS REQUIRED
#2 Phillips screwdriver
9/16” Wrench
1/2” Wrench
Scissors or utility knife
N
K
L
J
Q
O
S
N O P Q
R S
Question and Answer IconNeed help?

Do you have a question about the Retrax Powertrax and is the answer not in the manual?

Retrax Powertrax Specifications

General IconGeneral
BrandRetrax
ModelPowertrax
CategoryAutomobile Accessories
LanguageEnglish

Summary

Installation Steps

Route Wire Harness and Options

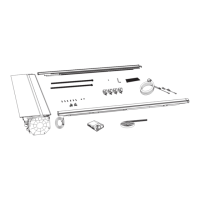
Guide the electrical harness from the battery to the truck bed and select wiring routing options.

Install Canister and Rails

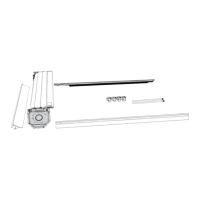
Remove shipping materials, install the canister, and attach side rails to the truck bed.

Install Front Cover and Clamps

Fit the front cover and secure rails using clamps, ensuring proper alignment for water sealing.

XR Rail Clamp Installation

Detailed procedures for correctly positioning and tightening the XR rail system clamps.

Adjust Rails and Install Drain Tubes

Measure rail spacing, adjust for parallelism, and install drain tubes for water management.

Final Wiring Connection

Connect the main wiring harness to the electronics box and battery terminals.

Rack System Information

Truck Owner's Manual Load Ratings

Consult the truck owner's manual for load ratings and cargo weight calculations.

Rack System Load Capacity

Verify vehicle manufacturer's weight capacity and Retrax cover load limits.

Cover Use and Maintenance

Opening and Closing the Cover

Instructions for operating the cover's latch mechanism and lock.

Lock Cover Adjustment

Adjusting the set-screw on the lock arm for proper latching pressure.

Securing Loose Cargo

Tips for safely transporting items and securing them with the cover's latch.

Cleaning and Caring for Cover

Guidelines for cleaning the cover with mild soap and water, avoiding harsh chemicals.

Limited Warranty

Warranty Coverage

Details on what the truck bed cover warranty covers and conditions that void it.

Warranty Conditions

Essential care and use instructions that must be followed to maintain warranty validity.

Warranty Performance and Return

Information on how warranty claims are handled, including repair, replacement, and return procedures.

Related product manuals