www.rgblink.com
How to Enter Logo Interface
The user can gain access to Logo Interface through
the following methods:
1.
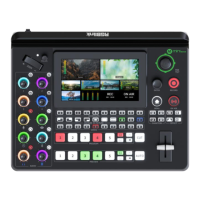
Long press Logo button along the PREVIEW
Outputs Row.
2. Use ENTER knob to move the cursor to LOGO
in Sour Selection Area, press knob again to enter.
Adding Logo Sources
Please follow the steps outlined as follows to add
logo Source.
1. Rotate ENTER knob to select logo source saved in
U disk;
2. Use ENTER knob to move the cursor to“+”, press
ENTER knob again to choose whether to add the
source to Source Selection Area;
3. The operations above also indicate preview
process. The Logo button will be illuminated blue.
Warning: Sources should meet the following requirements:
1. No space and symbols in picture name.
2.
png (32-bit depth) , resolution within 1920x1080, subject to the actual output resolution.
Enabling Logo
Push Logo button on the front panel to enable it.
If the Logo button along the Program Source Row
illuminates White, press the button to place a logo
on Program screen and the button will be
illuminated Red.
Press button illuminated red to remove, and the
button indicator changes to white.
 Loading...