WALL TO WALL
Installation Guide (Continued)
Page
11
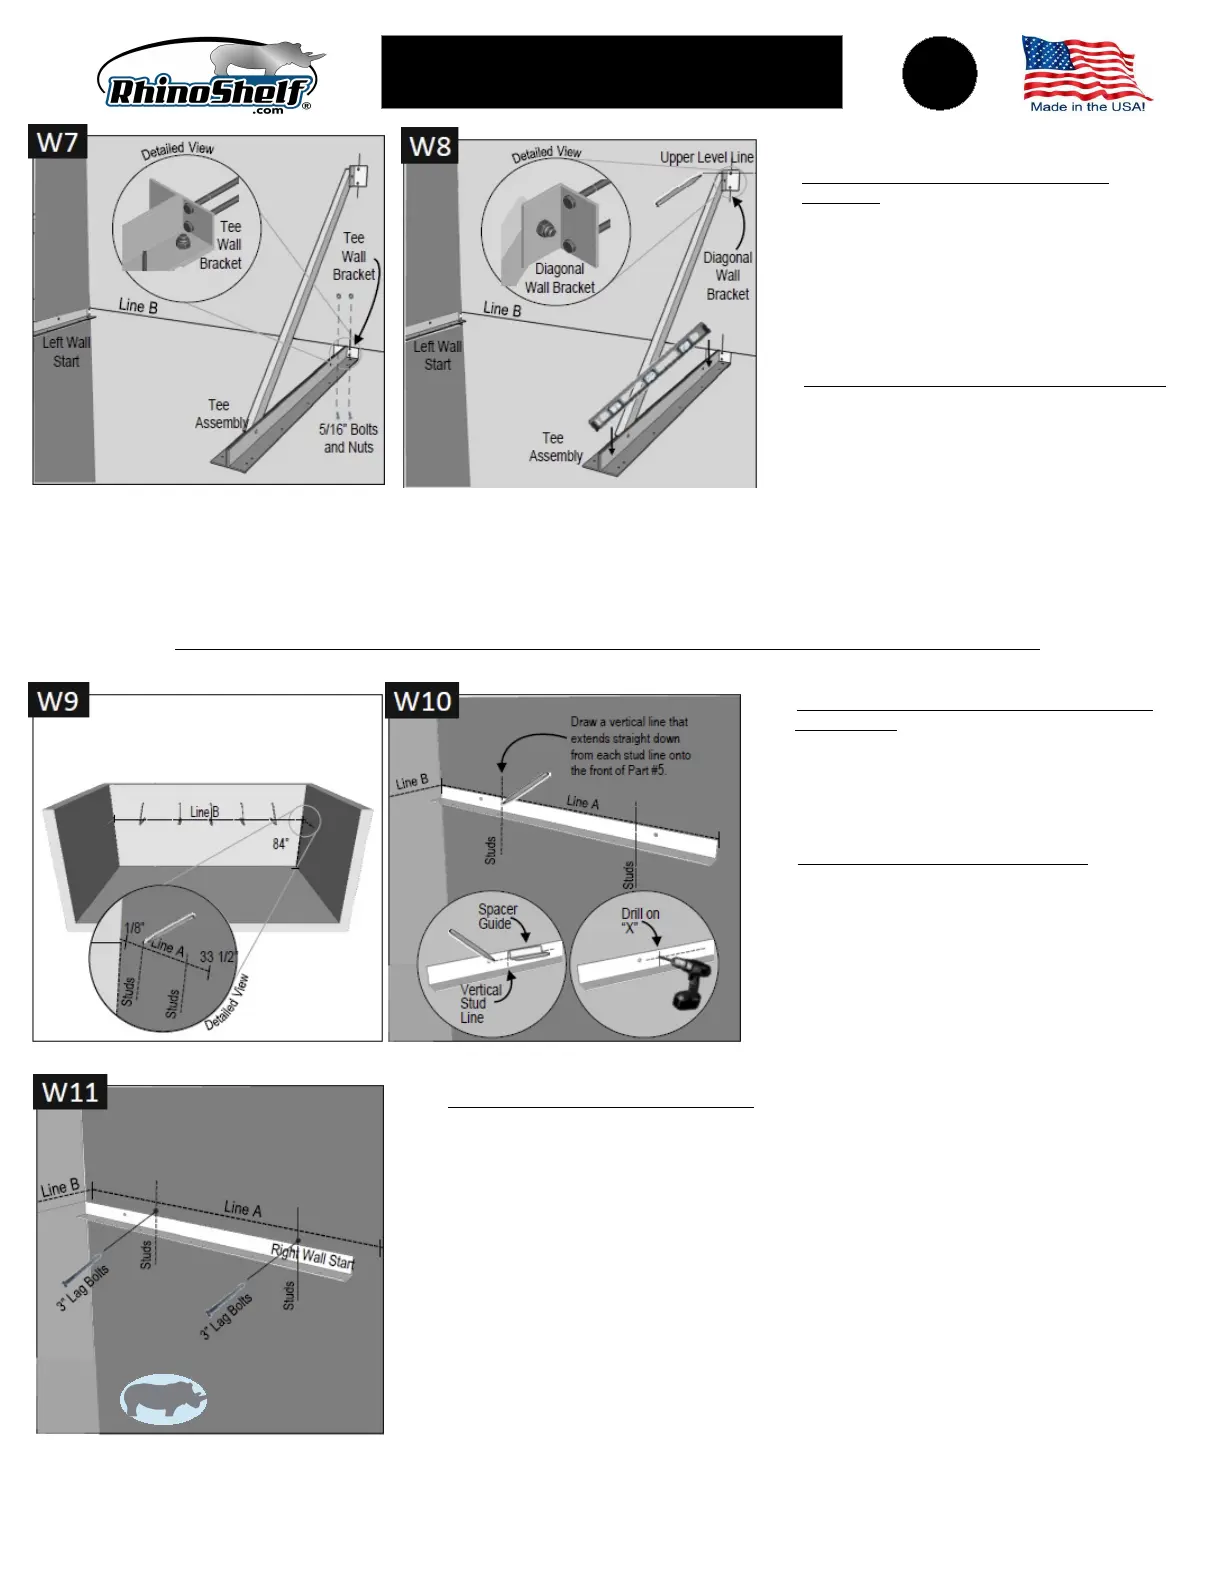
W7. FASTEN TEE ASSEMBLY TO TEE WALL
BRACKET. Slide the pre-assembled Tee assembly
under Tee Wall Bracket’s lower lag bolt head. This will
temporarily hold the Assembly in place. Insert 5/16”
bolts through bottom of the Tee Wall Bracket the Tee
Assembly and hand tighten. Check to make sure the
Tee Assembly is perpendicular to wall with a framing
square. Tighten bolts with 1/2” wrench and socket or
wrench and nut driver.
W8. ATTACH TOP OF TEE ASSEMBLY TO WALL.
Place 2' level on the Assembly and push the top
of the diagonal to the wall so that the top wall
bracket rests flat on the wall, aligning holes to
upper vertical Line C. Check level and draw 2”
horizontal level line at the top of the bracket.
If your Kit is an 8' Model, proceed to step W9;
if not, repeat Steps W5 – W8 until all of the pre-assembled Tee Assemblies are installed.
Go to Page 12, “Cut and Install 2x4
Boards” to complete your installation.
INSTALL RIGHT WALL START
W9. MARK LOCATION OF RIGHT WALL START ON
RIGHT WALL. Starting from right corner, referencing
Line B, make a small horizontal mark on left wall 1/8”
above Line B. From this mark, use a level to draw a 33
1/2” horizontal line onto the right wall. This is Line A.
Locate and mark the center of each stud along Line A.
See “How To Locate Center of Stud” on Page 2.
W10. DRILL HOLES IN RIGHT WALL START. Align the
top of the Right Wall Start with Line A making sure the
side with only two holes is against the wall. Place it
1/8” from corner. Holding the part in position, draw a
vertical line that extends straight down from each stud
line onto the front of the part. Place the Right Wall
Start on a scrap piece of wood. Use the 3/4” side of
the Spacer Bar to draw a perpendicular line across
each vertical line on the front of the part. Drill holes
through front of the Right Wall Start on each “x” using
a 1/4” drill bit.
W11. FASTEN RIGHT WALL START TO WALL. Align the Right Wall Start’s top edge with Line A, placing it
1/8” from corner. Make sure that the new 1/4” holes on the front of the Right Wall Start are aligned
with the center of stud lines. Holding the part in position, use a 3/16” bit to pre-drill pilot hole through
right 1/4” hole. Use a 7/16” socket wrench or nut driver to attach the Right Wall Start to the wall with 3”
lag bolt. Tighten until snug but movable. Ensure the part is level and that its top edge is aligned with
Line A. Drill second pilot hole through right 1/4” hole and attach second 3” lag bolt. Level the part and
tighten both 3" bolts.
Holding the top bracket in position, drill the first pilot hole with a 3/16” drill bit. Use 7/16” socket wrench or nut driver to attach the
top bracket to the wall with 3” lag bolt. Make sure that the top bracket is level and pre-drill pilot hole and attach second lag bolt.
Use a 1/2” wrench and socket or wrench and nut driver to tighten all the 5/16” bolts and nuts on the Tee Assembly.
MINI Special Instruction
For Rhino Mini Pg 3
FOR RHINO MINI W10 AND W11 SEE “SPECIAL INSTRUCTIONS” BOTTOM OF PAGE 3
 Loading...