MID WALL SHELF
Installation Guide
Page
4
Make sure you've read Pages 1 -3 first.
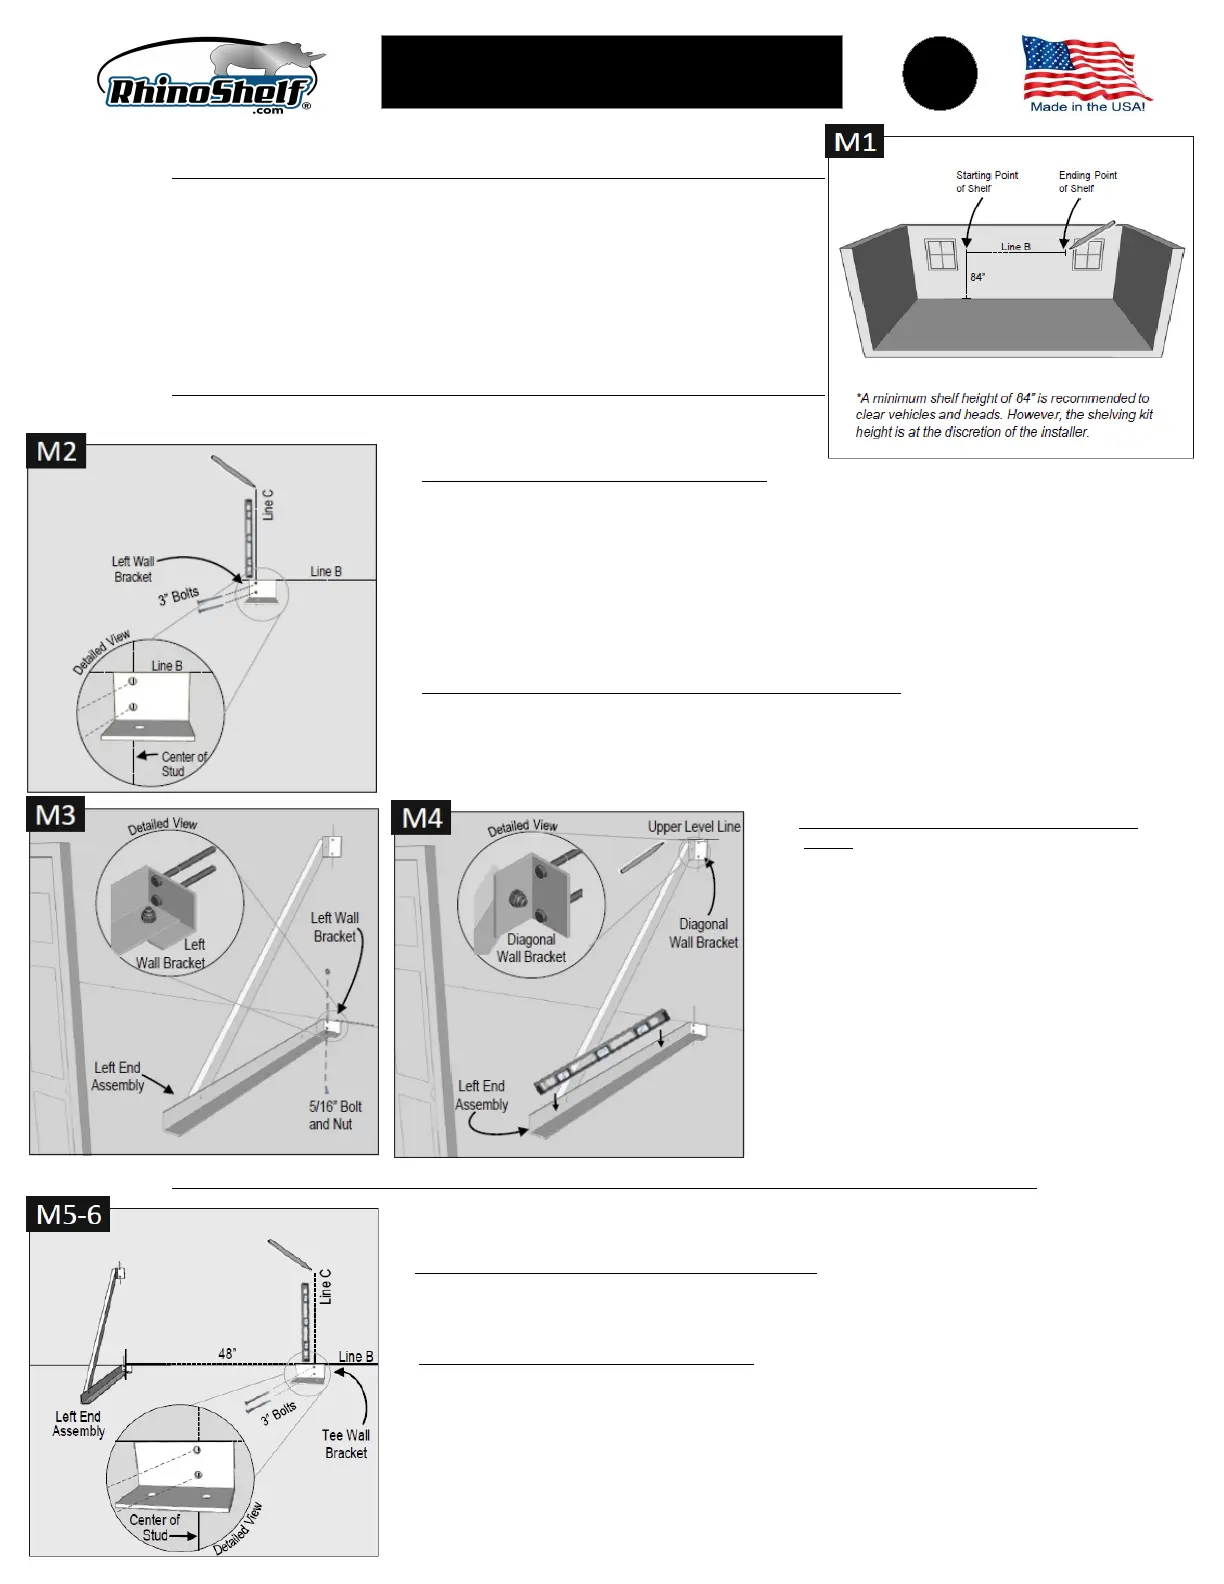
INSTALL LEFT END ASSEMBLY:
M2. ATTACH LEFT WALL BRACKET TO WALL. Locate and mark the center of the stud at your
starting point (See “How to Locate the Center of Stud” on Page 2) with a 2” vertical mark,
which will be referenced as Line C. Place the bottom of a 2' level on Line B, aligning with the
edge of Line C. With level plumb, mark 2” vertical mark at top of the level. Place the top of the
Left Wall Bracket on horizontal Line B and align the center of the two holes on vertical Line C.
Holding the Bracket in position, drill pilot hole in top hole using 3/16” drill bit. Use a 7/16”
socket or nut driver to attach the Bracket to wall with 3” lag bolt. Tighten until snug but
movable. Ensure Bracket is level and drill second pilot hole and attach with a second 3” lag
bolt. Tighten both 3” bolts.
M3. ATTACH LEFT END ASSEMBLY TO LEFT WALL BRACKET. Slide the pre-assembled Left End
Assembly under the lower lag bolt head on Left Wall Bracket. This will temporarily hold the
Assembly in place. Insert 5/16” bolt through bottom of Left Wall Bracket and the Assembly,
then hand tighten with included nut. Check to make sure the Left End Assembly is
perpendicular to wall with a framing square. Tighten nut and bolt with 1/2” wrench and socket
or wrench and nut driver.
M4. ATTACH DIAGONAL WALL BRACKET TO
WALL. Place 2' level on the assembly and
push the diagonal to the wall so that the top
wall bracket rests flat on the wall, aligning
holes to upper vertical Line C. Check level and
draw 2” horizontal level line at the top of the
bracket. Holding the top bracket in position,
drill the first pilot hole with a 3/16” drill bit. Use
7/16” socket wrench or nut driver to attach the
top bracket to the wall with 3” lag bolt. Make
sure that the top bracket is level and pre-drill
pilot hole and attach second lag bolt. Use a
1/2” wrench and socket or wrench and nut
driver to tighten all the 5/16” bolts and nuts on
the Left End Assembly.
LAY OUT SHELF – CONSTRUCTION LINES:
M1. To determine the starting point, find the first available stud from the left obstruction (e.g.,
window, stairs, garage door track, door, etc.). Measure 84” from the floor and make a
small mark. This will be your starting point. From that point, draw a level and horizontal
line from left to right the length of the kit you ordered. This line will be referred to as Line
B. Locate the nearest stud to the end of this line. It may be left or right from this end
point. This stud will be your stopping point.
M5. MARK LOCATION OF TEE ASSEMBLY ON WALL. Along Line B find the first available stud
nearest to 48” from the previously installed assembly. Locate the center of the stud and mark
with a 2” vertical mark (Line C).
M6. ATTACH TEE WALL BRACKET TO WALL. Place bottom of 2' level on Line B aligning with the
edge of Line C. Make a plumb (vertical) mark at top of the level. Place the top of the Tee Wall
Bracket on horizontal Line B and align the center of the two holes on vertical Line C. Holding
the Tee Wall Bracket in position, drill pilot hole in top hole using 3/16” drill bit. Use a 7/16”
socket wrench or nut driver to attach Tee Wall Bracket to wall with 3” lag bolt. Tighten until snug
but movable. Ensure Tee Wall Bracket is level, drill second pilot hole, and attach second 3” lag
bolt. Tighten both 3” bolts.
INSTALL TEE ASSEMBLY(IES): – (If your Kit is the 4' Model, skip to Step M 9)
 Loading...