EasyManua.ls Logo

RIDGID KWIK-SPIN User Manual

RIDGID KWIK-SPIN
3 pages
To Next Page IconTo Next Page
Page #1 background imageLoading...
Page #1 background image
WARNING
Wear appropriate protective equipment including
safety glasses and leather gloves. Drains may con-
tain hazardous chemicals or bacteria.
If you have any question concerning this RIDGID
®
product:
Contact your local RIDGID distributor.
Visit www.RIDGID.com or www.RIDGID.eu to find your
local RIDGID contact point.
Contact RIDGID Technical Services Department at rtctech-
services@emerson.com, or in the U.S. and Canada call
(800) 519-3456.
Specifications
The Kwik-Spin cleans drain lines up to 1
1
/
2
" in diameter. It is
not recommended for toilets. The cable is positively retained
in the drum to prevent cable pullout.
Before Use
Inspect Kwik-Spin. Do not use if damaged. Inspect the drain.
Determine if chemicals are present. Some chemicals have spe-
cific health and handling considerations that should be provid-
ed by the manufacturer. Confirm the Kwik-Spin is appropriate
for the job.
Drain Access
Thread through crosshairs
(Figure 1)
.
Unscrew cleanout plug or remove trap
(Figure 2)
.
Pop-up Drain: Remove lift rod and drain plug
(Figure 3)
.
Bathtub overflow: Remove overflow plate and internal
mechanism
(Figure 4)
.
Figure 3 Figure 4
KWIK-SPIN Instruction Sheet
Operating Instructions
1. Insert cable into drain. Position unit as close to drain as
possible. Squeeze trigger and press lock button to engage
the AUTOFEED
®
lock
(Figure 5)
.
2. Turning drum clockwise advances cable. Counter-clock-
wise retracts cable. Advance cable until you encounter the
blockage
(Figure 6)
.
3. Work cable through blockage. DO NOT force cable. Work
cable back and forth 2-3 times
4. Retract cable
(Figure 7)
. After flow is established, if pos-
sible run water to clear debris and clean cable
(Figure 8)
.
5. Squeeze trigger and press lock button to disengage AUTO -
FEED
®
lock.
6. Rinse cable and drum. Air dry before storage to prevent
rust.
Figure 7 Figure 8
RIDGID
®
3/12
999-999-433.10
REV. A
Printed in U.S.A.
EC38998
Figure 1 Figure 2
KWIK-SPIN : Mode d'emploi
AVERTISSEMENT
Porter un équipement deprotection, y compris des
lunettes de sécurité et des gants de cuir. Les évac-
uation peuvent contenir des produits chimiques
dangereux ou des bactéries.
En cas de questions concernant ce produit RIDGID
®
:
Consultez votre distributeur RIDGID.
Consultez les sites www.RIDGID.com ou www.RIDGID.eu
pour localiser le représentant RIDGID le plus proche.
Figure 5 Figure 6
Question and Answer IconNeed help?

Do you have a question about the RIDGID KWIK-SPIN and is the answer not in the manual?

RIDGID KWIK-SPIN Specifications

General IconGeneral
Cable Length25 ft
Handle TypeErgonomic
Model NumberKWIK-SPIN
MaterialSteel
Weight3.5 lbs
TypeHandheld

Summary

Warning and Safety Precautions

Wear Protective Equipment

Wear safety glasses and leather gloves as drains may contain hazardous chemicals or bacteria.

Contact RIDGID for Questions

Contact local distributor, visit RIDGID.com/.eu, or call Technical Services for product inquiries.

Specifications

Before Use

Inspect for Damage and Chemicals

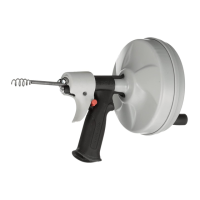
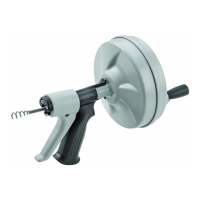
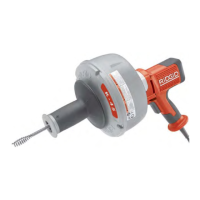
Inspect the Kwik-Spin for damage. Determine if chemicals are present and confirm the tool's suitability for the job.

Operating Instructions

Insert Cable and Engage AUTOFEED

Insert cable into drain, position unit, squeeze trigger, and press lock to engage AUTOFEED.

Advance Cable

Turn drum clockwise to advance cable; counter-clockwise retracts. Advance until blockage is met.

Work Through Blockage

Work the cable back and forth 2-3 times to clear blockage. Do not force the cable.

Retract Cable and Flush

Retract the cable after flow is established. Run water to clear debris and clean the cable.

Disengage AUTOFEED Lock

Squeeze the trigger and press the lock button to disengage the AUTOFEED lock.

Rinse and Dry

Rinse the cable and drum thoroughly. Air dry before storage to prevent rust.

Drain Access Methods

Crosshairs Access

Thread the cable through the crosshairs for drain access.

Cleanout Plug or Trap

Unscrew the cleanout plug or remove the trap for drain access.

Pop-up Drain Access

Remove the lift rod and drain plug for pop-up drain access.

Bathtub Overflow Access

Remove the overflow plate and internal mechanism for bathtub overflow access.

Related product manuals