Do you have a question about the ring Stick Up Cam Plug-In and is the answer not in the manual?
Plug the camera's power cable into the device and then into an outlet.
Get the Ring app from the App Store or Google Play, or visit ring.com/app.
Open the Ring app, select 'Set Up a Device', then 'Security Cams'.
You will need your Wi-Fi password during the setup process.
A flashing blue light indicates a software update; do not unplug.
After setup, check the live video feed in the Ring app.
Select a spot indoors or outdoors, on a flat surface or wall, near a power outlet.
Plug in the camera and place it on a flat surface like a table or shelf.
Swivel the base and tilt the camera to achieve a downward viewing angle.
Unscrew the camera's base using a Phillips-head screwdriver.
Slide the mounting bracket down to detach it from the camera base.
Position the bracket with the 'UP' arrow pointing up, then secure with screws.
Align grooves on the base with bracket hooks and slide down to secure.
Screw the camera's base back on, ensuring the 'UP' arrow faces upward.
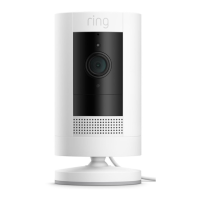
The Ring Stick Up Cam Plug-In is a versatile security camera designed for both indoor and outdoor use, offering peace of mind through continuous monitoring and smart alerts. This device is part of the broader Ring ecosystem, allowing for seamless integration with other Ring products and management through the intuitive Ring app.
The primary function of the Stick Up Cam Plug-In is to provide real-time video surveillance of your property. It captures high-definition video, allowing you to see and hear what's happening around your home from anywhere using your smartphone, tablet, or PC. The camera is equipped with motion detection capabilities, which can be customized to alert you whenever activity is detected in specified zones. This ensures that you are only notified about events that matter to you, reducing unnecessary alerts.
When motion is detected, the camera can automatically begin recording, storing the footage in the cloud (with a Ring Protect subscription) for later review. This cloud storage allows you to go back and watch events, download important clips, and share them with others if needed. The camera also features two-way audio, enabling you to speak to visitors or deter intruders directly through the Ring app. This is particularly useful for communicating with delivery drivers, greeting guests, or even checking in on pets when you're away from home.
The Stick Up Cam Plug-In is powered by a standard electrical outlet, providing continuous power and eliminating the need for battery changes. This makes it an ideal choice for locations where constant surveillance is desired and a power source is readily available. Its robust design allows it to withstand various weather conditions, making it suitable for outdoor installation, while its sleek appearance also blends well into indoor environments.
Setting up the Stick Up Cam Plug-In is designed to be straightforward and user-friendly. The process begins with downloading the Ring app, which guides you through each step. Once the app is installed, you'll select "Set Up a Device" and follow the prompts to connect your camera to your home's Wi-Fi network. It's crucial to have your Wi-Fi password handy during this stage.
Powering up the device is as simple as plugging the included power cable into the back of the camera and then into a standard electrical outlet. The camera will then begin its boot-up sequence. If the blue light on the front of the camera flashes after setup, it indicates that the device is updating its software. It is important not to unplug the camera during this update process to avoid interruption or potential damage.
The Stick Up Cam Plug-In offers flexible placement options. It comes ready to be placed on a flat surface, such as a table or shelf, making it easy to position indoors or in covered outdoor areas. For those who prefer a downward camera angle, the base can be swiveled around so that the long side faces the front, allowing the camera to be tilted downward for optimal viewing.
Alternatively, the camera can be wall-mounted for a more permanent installation. To wall-mount, you first remove the base by unscrewing it with a Phillips-head screwdriver. Then, the mounting bracket slides off the base. The bracket is then secured to the wall using the included screws, ensuring the "UP" arrow on the bracket points upward. After the bracket is mounted, the base is re-attached to the camera, with the "UP" arrow on the bracket pointing upward as it screws into the back of the camera. Finally, the camera is mounted by guiding the grooves on its base onto the hooks of the wall bracket and sliding it down to secure it. After any installation, it is recommended to check the live video feed in the Ring app to confirm that you have the desired view.
The Ring app serves as the central control hub for your Stick Up Cam. From the app, you can access the live view at any time, review recorded events, customize motion detection settings, adjust privacy zones, and manage other device settings. The "Live View" button in the app allows you to instantly see what your camera sees, providing immediate access to your property's surveillance.
The Ring Stick Up Cam Plug-In is designed for minimal maintenance, primarily focusing on ensuring continuous operation and optimal performance. Since it is a plug-in device, there is no need to worry about battery life or recharging, which simplifies ongoing care.
Regularly checking the camera's field of view through the Ring app is a good practice to ensure that no obstructions have appeared that might block the camera's perspective. Over time, dust, dirt, or spiderwebs can accumulate on the camera lens or housing, especially if installed outdoors. Periodically wiping the lens and the camera body with a soft, clean cloth can help maintain clear video quality. Avoid using harsh chemicals or abrasive materials that could scratch the lens or damage the device's finish.
Keeping the Ring app updated to the latest version is also important, as updates often include performance improvements, new features, and security enhancements. Similarly, the camera itself receives software updates automatically, as indicated by the flashing blue light. It is crucial to allow these updates to complete without interruption by ensuring the camera remains powered on.
If you experience any connectivity issues, troubleshooting steps typically involve checking your Wi-Fi signal strength in the camera's location and ensuring your router is functioning correctly. The Ring app often provides diagnostic tools and guidance for resolving common issues.
For outdoor installations, ensuring that the power cable connection is secure and protected from the elements can help prevent wear and tear. While the camera is designed to be weather-resistant, taking precautions to minimize direct exposure to extreme conditions can prolong its lifespan.
In summary, the Ring Stick Up Cam Plug-In offers a robust and user-friendly solution for home security, providing continuous surveillance, smart alerts, and two-way communication, all managed through a convenient mobile app. Its flexible installation options and low maintenance requirements make it a practical choice for enhancing the security of any home.
| Type | IP security camera |
|---|---|
| Operating frequency | 2400 MHz |
| Placement supported | Indoor & outdoor |
| Connectivity technology | Wireless |
| Wi-Fi | Yes |
| Ethernet LAN | - |
| Wi-Fi standards | 802.11b, 802.11g, Wi-Fi 4 (802.11n) |
| Built-in HDD | No |
| Form factor | Box |
| Mounting type | Desk/Wall |
| Product color | White |
| Minimum illumination | - lx |
| Number of sensors | 1 |
| Operating temperature (T-T) | -20 - 50 °C |
| Mobile operating systems supported | Android, iOS |
| Total megapixels | - MP |
| Maximum resolution | - pixels |
| Audio system | 2-way |
| Harmonized System (HS) code | 85258900 |
| Width | 60 mm |
|---|---|
| Height | 97 mm |