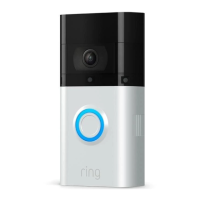

Do you have a question about the ring VIDEO DOORBELL and is the answer not in the manual?
The central hub of your Ring Alarm system, connecting all devices to the Ring app.
Hands-on control for your Ring Alarm system, mountable or table-placed.
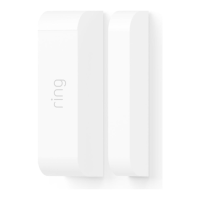
Alerts you when a door or window is opened; uses magnet and mounting hardware.
Alerts you to movement inside your home; mounts using included hardware.
Extends the Z-Wave wireless network to reach distant Alarm devices.
Get the latest Ring app from your device's app store for iOS or Android.
Set up a new account with your address or log in with existing credentials.
Navigate the app menu to begin the Base Station setup process.
Connect the Base Station, press the pairing button, and allow for software updates.
Learn the meaning of LED light patterns during pairing and internet connection.
Automated calls to contacts for security issues; requires Ring Protect Plus subscription.
Alarm sounds locally, but no automated calls are sent to monitoring services.
Visit ring.com/protect-plans, subscribe, then configure in the Ring app.
Contacts must answer calls, respond to home, grant access, and use Ring Alarm if asked.
Connect, configure, and install each device sequentially for optimal setup.
Connect, configure, and install devices one by one. Do not pull out all tabs at once.
Place between Base Station and distant devices; adjust socket location for best performance.
Line up notches, max 1.27cm apart. Configure as Door/Window, set Entry/Exit Delays for doors.
Find brackets, choose location, mount brackets, snap sensor and magnet.
Sensor is 'tampered' if cover is opened. Bypass needed to arm if sensor is tampered.
Normal/Test modes. Detects motion, notifies on first detection or every 15s in Test Mode.
Install 2.1m high, avoid heat sources, ignore pets under 22kg, ensure clear line of sight.
Illustrations and steps for installing a Motion Detector on a wall or in a corner.
Connect (pull tab), Configure (name/room), Install (mount bracket, snap detector).
Connect via USB, name/assign to a room, create a personal access code.
The Keypad can be mounted flush on a wall or placed on a table.
Instructions for detaching and flipping the bracket to use the Keypad on a table.
Instructions for mounting the bracket, using anchors/screws, and sliding the Keypad onto it.
Details on Disarmed, Away (all sensors armed), and Home (door/window sensors armed) modes.
Arm/disarm using the Keypad with a code or by tapping the Mode in the Ring app.
Allows arming the system while ignoring a specific sensor until next arming.
Step-by-step guide on how to add users to your Ring account via the app.
Suggestions for comfortable use: sharing access, checking detectors, setting delays, saving numbers.
Short delays, poor setup, or wrong mode selection can lead to false alarms.
Make contacts Shared Users, ensure comfort with arming, save monitoring number.
Links to ring.com/alarm-faq for common questions about sensors, lights, Alexa, and false alarms.
This manual describes the Ring Alarm system, a comprehensive home security solution designed to keep your home safe and provide peace of mind. The system consists of several interconnected devices that work together to detect security threats and alert you and your emergency contacts.
The Base Station serves as the central hub of your Ring Alarm system. It connects all your Alarm devices to the Ring app, allowing you to stay in control of your home from anywhere. The Base Station connects to power using an included power supply. During setup, the app will guide you to press the Pairing button on the back of the Base Station until a blue ring begins spinning, indicating it's ready to pair. When the Base Station connects to the internet for the first time, it will automatically begin a software update, which may take a few minutes. During this update, the LED light will show a blue ring with yellow spinning around. Once complete, the LED will be solid blue. The LED light ring uses different colors and patterns to indicate its status, such as blue spinning for "ready to pair," blue solid for "pairing successful," blue flashing for "pairing failed," white climbing for "connecting to Wi-Fi," white solid for "connected to Wi-Fi or Ethernet," and white flashing for "Wi-Fi network connection failed."
The Keypad provides hands-on control of your Ring Alarm system. You can mount it on a wall or place it on a table near a frequently used door. It connects to power using a USB power supply and cable. The Keypad is used to arm and disarm your Alarm, making it a crucial component for daily interaction with the system. It's recommended to place it in a hallway or near the door you most often use to exit and enter, and some users may install a second Keypad in their bedroom for easy access at night. To connect the Keypad, plug it into a socket using the included USB cable and wall adapter. You'll then give it a unique name, assign it to a room, and create a personal access code for arming and disarming the Alarm. The Keypad can be mounted flush on a wall using the mounting bracket, wall anchors, and screws, or placed on a table using the reversible bracket. It can be left plugged in or unplugged.
Contact Sensors are designed to alert you when a door or window is opened. They can be installed on any door or window, regardless of direction, as long as the notches on the Sensor and its magnet line up and are no more than 1.27cm (1/2") apart. The Sensor uses a magnet and mounting hardware included with the Contact Sensor Install Kit. It's recommended to install Contact Sensors on every door and window that could be used to gain access to your home, including all first-floor windows and any second-floor windows above a garage, porch, or large tree. To connect a Contact Sensor, pull the tab out of the back. Using the app, choose its placement (Door or Window), give it a unique name describing its location, and assign it to a room. If used on a door, configure the Placement setting to "Door" and decide if it's a primary or secondary door. Primary doors have Entry and Exit Delays to prevent accidental alarm triggers. The brackets for the Sensor and magnet are found in the accessory bag. Mount them using the included tape or screws, ensuring the Sensor and magnet are no more than 1.27cm apart and their notches are aligned. Snap the Sensor and magnet onto their brackets. Opening a Sensor cover will show it as "tampered" in the Ring app, returning to normal when closed. If you need to arm the Alarm while a Sensor is tampered, you'll be prompted to bypass it.
Motion Detectors are smart devices designed to detect movement through rooms and hallways where an intruder would likely pass, while allowing residents to move freely. In Normal Mode, the sensor detects motion constantly but only notifies you of the first detection. After three minutes of no activity, it restores and is ready to notify again. In Test Mode, it detects motion constantly and notifies every 15 seconds, which is useful for testing blind spots, pet immunity, and environmental triggers. Motion Detectors should be installed 2.1m (7') above the floor and can be placed in a corner or on a flat wall. They require a line of sight view of the room without obstacles or blind spots and should never face heat sources like stoves, fireplaces, or windows with direct sun. They are designed to ignore pets under 22kg (50lbs) when set to the lowest motion sensitivity settings. To connect a Motion Detector, pull the tab out of the back. In the app, decide if it will be used in an entryway or a room, give it a unique name, and assign it to a room. Locate the bracket in the accessory bag, mount it using included tape or screws, and then snap the Motion Detector onto its bracket.
Range Extenders expand the Z-Wave wireless network of your Ring Alarm, enabling your devices to communicate with the Base Station over greater distances. To connect a Range Extender, plug it into any socket for pairing. Using the app, give it a unique name and assign it to a room. For optimal performance, plug the Range Extender into a socket located between your Base Station and your most distant Alarm devices. You may need to experiment with different sockets within your home to find the best placement.
Setting up your Ring Alarm involves a few steps. First, download the Ring app for your iOS or Android device and ensure you have the latest version. Next, create your account. If you're new to Ring, tap "Create Account" and follow the prompts to enter your home address, name, email, and create a password. If you already have a Ring account, log in using your existing credentials. Once your account is set up, you're ready to begin setting up your Ring Alarm. From the app's Menu, tap "Set up a device," then "Security Devices," and finally "Base Station." The app will guide you through the process step-by-step. For any questions or help, you can visit ring.com/alarm-faq.
Ring Alarm offers two monitoring options: Assisted Monitoring and self monitoring. Assisted Monitoring sends automated calls to you and your emergency contacts when your Ring Alarm detects a security issue and sounds the alarm. This requires a subscription to Ring Protect Plus, which also provides Cellular Backup in case your internet goes down. To set up Assisted Monitoring, subscribe to the Ring Protect Plus plan via ring.com/protect-plans after adding your Base Station, then use the Ring app to configure it. If you choose self monitoring, your Alarm will sound in an emergency, but it won't signal a monitoring service, and your emergency contacts won't receive automated calls. You can switch to Assisted Monitoring at any time.
With Assisted Monitoring, when an alarm signal is received, the monitoring service will call your list of emergency contacts. These are trusted individuals who can answer the call and take care of your home if you're unreachable. Emergency contacts should be able to answer their phone and handle Alarm emergencies, respond to your home if assistance is needed, unlock your home for emergency responders if necessary, and use your Ring Alarm to disarm it if asked by authorities. It's recommended to save the Ring Alarm number (+44 800 802 1205) as a contact so you recognize their calls during an emergency.
Your Ring Alarm system has three Security Modes: Disarmed, Away, and Home. You can switch between them using the Keypad or the Ring app.
To arm or disarm using the Keypad, enter your personal access code and then press the Disarmed, Away, or Home Mode button. In the app, simply tap your desired Mode. Disarming the system during an alarm will cancel the alarm signal sent to the monitoring service. If you disarm within 60 seconds of the alarm sounding, you may not receive calls from the monitoring service.
The bypass feature allows you to arm your Alarm while temporarily ignoring a specific Sensor until the next time you arm your Alarm. This is useful if you need to leave a window open or if a device has an issue that needs to be resolved later. When using the Keypad, if a Sensor needs bypassing, the Keypad will prompt "Sensors require bypass," the "!" icon will turn on, and the "✓" button will blink. Pressing "✓" accepts the bypass; doing nothing cancels arming. In the app, you'll receive a notification if a Sensor needs to be bypassed.
Entry Delay provides a short period to disarm your Ring Alarm when entering your home. You'll hear reminder chirps, and if you don't disarm before the delay ends, the siren will sound. Exit Delay gives you a short period to leave your home after arming. You'll hear chirps reminding you of the remaining time, and when the delay ends, your Alarm will be in Armed Mode. Opening your door will then trigger the Entry Delay. To use these delays, set the Contact Sensor Placement setting to "Main Door." You can customize each delay for any time between 0 seconds (no delay) and 180 seconds (3 minutes), ensuring you have enough time to arm and disarm.
Your Ring Alarm system can send notifications to your phone and email for various events, such as when a device goes offline, when the alarm begins to sound, or when a device has a low battery. To adjust which notifications you receive, open the side menu in the app, tap "Settings," and select "Alarm Alerts." Both you and your Shared Users can turn preferred notifications on or off.
You can invite trusted people to use your Ring Alarm and provide them with limited access.
To add users, open the side menu in the Ring app, tap "Settings," then "Users." Tap the "+" icon (Android) or "Add User" button (iOS) or "+" button in the header bar (Web). Then select the user type. For Shared Users, choose an access code, then tap "Send Invite" (invitations expire in seven days if not accepted). For Guest Users, choose an access code, tap "Done," and provide it to the user. To delete a user, tap their name and "Remove User." To remove only Alarm access, tap their name and the checkmark next to "Alarm Base Station."
The Ring Alarm features a Panic alarm for emergencies. To trigger it, press and hold the "X" and "✓" buttons on the Keypad simultaneously for three seconds. This will sound the siren. If you have Assisted Monitoring, it will also send a signal to the monitoring service, which will call your emergency contacts one at a time until someone is reached.
Practicing arming and disarming your Ring Alarm regularly helps everyone in your home become comfortable with the system, reduces false alarms, and helps you customize settings. Suggestions for comfort and security:
False alarms occur when something accidentally triggers the Alarm without a real emergency. Common causes include:
Ways to prevent false alarms:
For more tips on avoiding false alarms and other questions, visit ring.com/alarm-faq.
| Operating temperature (T-T) | -20.5 - 48.5 °C |
|---|---|
| Frequency | 2400 MHz |
| Product color | Black |
| Connection type | Wireless |
| Quantity | 1 |
| Indication light | Yes |
| Input voltage | 8 - 24 V |
| Power source type | AC, Battery |
| Wi-Fi standards | 802.11b, 802.11g, Wi-Fi 4 (802.11n) |
| Field of view | 180 ° |
| Supported video modes | 720p |
| Depth | 22.1 mm |
|---|---|
| Width | 61.7 mm |
| Height | 126.5 mm |