Do you have a question about the ring Video Doorbell Gen.2 and is the answer not in the manual?
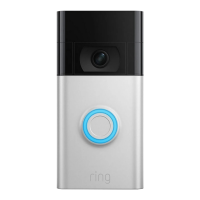
This document outlines the installation and setup process for the Ring Video Doorbell (2nd Generation), a device designed to enhance home security and convenience by providing video monitoring and communication at your doorstep. The installation is presented as a straightforward, step-by-step guide, making it accessible for users with varying levels of technical expertise.
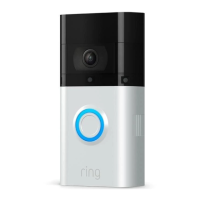
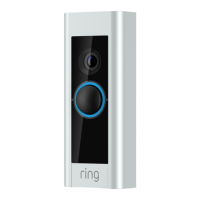
The primary function of the Ring Video Doorbell is to allow users to see, hear, and speak to visitors from anywhere, using their smartphone, tablet, or PC. It integrates with an existing doorbell system, or can operate independently using its built-in battery. The device captures video footage of activity at your front door, offering peace of mind and an added layer of security. Motion detection capabilities alert you to visitors or suspicious activity, even before someone rings the doorbell.
The installation process begins with Step One: Charge the built-in battery. This crucial initial step ensures the device has sufficient power for setup and operation. The battery is charged by connecting it to a USB power source using the provided orange cable. A clear indicator for a fully charged battery is when only one of the two LEDs on the battery remains lit. This ensures the device is ready for immediate use upon installation, especially if it will be operating solely on battery power.
Step Two: Remove your existing doorbell (optional), is relevant for users who are replacing an older doorbell system. This step emphasizes safety by instructing users to shut off power to their doorbell system at the breaker before removing the old doorbell button and disconnecting its wires. This prevents electrical hazards during the installation. A key note here specifies the transformer requirements for wiring the Ring Doorbell to an existing system: 8-24 VAC, 40VA max, 50/60Hz. It also explicitly states that DC transformers and most intercoms are not supported, guiding users on compatibility.
Step Three: Line Up your Ring Video Doorbell (2nd Generation), focuses on precise placement for optimal performance. Users are instructed to click the included level tool into a small hole on the front of the doorbell, below the camera. The recommended placement is approximately 1.2 meters (4 feet) from the ground, next to the door. The level tool helps ensure the device is mounted straight, and users are advised to mark the positions for mounting holes with a pencil. This step is critical for achieving a clear and level camera field of view and effective motion detection. The diagram illustrates the camera's field of view and the motion detection range, highlighting the importance of correct height for comprehensive coverage.
Step Four (Optional): Mark the screw holes, reiterates the importance of accurate placement. Users can use the mounting bracket as a template to mark the four corner holes. The recommended installation height of 1.2 meters above the ground is again emphasized, reinforcing the optimal positioning for the device's sensors and camera.
Step Five (optional): Drill the mounting holes (Only When Mounting on Brick, Concrete, or Stucco), provides specific instructions for different wall materials. For brick, concrete, or stucco, users are directed to use the included drill bit with a power drill to create holes at the marked positions. Plastic anchors, also included, are then inserted into these holes, possibly requiring a hammer for secure placement. If installing on wood, this step is skipped, simplifying the process for certain wall types. This adaptability ensures the doorbell can be securely mounted on a variety of surfaces.
Step Six (optional): Attach the wire extensions, addresses potential challenges in connecting wires. If the existing wires from the wall are difficult to connect to the back of the Ring Doorbell, provided wire extensions and wire nuts can be used. For wired installations, users must feed the doorbell wires through a hole in the mounting bracket first, then drive screws into the wall (or anchors) until they are flush with the bracket, securing it firmly.
Step Seven: Connect the wires (optional), details the electrical connection for wired installations. Users connect the wires from the wall to the screws on the back of the Video Doorbell. The order of connection for the wires does not matter. The compatibility with doorbell systems supplying 8-24 volts AC, 50mA, at 50 or 60Hz, 40VA max is reiterated. A helpful tip is provided for direct wiring to a doorbell transformer: connect a 25 ohm, 50W wirewound resistor in series with one of the doorbell wires to protect the Video Doorbell. This is a crucial detail for ensuring the longevity and proper functioning of the device in a wired setup. The note again warns against connecting to DC transformers, halogen or lighting transformers, or intercoms.
Step Seven (continued): Place Your Ring Video Doorbell over the holes, describes the final physical attachment of the device. Before this, users are reminded to remove the level tool from the front of the device. The doorbell is then hooked onto a tab on the mounting bracket via a slot on its rear, and pivoted down to sit flush on the bracket. This design ensures a secure and neat fit.
Step Eight: Screw in the Ring Doorbell, involves securing the device to the wall. All wires and wire nuts (if used) are tucked into the wall, and all four included screws are used to firmly attach the Ring Doorbell to the wall. This step ensures the device is stable and tamper-resistant.
Step Nine: Install the Security Screw, is the final step in the physical installation, focusing on security. One of the provided security screws is used with the star-shaped end of the screwdriver bit to secure the faceplate at the bottom of the Ring Video Doorbell. This screw helps prevent unauthorized removal of the device.
While the document primarily focuses on installation, it implicitly highlights a key maintenance feature: the rechargeable battery. The initial charging step and the mention of battery status indicators suggest that users will need to periodically recharge the battery if the device is not hardwired. The ease of charging via a standard USB power source simplifies this maintenance task.
The emphasis on using the correct security screws is also a form of preventative maintenance. The "Important!" note explicitly states: "For your safety, use only the short security screws under the faceplate. Using any other type of screw could damage the battery and create a potential fire hazard. If you feel that you may have used the wrong screw to install your doorbell, please contact Ring Support." This warning underscores the importance of using the correct components to prevent damage to the battery and ensure safe operation, thereby contributing to the device's longevity and user safety.
The document also provides links for further information on setting up the Ring Video Doorbell in the Ring app and charging the battery, indicating that the app is an integral part of managing and maintaining the device, including monitoring battery life and accessing other features. This suggests that the app serves as a central hub for ongoing interaction and maintenance.
| Video Resolution | 1080p HD |
|---|---|
| Field of View | 155° horizontal, 90° vertical |
| Connectivity | 802.11 b/g/n Wi-Fi connection @ 2.4GHz |
| Audio | Two-way talk with noise cancellation |
| Motion Detection | Adjustable Motion Zones |
| Color Options | Satin Nickel, Venetian Bronze |
| Compatibility | Works with Alexa |
| Power Source | Rechargeable Battery Pack or Hardwired |
| Operating Conditions | -5°F to 120°F (-20°C to 50°C) |
| Night Vision | Yes |