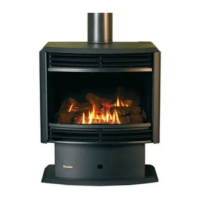
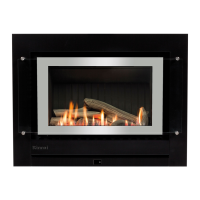
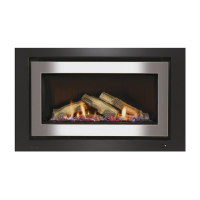
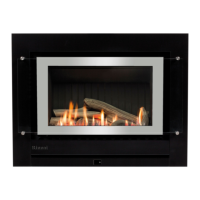
The Rinnai Flame Fire is a gas-fired space heater designed for both Australia (Freestanding Royale) and New Zealand (Timberflame FS 35) markets. It is a radiant/convector, glass-fronted appliance featuring a ceramic log set, an ember bed, and a heat burner. The heater operates with forced convection and a natural draught flue system, providing efficient heating for residential spaces.
Function Description
The primary function of the Rinnai Flame Fire is to provide warmth through both radiant heat and forced convection. It utilizes a natural draught flue system to safely vent combustion byproducts. The appliance is controlled via a push-button combination control system, allowing users to ignite the burner, adjust heat levels, and manage the fan operation.
Usage Features
Operation and Ignition:
To operate the Rinnai Flame Fire, controls are conveniently located under a cover on the top right-hand side of the heater.
- Ignition: To start the heater, firmly press the front control button. This action activates a built-in safety device and initiates an electronic spark, igniting the center burner. It is crucial to hold the button down for up to 15 seconds to ensure the burner remains lit. The spark will continue as long as the button is held. If the burner fails to remain alight, release the button to return it to the "OFF" position, wait 30 seconds, and then repeat the ignition procedure. It's important that the ignition button is in the "OFF" position before attempting re-ignition.
- Increasing Heat: To increase the heat output, press the control buttons sequentially from front to rear. This will ignite additional burners, expanding the burner pattern and increasing the heat. Unlike ignition, there is no need to hold these buttons for 15 seconds when increasing the heat.
- Decreasing Heat: Heat output can be decreased by releasing the control buttons in order from rear to front, which will extinguish burners and reduce the heat.
- Turning Off: To turn the unit off, press and release the buttons from back to front until all three buttons are in the "OFF" (UP) position. The fan will continue to operate until the heater has cooled down completely. Users should ensure all burners are extinguished.
Fan Operation:
The Rinnai Flame Fire includes a fan to aid in heat distribution.
- Fan Speed: On the LOW and MEDIUM heater settings, the fan can be operated at a LOW speed or turned OFF.
- Fan Delay: When the heater is turned on, there will be a brief delay before the fan starts operating. This feature is designed to prevent a cold draft from being circulated while the heater is warming up.
- Cool-down Operation: After the heater is turned off, the fan will continue to run until the unit has cooled down. This helps dissipate residual heat safely.
Power Failure Operation:
In the event of a power failure, the Rinnai Flame Fire can still be used on the low and medium heat settings. However, if the appliance is switched off during a power outage, it cannot be re-lit until power is restored. The appliance is equipped with an overheat switch that may cut out if the heater is used on the HIGH setting during a power failure, as this setting typically requires full electrical functionality for safe operation.
Safety Points:
Several safety guidelines must be followed to ensure safe operation:
- Air Discharge: Do not restrict the warm air discharge by placing any articles directly in front of the heater.
- Intended Use: The appliance is designed solely for heating purposes and should not be used for any other function.
- Aerosols: Avoid spraying aerosols while the heater is operating, as most aerosols contain butane gas, which can pose a fire hazard when used near a heat source.
- Children Supervision: Young children must be supervised at all times around the heater. Direct hand or body contact with the louvres should be avoided due to high temperatures.
- Sleeping Near Heater: Do not allow young children or infirm individuals to sleep directly in front of the heater.
- Sitting/Leaning: Do not sit on or lean against the appliance.
- Inserting Objects: Do not post any articles through the louvres.
- Combustible Materials: Ensure curtains or other flammable or combustible materials do not come into contact with the heater.
Maintenance Features
Troubleshooting:
The manual provides a troubleshooting guide to help users identify and resolve common issues:
- Burner Not Lighting: This could be due to no power, no gas, a power cut, air in the gas pipe, or an ignition failure. Solutions include checking power and gas supply, re-igniting after power restoration, purging air (installer task), or repeating the lighting procedure.
- Smell of Gas: Indicates a gas leak. The immediate action is to turn off the gas at the meter and call an installer.
- Fan Not Working: May occur if the heat switch is not activated or the fan is not turned on. Solutions involve allowing the heater to run on HIGH for at least 15 minutes to activate the heat switch or ensuring the fan switch is in the ON position.
- Small Soot Deposit: Considered normal operation and requires no action.
- Soot Deposit on Glass or Logs: Could be caused by an inadequate flue system, log misalignment, or incorrect gas pressure. This requires a call to Rinnai Service Dept./Agent.
- Condensation on Glass: Normal operation. Allow the heater to warm up to resolve.
- Streaky Lines on Glass: Normal operation. Remove and clean the glass.
Cleaning Instructions:
Before any cleaning, ensure the power and gas supply are turned off and the heater has completely cooled down.
- General Cleaning: Do not remove any internal wiring covers. Use only non-abrasive cleaners and avoid solvent-based cleaners.
- Outer Case: Clean the outer case with a soft, damp cloth. Do not use aerosol polishes on the casing while the heater is in operation.
- Glass Cleaning: Over time, the glass panel may require cleaning. When the heater is cold, refer to the log installation instructions to remove side panels and glass for cleaning.
Log Installation and Maintenance:
The log set is packed inside the heater and must be installed correctly before use.
- Initial Setup: Open both side panels, remove fastenings on the top glass retainer, lift the retainer, loosen screws on the bottom glass retainer, carefully lift the glass out, and remove log packaging.
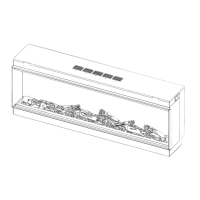
- Log Placement: The log set consists of a Main Log, a Top Log, and a Right Log. The Main Log has pins on top for the Top and Right Logs and holes underneath for location onto pins inside the heater. Ensure the Main Log's locating pins enter the corresponding holes on the heater's bottom face. Carefully position the Top Log and Right Log onto the locating pins of the Main Log.
- Ember Bed Material: Gently place loose ember bed material in front of the front log. Avoid pouring, as dust particles can block burner ports. Level the material with a pencil or screwdriver and remove any excess. The ember bed material should be placed after the logs are fitted. If logs are removed for any reason, the ember bed material must be removed first and replaced after the logs are refitted. Any material preventing the logs from sitting flat on the burner top can disrupt the burning pattern and performance.
- Reassembly: Replace the glass and top glass retainer, tightening the bottom glass retainer screws. Ensure the glass is fitted so that the join/gap in the glass seal is at the bottom. Take care not to damage seals. Reinstall side panels.
- Burn-in Period: When first lighting the heater, the logs require a burn-in period of approximately 2 hours. The flame color may change after this initial burning-in.
Installation and Commissioning:
Installation must be carried out by a certified Gas Installer in accordance with:
- Manufacturer's Installation Instructions.
- Local Gas fitting regulations.
- Municipal Building codes.
- AGA Gas Installation Code AG601 - NZ 5261.
- Any other relevant statutory regulation.
The installer must complete a checklist covering fireplace inspection, chimney inspection, flue liner system, gas pressure setting, log placement, ember granule placement, appliance sealing, and commissioning. The installer is also responsible for instructing the customer on the proper use and care of the unit, including ignition, heat level adjustment, fan switch operation, and turning the unit off.