EasyManua.ls Logo

RiverRidge Kids 6 Cubby Storage Activity Table User Manual

RiverRidge Kids 6 Cubby Storage Activity Table
9 pages
To Next Page IconTo Next Page
Page #1 background imageLoading...
Page #1 background image
ASSEMBLY INSTRUCTIONS
Kids 6 Cubby Storage Activity Table
White
ADULT ASSEMBLY REQUIRED
This product requires assembly by an adult because of small parts. Care should be taken
in unpacking and assembling this item to keep small parts away from children. During assembly
children should be kept away from the product due to possible risk of injury.
WARNING SEE FULL WARNING ON PAGE 2
Young children can be seriously injured or killed if furniture tips over. Don’t use
this item for a TV stand or place heavy objects on top of item. Always use
angle-braces or anchors to secure furniture to the wall.
Question and Answer IconNeed help?

Do you have a question about the RiverRidge Kids 6 Cubby Storage Activity Table and is the answer not in the manual?

RiverRidge Kids 6 Cubby Storage Activity Table Specifications

General IconGeneral
Product NameRiverRidge Kids 6 Cubby Storage Activity Table
CategoryIndoor Furnishing
MaterialWood
ColorWhite
Number of Cubbies6
Recommended Age3 years and up
Assembly RequiredYes
Weight Capacity50 lbs

Summary

Assembly Instructions

Product Identification and Assembly Requirements

States the product name and indicates that adult assembly is required due to small parts.

Initial Safety Warning

Provides a warning about potential injury and directs users to page 2 for detailed safety information.

Parts List

Main Components Identification

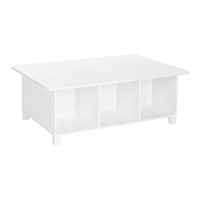
Lists and identifies the main structural components of the activity table with quantities.

Hardware and Tools Required

Lists hardware components, quantities, and necessary tools, advising against power screwdrivers.

Assembly Steps

Step 1: Prepare Top Board

Instructions for attaching cam bolts to the top board.

Step 2: Attach Side and Support Boards

Attaching side and support boards to the top board using dowels, cam bolts, and cam locks.

Step 3: Insert Divider Boards

Sliding the divider boards into grooves on the assembled structure.

Step 4: Attach Legs

Securing the legs to the bottom board using screws and an Allen wrench.

Step 5: Attach Bottom Board

Connecting the bottom board to side and support panels using dowels and screws.

Product Care and Maintenance

Adult Attention and Periodic Checks

Advises adults to check for damage or loose parts and take corrective action.

Cleaning Instructions

Provides guidance on cleaning the item using a damp cloth and wiping dry.

Related product manuals