5-3
HOW
TO
DISASSEMBLE
Order
1
2
3
4
5
6
7
8
Item
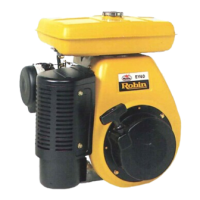
Engine
Fuel tank
Tank bracket
Air cleaner
Muffler cover
Muffler
Carburetor
Governor
lever
*Length of the bolt indicates the length from the bolt head bottom surface to the threaded end.
Procedures
Remarks
Drain engine oil.
case
the gasket.
Drain plugs on both sides of the
Be careful not to lose the
(1) Close the strainer cock.
(2)
Move the fuel pipe clamp (on
strainer side) downward.
(3)
Remove the tank from tank
bracket.
Remove tank bracket.
(1)
Remove
air
cleaner cover and
(2)
Remove choke knob.
(3)
Remove the bottom plate of
element.
air cleaner.
Remove muffler cover.
(1)
Remove the flange portion
(2)
Remove the muffler bracket.
of the muffler.
Remove the carburetor.
etc.
Be careful
of
the packing
Joint sheet, insulator, and
then paper packing, in ths
order from the engine side
Remove the governor lever.
Be careful
of
the position
of the governor spring.
Bolts, nuts, etc. used
Flange bolt
8
mm
(No.2)
nut
. .
.4
pcs.
SpI-ing washer
.
.
.4
pcs.
10
mm flange nut
.
.
.4
pcs.
(tightened together with
cylinder head)
Swivel
6
x
12 mm flange bolt
. .
.
2
pcs.
6
x
8
(5T) Flange bolt
*
.
.
4
pcs.
8
mm brass nut
. . .
2
pcs.
8
x
16
(ST) Bolt
&
washer
.
. .
2
pcs., Washer
.
.
.
1
pce
6
mm nut
. .
.2
pcs.
Spring washer
.
.
.
2
pcs.
Washer
.
. .
2 pcs.
6
mm special nut.
.
,
1
pce.
Washer
.
.
.
1 pce.
6
x
25
(7T)
bolt
. . .
1
pce.
Fig.
18
-
13
-