JUPITER-Xm Owner's Manual Ver. 1.5 and later
12
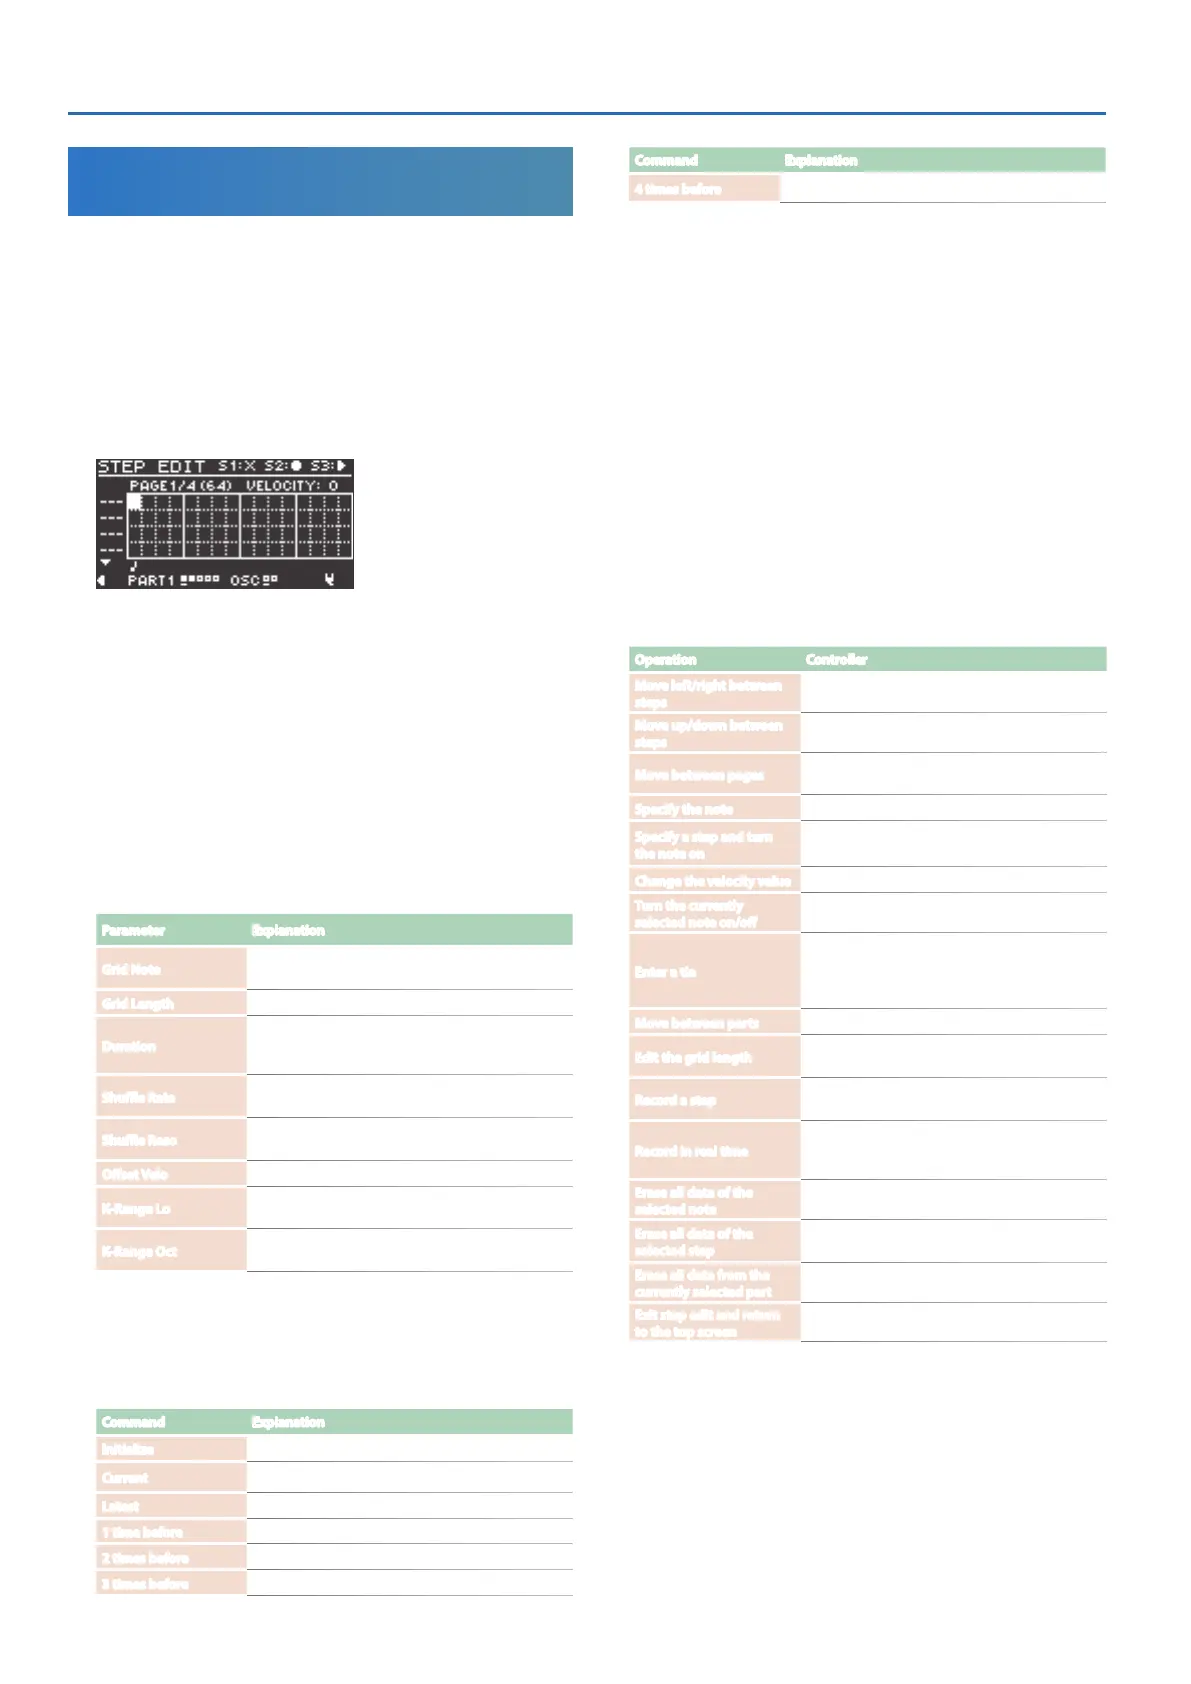
Editing Individual Steps of the Arpeggio
Performance (STEP EDIT)
The arpeggio performance is always recorded inside this unit. If you
like the performance, you can use the STEP EDIT function to extract
and edit it.
The edited pattern can be used as a user pattern for the arpeggiator, or
used in your computer as MIDI data.
You can also create a user pattern from a blank state without using
recorded data.
1. Press the [STEP EDIT] button.
The arpeggio stops playing, and the STEP EDIT screen appears.
* An empty STEP EDIT screen appears right after you press the [STEP EDIT]
button.
2. Set the part to edit.
Press the [PART] button and then press the [1]–[5] buttons to select
the part that you want to edit (the current part).
3. Press the [MENU] button.
The MENU screen for arpeggio play appears. Here you can
configure the basic settings for creating patterns, or copy existing
patterns.
SETTING
Configures the basic pattern settings.
Parameter Explanation
Grid Note
Specifies the note value represented by one grid of
the arpeggio.
Grid Length
Specifies the grid length for the arpeggio pattern.
Duration
Specifies the duration that the notes of the arpeggio
pattern are sounded, as a proportion of the note
length.
Shuffle Rate
Varies the timing of even-numbered beats, creating a
shuffle rhythm.
Shuffle Reso
Specifies the note resolution that is the reference for
the shuffle setting.
Offset Velo
Shifts the velocity values.
K-Range Lo
Specifies the lower pitch limit that is sounded by the
arpeggio.
K-Range Oct
Specifies the number of higher octaves in which the
arpeggio is sounded, relative to K-Range Lo.
COPY from I-ARP
Use this to copy the performance data of the arpeggio that was just
playing, and to edit this data on the STEP EDIT screen.
* You can use the [S3] button to preview the data.
Command Explanation
Initialize
Clears the step data of all parts.
Current
Loads the current step data.
Latest
Loads the most recently recorded data.
1 time before
Loads the recorded data from one pass before.
2 times before
Loads the recorded data from two passes before.
3 times before
Loads the recorded data from three passes before.
Command Explanation
4 times before
Loads the recorded data from four passes before.
* A “pass” means the length of the arpeggio pattern, set in “Grid Length.”
COPY from SCENE
Copies the performance data you like from a scene for editing in
the STEP EDIT screen.
* You can use the [S3] button to preview the data.
ERASE
Erases the performance data.
4. After making the settings, press the [EXIT] button to return
to the STEP EDIT screen.
The changes made on the MENU screen are also applied to the
STEP EDIT screen.
5. Edit using the STEP EDIT screen.
The following shows how to use the operations in the STEP EDIT
screen.
Using the STEP EDIT operations
Operation Controller
Move left/right between
steps
Press the PAGE [
ç
] [
æ
] buttons.
Move up/down between
steps
Press the PAGE [
ä
] [
å
] buttons.
Move between pages
Hold down the [SHIFT] button and press the PAGE
[
ç
] [
æ
] buttons.
Specify the note
Press a key
Specify a step and turn
the note on
Press a [1]–[16] button
* The velocity value that was set just before is inputted.
Change the velocity value
Turn the [2] knob.
Turn the currently
selected note on/off
Press the [ENTER] button.
Enter a tie
Move the cursor to the beginning of the tie, then
hold down the [SHIFT] button and press the
[1]–[16] button corresponding to the last step of
the tie.
Move between parts
Press the [PART] button to select the current part
Edit the grid length
Hold down the [SHIFT] button and turn the [1]
knob.
Record a step
When you play the keyboard while the [S2] button
is lit, a note is input for each step.
Record in real time
When you play the keyboard during preview
playback while the [S2] button is lit, notes are
recorded in real time.
Erase all data of the
selected note
Hold down a key and press the [S1] button.
Erase all data of the
selected step
Hold down a [1]–[16] button and press the [S1]
button.
Erase all data from the
currently selected part
Press the [S1] button.
Exit step edit and return
to the top screen
Press the [EXIT] button.
6. Use the [S3] button to play/stop, and listen to the result.
* The values specified for the arpeggio are applied to the number of
steps and the settings such as grid and shuffle.
7. If you want to edit these, exit the STEP screen and use the
ARP PART EDIT screen.
* You can use the [TEMPO] knob to change the tempo.

 Loading...


