EasyManua.ls Logo

Rugged Ridge 11210.11 - User Manual

Rugged Ridge 11210.11
3 pages
Print Icon
To Next Page IconTo Next Page
Loading...
460 Horizon Drive #400 | Suwanee, GA 30024 USA | www.omix-ada.com | Copyright © 2013 Omix-Ada
®
, Inc.
Page 1/3
11210.17 (Textured Black)
11116.07 (Silver)
11210.11 (Black)
JEEP
®
JK ALUMINUM HOOD CATCH
OMIX-ADA
®
TECHNICAL SUPPORT
PHONE: M-F 8am - 5pm EST 1-800-449-6649 | EMAIL: techsupport@omix-ada.com
FOR WARRANTY INFORMATION VISIT: www.Omix-Ada.com
Contents:
A - Latch
B - Latch Joint
C - Pivot Base Joint
D - Pivot Base
E - Catch
F - Pivot Base Gasket
G - Catch Gasket
H - Flat Head Bolts
I - Lock Nuts
J - Binding Posts
K - Jam Nuts
L - Adjustment Rod
M - Safety Snap
Suggested Tools:
Basic Hand Tools
A
B
C
D
E
F
G
H
I
J
M
J
J
J
K
L
Patent No. D692290
Assure hood is fully secure by undamaged Jeep® front latch & supplemental side
catches.
Do not modify hood or catches to defeat intended safety of Jeep® primary latch &
supplemental catch system.
Hood catch is intended only as supplemental to Jeep® supplied latch at front of hood.
To avoid risk of property damage or injury: Always;
CAUTION
!
Question and Answer IconNeed help?

Do you have a question about the Rugged Ridge 11210.11 and is the answer not in the manual?

Summary

JEEP JK ALUMINUM HOOD CATCH

Component Identification

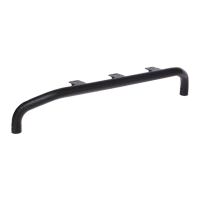
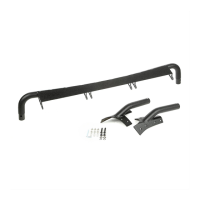
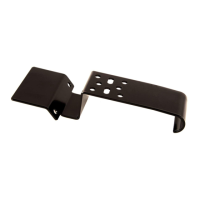
Lists and illustrates the various components of the JEEP JK Aluminum Hood Catch assembly.

Safety Precautions

Advises on proper installation and usage to avoid property damage or injury.

JEEP JK ALUMINUM HOOD CATCH Installation Steps

Step 1: Remove Factory Hood Catch

Instruction to remove the original hood catch from the vehicle.

Step 2: Remove Hood Bumper

Instruction to detach the hood bumper from the factory hood catch.

Step 3: Remove Pivot Base

Instruction to separate the pivot base from the aluminum hood catch assembly.

Step 4: Attach Hood Bumper

Instruction to secure the previously removed hood bumper to the pivot base.

JEEP JK ALUMINUM HOOD CATCH Installation and Adjustment

Step 5: Fasten Catch and Pivot Base

Instruction to attach the catch to the hood and the pivot base to the fender.

Step 6: Re-attach Assembly

Instruction to reconnect the aluminum hood catch assembly to the pivot base.

Step 7: Adjust Hood Catch Tension

Guidance on adjusting the hood catch tension using jam nuts and rod.

Step 8: Installation Complete

Confirms the successful installation and readiness of the hood catch.

Overview

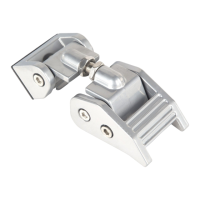
The document describes the installation and features of the Jeep JK Aluminum Hood Catch, a supplemental latch system designed for Jeep JK models. This product is available in three finishes: Black (11210.11), Silver (11116.07), and Textured Black (11210.17). The design is protected under Patent No. D692290.

Function Description:

The Jeep JK Aluminum Hood Catch serves as a supplemental latch system for the hood of a Jeep JK. Its primary function is to provide additional security for the hood, working in conjunction with the Jeep's factory-supplied front latch. The system is designed to keep the hood securely fastened, preventing accidental opening or movement, especially during driving. The latch mechanism allows for adjustment to ensure proper tension and contact with the hood bumper, contributing to a stable and secure hood closure.

Important Technical Specifications:

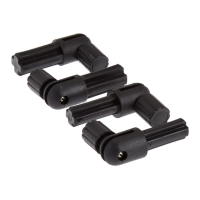
The hood catch assembly comprises several key components:

  • Latch (A): The main locking mechanism.
  • Latch Joint (B): Connects the latch to the pivot base.
  • Pivot Base Joint (C): Connects the pivot base to the fender.
  • Pivot Base (D): The mounting point for the latch assembly on the fender.
  • Catch (E): The component on the hood that the latch engages with.
  • Pivot Base Gasket (F) & Catch Gasket (G): Provide cushioning and sealing for the mounting points.
  • Flat Head Bolts (H): Used for fastening components.
  • Lock Nuts (I): Secure the bolts in place.
  • Binding Posts (J): Connect the hood catch assembly to the pivot base.
  • Jam Nuts (K): Used for adjusting tension.
  • Adjustment Rod (L): Allows for fine-tuning the latch tension.
  • Safety Snap (M): Ensures the catch is securely attached.

The system is designed to integrate with the existing hood bumper, which is transferred from the factory hood catch to the new pivot base.

Usage Features:

The installation process involves several steps, starting with the removal of the factory hood catch and its bumper. The new Aluminum Hood Catch is then assembled and mounted.

  1. Removal of Factory Components: The factory hood catch is removed, and its hood bumper is detached for reuse.
  2. Assembly of New Components: The pivot base is separated from the Aluminum Hood Catch assembly, and the factory hood bumper is attached to the new pivot base.
  3. Mounting: The catch component (E) is fastened to the hood, and the pivot base (D) is fastened to the fender.
  4. Re-attachment: The Aluminum Hood Catch assembly is re-attached to the pivot base using the binding posts.
  5. Adjustment: The latch tension can be adjusted by releasing the latch, loosening the jam nuts (K), and rotating the adjustment rod (L). Rotating clockwise increases tension, while counter-clockwise decreases it. Proper adjustment ensures the hood contacts and slightly compresses the hood bumper when closed.

Maintenance Features:

The document emphasizes critical safety and maintenance considerations:

  • Security Check: Users must always ensure the hood is fully secure using both the undamaged Jeep® front latch and the supplemental side catches.
  • No Modifications: The hood or catches should not be modified in a way that defeats the intended safety of the primary and supplemental latch systems.
  • Safety Snap: It is crucial to ensure the safety snap (M) is securely attached to the catch (E).
  • Adjustment Rod Engagement: During adjustment, the adjustment rod (L) must have thread engagement equal to or greater than 3 threads on each end. Operating the vehicle with inadequate thread engagement could lead to damage.
  • Technical Support: OMIX-ADA provides technical support via phone (1-800-449-6649, M-F 8am-5pm EST) and email (techsupport@omix-ada.com). Warranty information is available at www.Omix-Ada.com.

The product is intended as a supplemental safety measure and does not replace the primary hood latch system.

Rugged Ridge 11210.11 Specifications

General IconGeneral
BrandRugged Ridge
Model11210.11
CategoryAutomobile Accessories
LanguageEnglish

Related product manuals