Do you have a question about the Rugged Ridge 13552.51 and is the answer not in the manual?
Refer to owner's manual for lowering factory soft top or removing factory hard top.
Orient windbreaker and thread top straps around sport bar and through buckles loosely.
Pull fabric gently, thread straps through back of seat brackets, buckle, and tighten.
Zip windbreaker to tonneau cover extension using the zipper under the windbreaker flap.
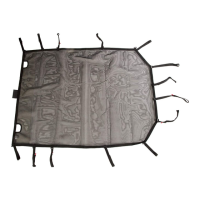
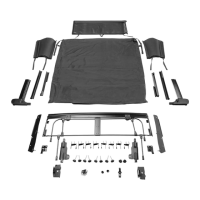
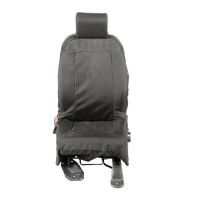
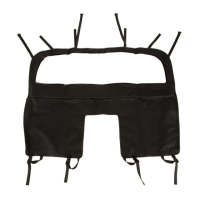
This document outlines the installation procedure for a "Windbreaker, 4 Door" accessory, designed for vehicles with either a soft top or a hard top. The primary function of this windbreaker is to reduce wind turbulence within the vehicle's cabin, particularly when the top is open or removed, thereby enhancing comfort for occupants. It features a window at the top and a vinyl side that faces the rear of the vehicle once installed.
The installation process is divided into several steps, beginning with the preparation of the vehicle. For soft top vehicles, the owner's manual should be consulted for instructions on lowering the factory top. Once the soft top is open, the shoulder bolts fastening it to the sport bar must be unscrewed, allowing for the removal of the soft top. Similarly, for hard top vehicles, the owner's manual provides instructions for removing the factory hard top. This initial step ensures that the vehicle is in the correct configuration to accommodate the windbreaker.
Once the vehicle's top is removed, the windbreaker can be oriented correctly. The windbreaker should be positioned with its window at the top and the vinyl side facing the rear of the vehicle. The installation then proceeds with securing the top portion of the windbreaker. This involves using the provided straps and buckles. The end of each top strap is threaded around the sport bar and then through its corresponding buckle. At this stage, the straps should only be loosely tightened. This loose fit is crucial as it allows for minor adjustments and ensures the windbreaker is held in place without being rigidly fixed, preparing it for the subsequent securing steps.
The next step focuses on securing the lower portion of the windbreaker to the vehicle's seat brackets. This involves gently pulling down on the fabric of the windbreaker to ensure it is taut. The straps located at the bottom of the windbreaker are then threaded through the back of the seat brackets. Once threaded, these straps are buckled, and all straps—both the top and bottom ones—are then fully tightened. This comprehensive tightening ensures that the windbreaker is securely fastened to the vehicle, preventing it from flapping or shifting during use. The design of the straps and buckles allows for a firm and stable attachment, contributing to the windbreaker's effectiveness.
A notable feature of this windbreaker is its compatibility with an optional tonneau cover extension. If the user intends to install the windbreaker with this extension, there is an additional step to follow. Otherwise, for standalone windbreaker installation, the process is complete after securing all straps.
For installations involving the optional tonneau cover extension, the windbreaker is designed to integrate seamlessly. This is achieved by zipping the windbreaker to the tonneau cover extension. The zipper for this connection is conveniently located under a flap on the windbreaker itself. This design detail ensures a neat and secure connection between the two accessories, creating a more enclosed and protected space within the vehicle. The flap likely serves to conceal the zipper when not in use or to provide a cleaner aesthetic.
The usage features of this windbreaker are primarily centered around enhancing the open-air driving experience. By reducing wind buffeting, it allows occupants to enjoy a more comfortable ride, even at higher speeds or in breezy conditions. The window integrated into the windbreaker ensures that rear visibility is not significantly impaired, maintaining a degree of safety and convenience. The vinyl material on the rear-facing side suggests durability and resistance to weather elements, which is important for an accessory exposed to the outdoors.
Maintenance features are not explicitly detailed in the provided document, but based on the materials and typical automotive accessories, some general considerations can be inferred. The vinyl material would likely benefit from regular cleaning with mild soap and water to remove dirt and grime, preserving its appearance and longevity. The straps and buckles, being critical for secure installation, should be periodically inspected for wear and tear, ensuring they remain functional and safe. Any signs of damage to the fabric, straps, or buckles would warrant attention to maintain the windbreaker's effectiveness and safety. Proper storage when not in use, perhaps folded and kept in a protective bag, would also contribute to its lifespan, preventing unnecessary exposure to harsh conditions or physical damage. The design with straps and buckles suggests that removal and reinstallation are straightforward, allowing for seasonal use or cleaning as needed. The integration with an optional tonneau cover extension highlights a modular design approach, offering flexibility to users who wish to combine accessories for enhanced functionality.
| Product Name | Rugged Ridge 13552.51 |
|---|---|
| Category | Automobile Accessories |
| Color | Black |
| Material | Thermoplastic |
| Finish | Textured |
| Compatibility | 2007-2018 Jeep Wrangler JK |