Do you have a question about the Ryobi TS1552LA and is the answer not in the manual?
Details the policy for exchanging defective RYOBI power tools within 30 days.
Outlines what defects are covered under the two-year limited warranty.
Explains the procedure for obtaining warranty service and authorized repair centers.
Specifies exclusions from the warranty coverage, such as misuse or unauthorized repairs.
Discusses limitations on implied warranties and liability for incidental damages.
Emphasizes reading and understanding the entire operator's manual before use.
Advises familiarization with the tool's applications, limitations, and hazards.
Instructions to prevent body contact with grounded surfaces to avoid electric shock.
Instruction to keep all guards in place and in good working order.
Habit of checking for and removing keys/wrenches before turning the tool on.
Maintaining a clean work area to prevent accidents.
Avoiding use in damp, wet locations or in rain; ensuring good lighting.
Keeping children and visitors at a safe distance from the work area and tool.
Securing the workshop with padlocks, master switches, or by removing starter keys.
Using the tool at its designed feed rate for better and safer performance.
Not forcing the tool or attachment to do a job it wasn't designed for.
Using a cord in good condition, heavy enough for the product's current draw.
Wearing appropriate clothing, avoiding loose items, and using protective hair covering.
Always wearing safety glasses with side shields for eye protection.
Using clamps or a vise to hold work for safer operation and free hands.
Maintaining proper footing and balance at all times.
Keeping tools sharp and clean for better and safer performance.
Disconnecting tools from power source before servicing or changing attachments.
Ensuring the switch is off when plugging in any tool.
Consulting the manual for recommended accessories to avoid injury.
Avoiding standing on the tool to prevent serious injury from tipping.
Checking damaged parts for proper operation before further use.
Feeding work into the blade against its direction of rotation.
Turning the power off and waiting for the blade to stop completely.
Wearing a face or dust mask if the cutting operation is dusty.
Wearing hearing protection during extended periods of operation.
Avoiding carrying the tool by the cord or yanking it to disconnect.
Using extension cords designed for outdoor use.
Maintaining clean, sharp blades to minimize stalling and kickback.
Notifying the user that the blade continues to spin after the switch is released.
Warning against using the tool in areas where flammable fumes may be ignited.
Regularly checking tool cords for damage and having them repaired by qualified technicians.
Regularly inspecting extension cords for damage and replacing them if necessary.
Explanation of polarized plugs and how to use them correctly to reduce shock risk.
Maintaining the tool in a dry, clean condition and avoiding specific cleaning agents.
Emphasizing alertness, control, and avoiding operation when tired or rushed.
Advising replacement of defective switches by an authorized service center.
Using blades with correct size holes and avoiding defective washers or bolts.
Ensuring all adjustments are secure before proceeding with a cut.
Inspecting the blade path for nails or other obstructions before cutting.
Warning against touching the blade or other moving parts while the tool is in use.
Prohibiting starting the tool when a rotating component is touching the workpiece.
Warning against operating the tool while under the influence of impairing substances.
Using only identical replacement parts when servicing the tool.
Using only accessories recommended in the manual to prevent injury.
Verifying blade tightness and ensuring no contact with saw or workpiece before powering.
Securing the tool to a workbench or table at approximately hip height.
Warning to keep hands clear of the cutting area and blade path.
Supporting long workpieces to minimize risk of pinching and kickback.
Using a clamp to secure the workpiece whenever possible.
Ensuring the blade is clear of the workpiece before starting the saw.
Locking the miter table and saw arm in position before operating.
Specifying materials that can and cannot be cut with the saw.
Warning against using length stops on the free scrap end of a clamped workpiece.
Prohibiting cutting or stacking more than one workpiece at a time.
Always guiding the workpiece against the fence or using other aids.
Warning against freehand holding of small workpieces.
Prohibiting reaching near the blade or its cutting path with hands or fingers.
Warning against reaching for workpieces or scraps near the blade path.
Avoiding awkward positions that could lead to hand contact with the blade.
Warning against positioning the body in line with the saw blade path.
Releasing the switch and waiting for the blade to stop before raising it.
Avoiding rapid on/off switching to prevent blade loosening or hazards.
Advising to stop operation and have damaged or missing parts replaced.
Maintaining constant alertness to prevent careless mistakes and severe injury.
Reinforcing material limitations for the saw.
Requiring replacement of damaged power cords by manufacturer or authorized center.
Ensuring adequate lighting in the work area for safe operation.
Turning off the saw before disconnecting to prevent accidental starting.
Powering off the tool and waiting for the blade to stop before changing settings.
Listing of required safety markings that should be present on the tool.
Instruction to carry the tool only by its designated handle.
Warning about direct eye exposure to the laser guide.
Encouraging users to save and refer to the instructions for future use and for others.
Defines the meaning of various symbols that may appear on the tool.
Details symbols for Volts, Amperes, Hertz, Watts, Minutes, AC/DC current, and RPM.
Explains symbols related to wet conditions, manual reading, eye protection, safety alerts, and hot surfaces.
Defines signal words like DANGER, WARNING, and CAUTION to indicate risk levels.
Advises against attempting use until the manual is understood, and to call customer service.
Emphasizes wearing safety goggles or a face shield to prevent eye damage from flying objects.
Explains the double insulation system and its safety benefits.
Details the required power supply (120 V, AC, 60 Hz) and warns against DC use.
Guidelines for selecting and using appropriate extension cords, including wire size charts.
Warnings about keeping extension cords clear of the work area and checking for damage.
Defines terms like Bevel Cut, Compound Cut, Cross Cut, Dado Cut, and Ripping.
Explains terms like Arbor, Featherboard, Kickback, Push Blocks, Saw Blade Path, and Set.
Lists technical specifications such as blade size, speed, input, and weight.
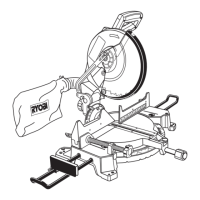
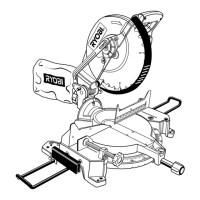
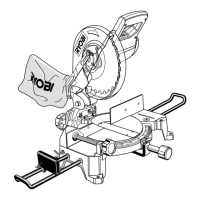
Identifies key parts of the miter saw with a labeled diagram.
Encourages familiarization with the tool's features and safety rules before use.
Describes the power and construction of the saw's motor.
Information about the included blade and its cutting capacity.
Details the location and function of the blade wrench.
Instructions on using the carrying handle for transport.
Explains how to securely lock the saw at desired miter angles.
Describes the function of the spindle lock button for blade installation/removal.
Instructions on preventing unauthorized use by locking the switch trigger with a padlock.
Details the preset positive stops for common miter angles.
Explains how the bevel lock knob secures the saw at desired bevel angles.
Describes the electric brake feature for quick blade stopping.
Information on the laser guide for accurate cutting.
Explains the function and adjustment of the sliding miter fence.
Describes the protective lower blade guard and its self-retracting feature.
Lists tools required for adjustments or blade installation.
Lists all items included with the compound miter saw.
Visual representation of the included loose parts.
Instructions for carefully removing the saw from its packaging.
Crucial safety warnings before and during assembly.
Details on securing the saw to a workbench or workstand using bolt holes.
Step-by-step instructions for installing the miter lock handle.
Instructions for fitting the dust guide over the exhaust port.
Procedure for attaching and removing the dust bag.
Instructions for installing the work clamp and its safety considerations.
Instructions for installing the rear bracket to prevent tipping.
Steps for installing table extensions and securing them with clamp brackets.
Instructions for installing and using the stop block for repetitive cuts.
Detailed instructions and safety warnings for blade installation and replacement.
Critical warnings regarding blade size, thickness, and proper alignment.
Step-by-step guide for fitting the blade, washers, and bolt.
Instructions for installing the laser guide, including safety precautions.
Explicit warning about laser radiation and avoiding direct eye contact.
How to align the laser line with the cutting mark for precision.
Procedure for aligning the miter table parallel to the fence using a framing square.
Steps to ensure the saw blade is parallel to the fence.
How to adjust the fence using socket head screws to align with the blade.
Procedure to align the saw blade perpendicular to the miter table.
Adjusting indicator screws on scales after alignment procedures.
General safety reminders for operating the miter saw.
Lists the intended applications for the miter saw.
Emphasizes clamping or bolting the saw to a workbench before operation.
Importance of securely tightening the miter lock handle before cutting.
Keeping hands clear of the blade path and avoiding freehand cuts.
Checking for interference between the blade and sliding fence before cutting.
General advice on cutting with the miter saw.
Warning about clamping workpiece on one side of the blade to prevent binding.
Step-by-step guide for performing miter and straight cross cuts.
How to use the miter lock plate for quick angle location.
Proper placement, support, and clamping of workpieces against the fence.
Performing a dry run and lowering the blade slowly through the workpiece.
Detailed instructions for making bevel cuts.
Setting bevel angles from 0° to 45° and securing with the bevel lock knob.
Proper workpiece placement and support for bevel cuts, including warp handling.
Instructions for making compound miter cuts, noting angle interdependence.
Proper workpiece placement and support for compound miter cuts.
Guidelines for supporting long workpieces with external supports.
Chart providing compound-angle settings for popular structures based on number of sides.
Instructions for accurately cutting crown molding using compound miter angles.
Method for accurately cutting crown molding by laying it flat on the table.
Provides specific bevel and miter angle settings for crown molding cuts.
Safely cutting warped or bowed material by positioning the convex side against the fence.
Guidance on using clamps for wide workpieces.
Warning to unplug the tool before performing any adjustments.
Notes on travel and bevel pivot adjustments, usually factory set.
Explains the depth stop function and when adjustment might be needed.
Step-by-step guide to adjusting the depth stop using wrenches.
Procedure to adjust positive stops for 0° and 45° angles by squaring the blade.
Instructions for aligning the laser guide using its adjustment screw.
Explicit warning about laser radiation and avoiding direct eye contact.
Warnings about using identical replacement parts and wearing safety gear.
Guidance on cleaning plastic parts and tool care.
States that bearings are lubricated for life and require no further lubrication.
Instructions for checking and replacing the saw's carbon brushes.
Steps for replacing the button cell batteries for the laser guide.
Caution regarding hazardous radiation exposure from improper adjustments.
Information on how to contact service centers for repair parts or service.
Space provided to record the tool's model and serial number.
Guidance on providing necessary information when ordering repair parts.