English 15
02 Connections
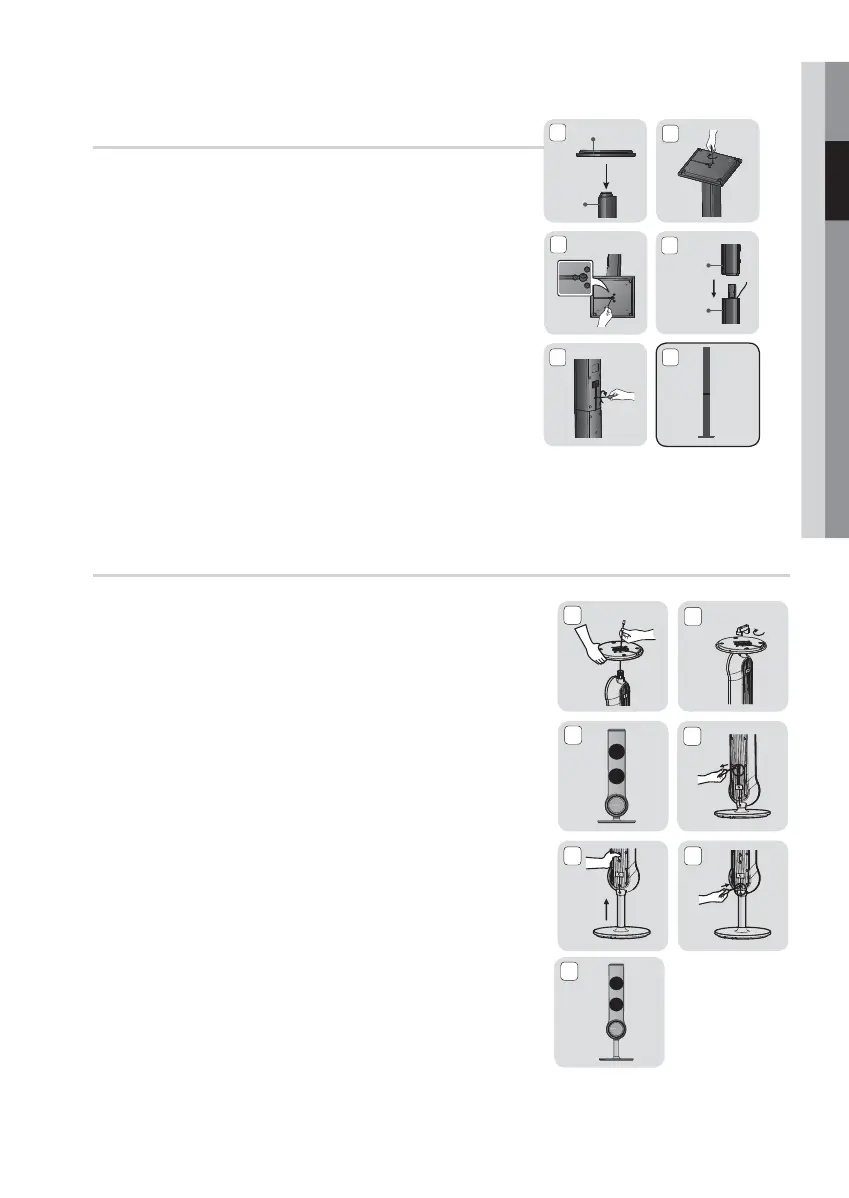
Installing the Speakers on the Tallboy Stand
* HT-E353K - FrontSpeakers
HT-E355K - Front/Surround Speakers
1. Turn the Stand Base upside-down and connect it to the Stand.
2. Insert three screws (5*15, For connecting Stand & Stand Base) clockwise
into the three holes marked using a screwdriver as shown in the
illustration.
! CAUTION : When you use a torque screwdriver, be careful not to put
excessive force. Otherwise, it runs idle or can be damaged. (torque
screwdriver- below 7 kg.f.cm)
3. Straighten a supplied speaker wire and put in the hole on the centre of
Stand Base.
4. Connect the upper Speaker to the assembled Stand.
5. Insert another large
screw (5*15, For connecting Speaker & Stand)
clockwise into the hole on the rear of the speaker using a
screwdriver.
6. This is the appearance after the speaker is installed. Follow this steps to install other speaker.
5
3
2
6
1
4
Stand Base
Stand
Speaker
Stand
Installing the Speakers on the Half Tallboy Stand
* HT-E353HK only - Front Speakers
1. Stretch out the speaker cables as shown and arrange it through the
hole of the stand base .
2. When done, use the stand driver to tighten the stand nut as shown.
3. This is the appearance after the speaker is installed. Follow these
steps to install another speaker.
4. If you want to adjust the height of the speaker, loosen two screws
on the rear of the speaker.
5. Pull up the speaker in the arrow direction.
Fit the speaker in a height
adjusting hole of your choice.
! CAUTION : Be careful as an excessive force may result in a physical
damage.
6. Insert two
screws
clockwise into the hole on the rear of the speaker
using a
screwdriver
as shown and tighten back 2 screws.
7. This is after the height of the speaker is adjusted.
You can repeat these steps above at any time if you want to
readjust the height.
5
3
2
6
1
4
7