Assembly Instructions for model: VMPR1
Congratulations on your purchase! The VMPR1 ceiling mount provides a unique, simplied method of ceiling mounting inverted
LCD/DLP projectors. Its low prole design offers roll, pitch and yaw adjustment. The ceiling mount is a steel-to-steel construction with
adjustable height to maintain proper projector ventilation, holds registration for quick lamp changes and easy lter cleaning without
loosing registration.
Caution:
•The maximum weight to be installed on the mount is 50 pounds (22.68 Kg).
•To prevent damage to the mount, which could affect or void the Factory warranty, thoroughly study all instructions and illustrations
before you begin to install the VMPR1.
•If you have any questions about this installation, contact Sanus Systems at 800.359.5520
Warning: Improper installation can result in serious personal injury! Make sure that the structural mem-
bers can support a redundant weight factor ve times the total weight of the equipment. If the structure can
not support this weight, reinforce the structure before installing the VMPR1.
Required Tools: Open End Wrenches (M10 & M12). Phillips screwdrivers, No. 1 and No. 2. Allen Wrench (provided).
Note: Other tools may be required depending on the method of installation.
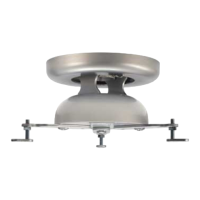
Dimensional Drawings:
Step 1: Inspect the Unit Before Installing
Carefully inspect the VMPR1 before installing. Please call Sanus if anything is missing or damaged. Our customer service department
can assist you quickly with any missing or damage parts. Never use damaged parts! Read all instructions before starting installation.
Lay out components to ensure you have all the required parts before proceeding (see “PARTS” on the next page).
[117.348]
4.62
TO
[100.076]
3.94
Sanus Systems 2221 Hwy 36 West, Saint Paul, MN 55113 5.11.05
Customer Service: 800.359.5520. See complementary Sanus products at www.sanus.com
18.51
Covering area with
extension arms installed
470.15
12.01
Covering area without
extension arms installed
305.07