


B
Brianna RamirezJul 28, 2025
What to do if my Sanyo PDG-DWL2500 Projector lamp has been used overtime?
- EElizabeth WardJul 29, 2025
If the lamp has been used overtime, replace the lamp immediately and then reset the lamp counter.
What to do if my Sanyo PDG-DWL2500 Projector lamp has been used overtime?
If the lamp has been used overtime, replace the lamp immediately and then reset the lamp counter.
What to do if my Sanyo PDG-DWL2500 detects an abnormal condition and cannot be turned on?
If the projector detects an abnormal condition and cannot be turned on, unplug the AC power cord and plug it in again to turn on the projector. If the projector turns off again, unplug the AC power cord and contact the dealer or the service center for service and checkup.
Why my Sanyo PDG-DWL2500 Projector cannot be turned on until cooling is completed?
The projector cannot be turned on until cooling is completed because it is preparing for stand-by, or the projection lamp is being cooled down. Wait until cooling is completed and the POWER indicator stops blinking.
What to do if Sanyo Projector is in stand-by mode?
If the projector is in stand-by mode, press the ON/STAND-BY button to turn on the projector.
Why is there no sound coming from my Sanyo PDG-DWL2500 Projector?
If there's no sound from your Sanyo Projector, try these steps: First, check the audio cable connection from the audio input source. Then, adjust the audio source volume. Also, press the Volume + button and ensure the Mute button is not activated. Note that when the AUDIO OUT is plugged-in, the projector's built-in speaker is disabled. Finally, sound is only available when an image is projected, so ensure an image is displayed.
What to do if the exclamation mark appears on the screen of Sanyo PDG-DWL2500 Projector?
If an exclamation mark appears on the screen of your Sanyo Projector, it indicates that your operation is invalid. Please review your actions and operate the projector correctly.
Why can't I select the terminal function on my Sanyo Projector?
The Terminal function on your Sanyo Projector cannot be selected after Computer 2 is selected. To enable the Terminal function, select another input source such as Computer 1, HDMI, S-video, or Video.
Ensures proper ventilation and prevents overheating by keeping openings clear.
Explains how to clean or replace the projector's filter to maintain performance.
Provides guidance on safely handling and transporting the projector.
Details correct placement to ensure proper operation and prevent hazards.
Outlines FCC regulations and compliance standards for the device.
Specifies requirements for the AC power cord and proper connection.
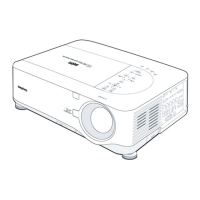
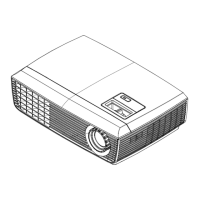
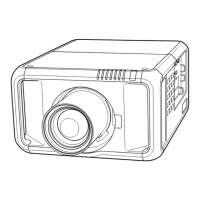
Identifies and describes the components located on the front of the projector.
Identifies and describes the components located on the rear of the projector.
Details the various input/output terminals available on the side of the projector.
Explains the function of buttons and indicator lights on the projector's top panel.
Provides step-by-step instructions for installing batteries in the remote control.
Specifies the maximum distance and angle for effective remote control operation.
Explains how to change remote control codes to prevent interference.
Guides on how to set up the projector for optimal image projection.
Explains how to use the adjustable feet to tilt and level the projector.
Illustrates how to connect the projector to a computer for display.
Shows how to connect the projector to various video sources.
Details connections for component video sources and monitor output.
Provides instructions on how to connect the projector to a power source.
Step-by-step guide on how to power on the projector and initiate startup.
Instructions for entering a PIN code if the projector is locked.
Explains the procedure for safely turning off the projector.
Describes how to quickly power off the projector by disconnecting power.
Guides on navigating and using the projector's on-screen menu system.
Explains the main menu categories and their functions.
How to adjust the image size and position using zoom controls.
Instructions on using the focus lever to sharpen the projected image.
Automates image optimization by detecting and adjusting input signals.
How to correct trapezoidal distortion for a rectangular image.
Details how to control volume and mute the audio output.
Explains direct operation of projector functions using the remote control.
Covers functions like NO SHOW, P-TIMER, IMAGE mode, and SCREEN selection.
Guides on selecting the Computer 1 RGB input source.
Guides on selecting the Computer 2 RGB input source.
Explains how to select or automatically detect computer system formats.
Automates PC image adjustments like sync and position.
Allows precise manual adjustment of PC image parameters.
How to choose preset image modes (Dynamic, Standard, Cinema, etc.).
Details how to fine-tune image settings like contrast, brightness, and color.
Guides on customizing the projected image size and aspect ratio.
How to select Video or S-Video input sources.
Guides on selecting Component, SCART, or HDMI input sources.
How to select preset image modes for video inputs.
Fine-tuning image parameters for video sources.
Customizing image size and aspect ratio for video inputs.
Requirements and steps for viewing 3D content with compatible glasses.
Important cautions and restrictions for safe and comfortable 3D viewing.
Overview of the main settings menu and its structure.
How to select the on-screen menu language from a list.
Adjusts the display position of the on-screen menu.
Configures automatic input search and PC adjustment functions.
Enables and configures the 3D display function and sync signals.
Allows memorizing zoom settings for the projector.
Selects the background displayed when no input signal is detected.
Controls the visibility of on-screen displays like countdowns.
Customizes the startup logo and manages PIN code lock for logo functions.
Captures the current projected image for use as a startup logo or presentation element.
Prevents unauthorized changes to the screen logo by requiring a PIN.
Configures settings specifically for the HDMI input source.
Manages the switchable Computer 2 / Monitor Out terminal function.
Configures power saving and network standby behavior.
Reduces power consumption by turning off the lamp after inactivity.
Enables automatic projector startup upon connecting AC power.
Displays subtitle text for TV programs when available.
Adjusts screen brightness to manage lamp life and power consumption.
Manages remote control codes to prevent interference with other devices.
Sets up security features to prevent unauthorized operation.
Controls fan operation modes for quietness or cooling.
Adjusts fan speed based on altitude for optimal cooling.
Displays cumulative lamp operating time and indicates when replacement is needed.
Sets filter replacement frequency and resets the counter.
Resets all settings to their original factory defaults.
Shows current input, signal status, and projector operational information.
Explains the temperature warning indicator and troubleshooting.
Step-by-step guide for replacing the projector's air filter.
How to reset the filter usage counter after replacement.
Instructions for safely cleaning the projector's projection lens.
Guidance on cleaning the projector's exterior body.
Detailed procedure for replacing the projector's lamp.
How to reset the lamp usage counter after lamp replacement.
Provides solutions for common projector problems and operational issues.
Visual representation of the projector's menu structure and options.
Explains the projector's status indicators and their meanings.
Lists supported computer resolutions, frequencies, and 3D compatibility.
Provides detailed technical data including dimensions, power, and interface specifications.
Lists available optional accessories for purchase.
Information on PJLink standard compliance and usage.
Pinout diagrams and specifications for all projector terminals.
Space to record PIN codes for security and lockout recovery.
Provides physical dimensions and mounting hole specifications for the projector.
| Matrix size | 0.65 \ |
|---|---|
| Projection distance | - m |
| Vertical scan range | 50 - 120 Hz |
| Horizontal scan range | 15 - 93 kHz |
| Projection technology | DLP |
| Contrast ratio (typical) | 2000:1 |
| Screen size compatibility | 60 - 110 \ |
| Projector native resolution | WXGA (1280x800) |
| Focus | Manual |
| Digital zoom | 16 x |
| Focal length range | - mm |
| Aspect ratio | 16:9 |
| RS-232 ports | 1 |
| Dimensions (WxDxH) | 320 x 175 x 386 mm |
| Power requirements | 100 - 240 V |
| Lamp power | 275 W |
| Light source type | Lamp |
| Service life of light source | - h |
| Service life of light source (economic mode) | 3000 h |
| Noise level | 28 dB |
| Dot clock scanning frequency | 150 MHz |
| RMS rated power | 10 W |
| DVI port | No |
| Serial interface type | RS-232 |
| USB 2.0 ports quantity | 0 |
| Power consumption (standby) | - W |
| Power consumption (typical) | 400 W |
| Weight | 6215 g |
|---|