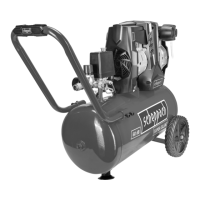
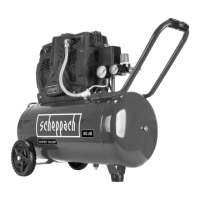
The Scheppach HC25Si is a compressor designed for generating compressed air to power various compressed-air driven tools. It is suitable for tools with an air volume of up to approximately 110 l/min, such as tire inflators, blow-out pistols, and paint spray guns. Due to its limited air output, it is not recommended for tools with very high air consumption like orbital sanders, die grinders, or hammer screwdrivers. The compressor is intended for indoor use in dry, well-ventilated spaces and should not be exposed to rain or operated in damp or wet environments.
Technical Specifications:
- Product Code: 705681
- Rev. Nr.: 04/11/2020
- Mains connection: 230 V~ 50 Hz
- Motor power: 1100 W
- Operating mode: S1
- Compressor speed: 2800 min⁻¹
- Pressure vessel capacity: approx. 24 l
- Operating pressure: approx. 8 bar
- Theoretical intake capacity: approx. 230 l/min
- Effective delivery quantity at 7 bar: approx. 50 l/min
- Effective delivery quantity at 4 bar: approx. 80 l/min
- Effective delivery quantity at 1 bar: approx. 110 l/min
- Sound pressure level L_PA: 60 dB(A)
- Sound power level L_WA: 87 dB(A)
- Uncertainty K_PA/WA: 2.59 dB
- Protection category: IP20
- Device weight: approx. 21 kg
- Max. altitude (above mean sea level): 1000 m
Usage Features:
The HC25Si features a transport handle (1) for easy mobility and wheels (5) for convenient movement. It is equipped with a pressure switch (2) and an on/off switch (3) for controlling operation. The compressor includes two pressure gauges: one (12) to read the set pressure and another (13) to read the vessel pressure. A pressure regulator (14) allows users to adjust the output pressure. Two quick couplings (10, 11) are provided for connecting compressed air tools. The device also has a safety valve (9) and a drain screw for condensate (6).
Installation and Commissioning:
Before commissioning, the compressor requires some assembly. The supporting foot (7) and wheels (5) must be fitted. The air filter (4) needs to be installed by removing the transport lid (15), screwing the air filter to the equipment, and inserting the hose (4d) into the air filter opening. The compressor connects to a standard 220-240 V~ 50 Hz protective contact socket with at least 16 A fuse protection. It's crucial to ensure the mains voltage matches the rating plate and to avoid long or thin extension cables, which can impede motor start-up. The compressor should be installed near the point of consumption, in a dry, well-ventilated room with an ambient temperature between +5 °C and 40 °C, free from dust, acids, vapors, or explosive gases.
Operation:
To switch on the compressor, pull the on/off switch (3) upwards. To switch it off, press the switch down. The pressure regulator (14) is used to set the desired working pressure, which can be read on pressure gauge (12). The vessel pressure is displayed on pressure gauge (13). The pressure switch (2) is factory-set to cut in at approximately 6 bar and cut out at approximately 8 bar. Compressed air tools are connected to the quick couplings (10, 11) using a plug nipple.
Users must read and follow the operating and safety instructions before start-up. Essential safety measures include wearing hearing protection (due to a sound power level of 87 dB(A)) and eye protection. Respiratory protection is also recommended. The compressor has hot parts (A fig. 10), so caution is advised. It operates with electrical voltage, and the equipment is remote-controlled, meaning it may start up without warning. The device should not be exposed to rain and must be stored and operated in dry ambient conditions.
Additional safety instructions for working with compressed air and blasting guns include maintaining a distance of at least 2.50 m from the product during operation, avoiding contact with hot compressor parts, and ensuring the intake air is free of impurities. Users should wear safety goggles and a respirator when using a compressed air pistol and never blow at people or clean clothes with the blow-out pistol.
When using spraying attachments (e.g., paint sprayers), keep the spray attachment away from the compressor to prevent liquid contact. Never spray towards the compressor, as moisture can lead to electrical hazards. Do not process paints or solvents with a flash point below 55 °C due to explosion risk. If hazardous liquids are processed, wear protective filter units and adhere to manufacturers' safety information. Smoking is prohibited during spraying due to the combustibility of paint vapors. The work area must exceed 30 m³ and have sufficient ventilation. The compressor must be separated from the work area to prevent direct contact with the working medium.
For pressure vessels, operators must ensure proper working order, correct operation, and timely maintenance. The vessel should be checked for rust and damage before each use. A damaged or rusty pressure vessel must not be operated.
Maintenance Features:
Regular cleaning and maintenance are crucial for the compressor's longevity and safe operation.
- General Cleaning: The device should be kept free of dust and dirt. Clean it with a damp cloth and mild soap, or blow it off with low-pressure compressed air. Avoid aggressive cleaning agents or solvents. Ensure no water penetrates the device interior. Disconnect hoses and injection tools before cleaning.
- Pressure Vessel Maintenance: To ensure a long service life, condensate must be drained from the pressure vessel (8) after each use. This involves releasing the vessel pressure, then opening the drain screw (6) by turning it counter-clockwise until all condensate is drained, and finally closing it by turning it clockwise. The pressure vessel should be checked for rust and damage before each use.
- Safety Valve Check: The safety valve (9) is factory-set and should not be adjusted or removed. It must be actuated every 30 operating hours (at least 3 times a year) to ensure proper function. To do this, turn the perforated exhaust nut (9a) counterclockwise, pull the valve rod outwards over the nut to open the outlet, and then tighten the exhaust nut (9a) clockwise.
- Air Filter Cleaning: The air filter (4) prevents dust and dirt from being sucked in and should be cleaned after at least every 300 hours of service. A blocked filter significantly reduces compressor power. To clean, turn the air filter (4) counterclockwise to remove it, open the filter cover (4c), and remove the filter element (4b). Tap out the filter element, filter cover, and filter housing (4a), then blow them out with compressed air (approx. 3 bar), and reassemble in reverse order.
- Wearing Parts: The air filter is a wearing part and may need replacement.
Transport:
The compressor can be transported using the transport handle (1). When lifting, consider its weight (approx. 21 kg). Ensure the load is well secured when transporting the compressor in a motor vehicle.
Troubleshooting:
The manual provides a troubleshooting guide for common issues:
- Compressor does not start: Possible causes include no mains voltage, low mains voltage, outside temperature below +5 °C, or an overheated motor. Remedies involve checking the power supply, using a suitable extension cable, operating above +5 °C, and allowing the motor to cool.
- Compressor starts but no pressure: This could be due to a leaking safety valve, damaged seals, a leaking drain screw, or leaking hose connections/quick couplings. Remedies include contacting a service center, checking/replacing seals, tightening the drain screw, and checking/replacing hoses.
- Compressor starts, pressure shown, but tools don't start: This indicates insufficient pressure set on the regulator, which can be resolved by increasing the set pressure.
Warranty and Support:
The product comes with a 12-month warranty against defects in workmanship and parts from the date of purchase. Repairs, replacements, or refunds are at the manufacturer's discretion. The warranty benefits are in addition to consumer rights under Australian law. Refurbished goods or parts may be used for repairs, provided they meet Scheppach's quality specifications.
For after-sales support, customers can call 1300 855 831 (local rate for landline calls, charges may vary) or email support@scheppach.com.au.