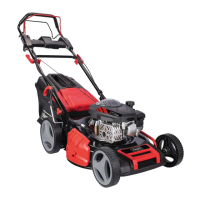
28 | GB
www.scheppach.com service@scheppach.com +(49)-08223-4002-99 +(49)-08223-4002-58 www.scheppach.com service@scheppach.com +(49)-08223-4002-99 +(49)-08223-4002-58
9. Maintenance and cleaning
• Regular, careful maintenance is required to guar-
antee the safety level and performance of the ma-
chine.
• Make sure that all nuts, bolts and screws are tight-
ened securely and that the machine is in safe work-
ing condition.
• Routinely check the grass basket for signs of wear
and impaired functionality.
Regularly clean the grass box with water and let it
dry thoroughly.
• For your own safety, replace worn or damaged
parts without delay.
• If the fuel tank should require emptying this should
only be done in the open air using a petrol suction
pump (available from DIY shops).
m WARNING
Never work on or touch conducting parts on the ig-
nition unit with the engine running. Always pull the
spark plug boot from the spark plug before starting
any work of care or maintenance. Never perform any
work on the machine while it is running. Any work not
described in these Operating Instructions must be
performed by an authorized service workshop only.
Cleaning
The lawn mower should be thoroughly cleaned after
every use, especially the underneath and the blade
mount. To remove the gras, tip the lawn mower onto
its left side (the opposite side to the oil lling socket)
or clean the mower with water as descript below:
• Remove the mulch unit / gras box.
• Fit the hose connection to the mower and turn the
tap on. (Fig. 23)
• Start the mower and switch o again after about 30
seconds. The rotating blade bar throws the water
onto the bottom of the mower and thus cleans it.
• Turn o the tap and remove the hose connection .
• Clean the top with a cloth (do not use any sharp
objects).
•
m Note! Before you tip the lawn mower onto its side,
completely empty the fuel tank using a petrol suction
pump. The lawn mower must never be tilted by more
than 90 degrees. Dirt and grass is easiest to remove
immediately after you have nished mowing the grass.
Dried on grass and dirt can result in poorer mowing per-
formance. Check that the grass chute is free of any re-
sidual grass. Remove any such residue. Never clean the
lawn mower with a water jet or high-pressure cleaner.
The engine must remain dry. Do not use aggressive
cleaning agents such as cold cleaner or petroleum ether.
Wheel axles and wheel hubs
• These should be lightly greased once a season.
Blade
For safety reasons you should only ever have your blade
sharpened, balanced and mounted by an authorized
service workshop. For optimum results it is recommend-
ed that the blade should be inspected once a year.
Changing the blade (Fig. 17)
Only ever use original spare parts when having the
blade replaced.
Wear gloves when replacing the blade in order to pre-
vent injury.
Never have any other blade tted.
• Empty the fuel tank before removing the blade
• To replace the blade, undo the screw.
• Reinstall as illustrated in Fig. 17. Tighten the screw
properly. Tightening torque 45 Nm. When replacing
the blade, the blade screw should also be replaced.
Damaged blades
Should the blade, in spite of all precautions, come
into contact with an obstruction, shut down the en-
gine immediately and pull the spark plug boot. Tip
the lawn mower onto its side and check the blade for
damage. Damaged or bent blades must be replaced.
Never attempt to bend a bent blade back to straight
again. Never mow the lawn with a bent or heavily
worn blade as this will cause vibrations and can lead
to further damage to the lawn mower.
m CAUTION! There is a risk of injury if you work with
a damaged blade.
Resharpening the blade
The blades can be resharpened with a metal le. In
order to avoid imbalance, the blade should be re-
sharpened by an authorized service workshop
Checking the oil level
m CAUTION! Never run the engine with no or too
little oil. This could cause severe damage to the en-
gine. Use only SAE30 engine oil.
Checking the oil level (Fig. 18):
• Stand the lawn mower on a at level surface.
• Unscrew the oil dip stick (12) by turning anticlock-
wise, pull out and wipe. Insert the dip stick back in
the lling mount as far as the stop, but do not screw
back in.
• Pull out the dip stick (12) again and read o the
oil level while holding horizontally. The oil level
must be between the maximum and the minimum
Changing the oil Fig. 23
• Change the engine oil every year before the start of
the season when the engine is warm.
• Use only engine oil (SAE30).
• Empty the fuel tank (with a petrol suction pump)
• Place a at oil drip tray in front of the mower (min.
volume 1 Liter).
 Loading...