Copyright © 2021 Axxiom Manufacturing, Inc.
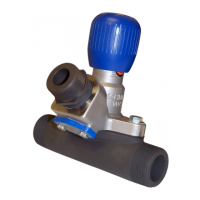
7.2.11. If necessary, adjust the abrasive flow with the knob on the MV3 Valve (#14). Turn
clockwise for less abrasive flow or turn counterclockwise for more abrasive. Due to the
length of the blast hose, there will be a slight delay in control of the abrasive flow at the
nozzle, therefore allow a few seconds before adjusting further.
7.2.12. Note the orifice indicator on the side of the MV3 Valve body to view the knob position
relative to the abrasive flow. The VPI position can be used as reference when changing
nozzle size or abrasive for different applications.
7.2.13. Re-test the blast air and abrasive mixture again on a test piece to determine is further
adjustment is needed.
7.2.14. At initial blasting have an assistant check the popup, handway, hoses, and piping for
leaks while the blaster is pressurized. Periodically check for leaks thereafter.
7.2.15. Release the deadman lever to stop blasting. The MV3 Valve blaster will depressurize.
Airborne particles and loud noise hazards from blowdown exhaust air can cause serious
injury and loss of hearing. Wear approved eye and ear protection. Stay clear of
blowdown air path. DO NOT place hands or other body parts in the blowdown air path.
Make sure no personnel are in the blowdown air path.
Figure 7.2 – MV3 Valve Abrasive Blaster with pneumatic blast controls