10
VACUUM MAINTENANCE
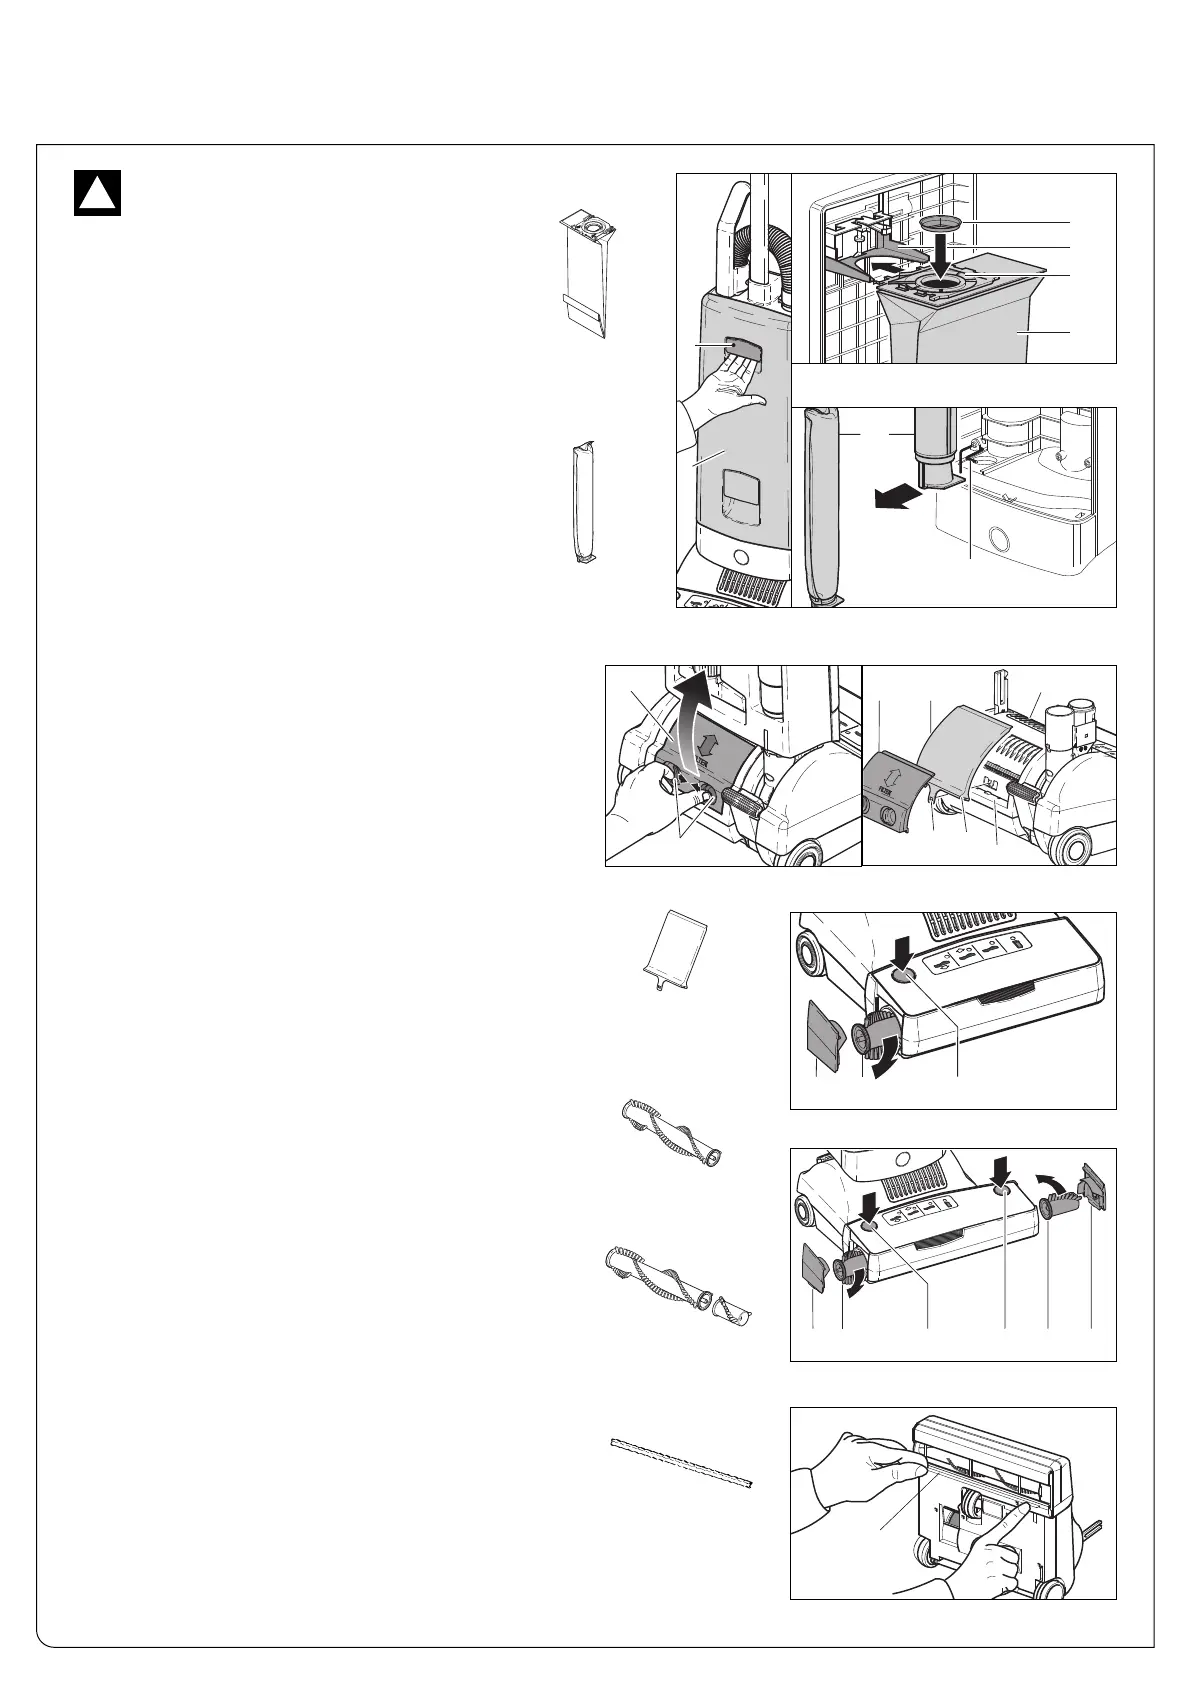
Changing the Filter Bag - Figures 12 & 13
To change the filter bag (37), pull the cover release
flap forward (7) and lift the front cover (8) from the bag
h
ousing. The cover release flap must remain in a for-
ward “pulled-out” position to change filter bags and
lock them into place. Squeeze the clamps on both
sides of the filter bag sealing plate (38), slide the plate
from the holder (39) and push the cap (40) on to seal
the bag. Slide the sealing plate (38) of a new bag into
the holder and push it in firmly. Re-insert cover into
bag housing, push it forward, then lock it in place by
pushing down the cover release flap. You may find it
convenient to store the bag cap inside the bag hous-
ing below the filter bag.
Changing the Pre-motor Microfilter -
Figures 12 & 14
The pre-motor microfilter (40) needs to be changed when it
becomes extremely dirty or clogged with dust, or after
approximately 20 filter bags have been used. To change the
pre-motor microfilter, pull the cover release flap (7) forward
and lift the cover (8) from the filter bag housing. Then, slide
the filter out at the bottom. To replace, lift the safety lever
(41) and slide the new filter in using the tracks as guides.
Changing the Brush Roller(s) - Figure 17 (X7),
Figure 17a (X8)
To change the brush roller(s) (45, 45a), push the brush roller
release button(s) (11, 11a), remove the side plate(s) (44, 44a),
turn the brush(s) clockwise a quarter of a turn, and pull the
old brush roller(s) out. Slide the new brush roller(s) into the
brush housing and turn it until it locks into position. While
slightly pushing the button(s) (11, 11a), press the side plate(s)
(44, 44a) back into the locked position.
Figure 13
Figure 14
Figure 17 (X7)
Figure 18
Always unplug vacuum from outlet
before dismantling any part of machine!
!
SEBO Ultra
Filter Bags
Part #5093AM
Pre-motor
Microfilter
Part #5036AM
Exhaust Filter
Part #52038ER
Brush Roller (X7)
Part #5010AM
Changing the Sealing Strip - Figure 18
The sealing strip (46) is located just behind the brush roller
opening. The sealing strip seals the power head to hard floors
to prevent kick-back of debris while vacuuming. To replace a
worn sealing strip, push the brush roller release button(s) (11,
11a), remove the side plate(s) (44, 44a) and slide the old strip
out. Insert the new strip into the slot and slide into place.
Changing the Exhaust Filter - Figures 15 & 16
After 20 bags have been used, change the exhaust filter (42).
To remove the exhaust filter, squeeze the filter door release
buttons (43) toward the middle and remove the filter cover
(25). Unhook the filter tab (A) from the catch (B) and pull the
filter out. Slide the closed end of the new filter into the
machine. Fit filter opening (C) to the air channel (D) and lock
the filter tab (A) onto the catch (B), making sure it is smooth
and flat. The correct positioning of the filter can be checked by
looking through the slots (E) on the front of the powerhead.
Slide the filter cover (25) into the top of the opening and move
it downward until it clicks into place.
46
Figure 17a (X8)
Brush &
Edge Roller (X8)
Part #5290AM
Sealing Strip
Part #5400-1 (X7)
Part #5400-2 (X8)
Figure 15
Figure 16
Figure 12
 Loading...