EasyManua.ls Logo

Seccua UrSpring - 4.2.6 Exchanging the Flow Sensor; 4.2.7 Cleaning the Flow Sensor

Seccua UrSpring
108 pages
Print Icon
To Next Page IconTo Next Page
To Previous Page IconTo Previous Page
Loading...
6. Apply grease and put all parts back as described in 4.2.3 Exchanging the solenoid valve.
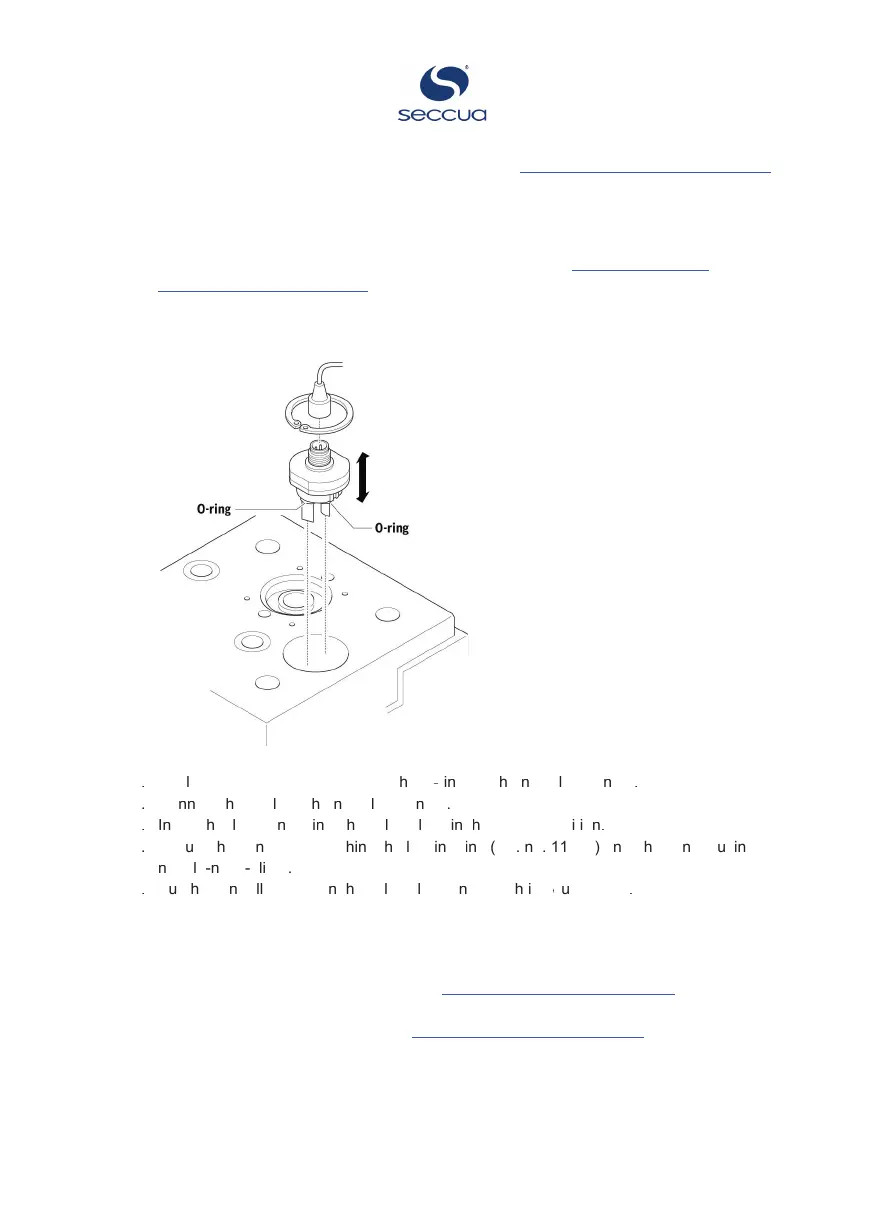
4.2.6 Exchanging the flow sensor
To exchange the flow sensor:
1. Remove the controller from the valve block as described in 4.2.2 Removing the
controller from the valve block.
2. Remove the locking ring using needle-nose-pliers.
3. Pull out the existing flow sensor with the cable.
4. Disconnect the cable of the flow sensor.
5
.
A
p
p
l
y
s
o
m
e
f
o
fof
o
d
g
r
a
d
e
g
r
e
a
s
e
t
o
t
h
e
O
-
r
i
n
g
s
o
f
t
h
e
n
e
w
f
l
o
w
s
e
n
s
o
r
.
6
.
C
o
n
n
e
c
t
t
h
e
c
a
b
l
e
t
o
t
h
e
n
e
w
f
l
o
w
s
e
n
s
o
r
.
7
.
I
n
s
e
r
t
t
h
e
f
l
o
w
s
e
n
s
o
r
i
n
t
o
t
h
e
v
a
l
v
e
b
l
o
c
k
i
n
t
h
e
c
o
r
r
e
c
t
p
o
s
i
t
i
o
n
.
8
.
S
e
c
u
r
e
t
h
e
s
e
n
s
o
r
b
y
a
t
t
a
c
h
i
n
g
t
h
e
l
o
c
k
i
n
g
r
i
n
g
(
A
r
t
.
n
o
.
1
1
3
5
4
)
o
n
t
o
t
h
e
s
e
n
s
o
r
u
s
i
n
g
n
e
e
d
l
e
-
n
o
s
e
-
p
l
i
e
r
s
.
9
.
P
u
t
t
h
e
c
o
n
t
r
o
l
l
e
r
b
a
c
k
o
n
t
h
e
v
a
l
v
e
b
l
o
c
k
a
n
d
a
t
t
a
c
h
i
t
s
f
o
fof
u
r
s
c
r
e
w
s
.
4.2.7 Cleaning the flow sensor
To clean the flow sensor:
1. Remove the flow sensor as described in 4.2.5 Exchanging the flow sensor.
2. Clean the O-rings and surfaces of the flow sensor with water, cloth or a soft brush.
3. Put back the sensor as described in 4.2.5 Exchanging the flow sensor.
Page 39/50

Table of Contents