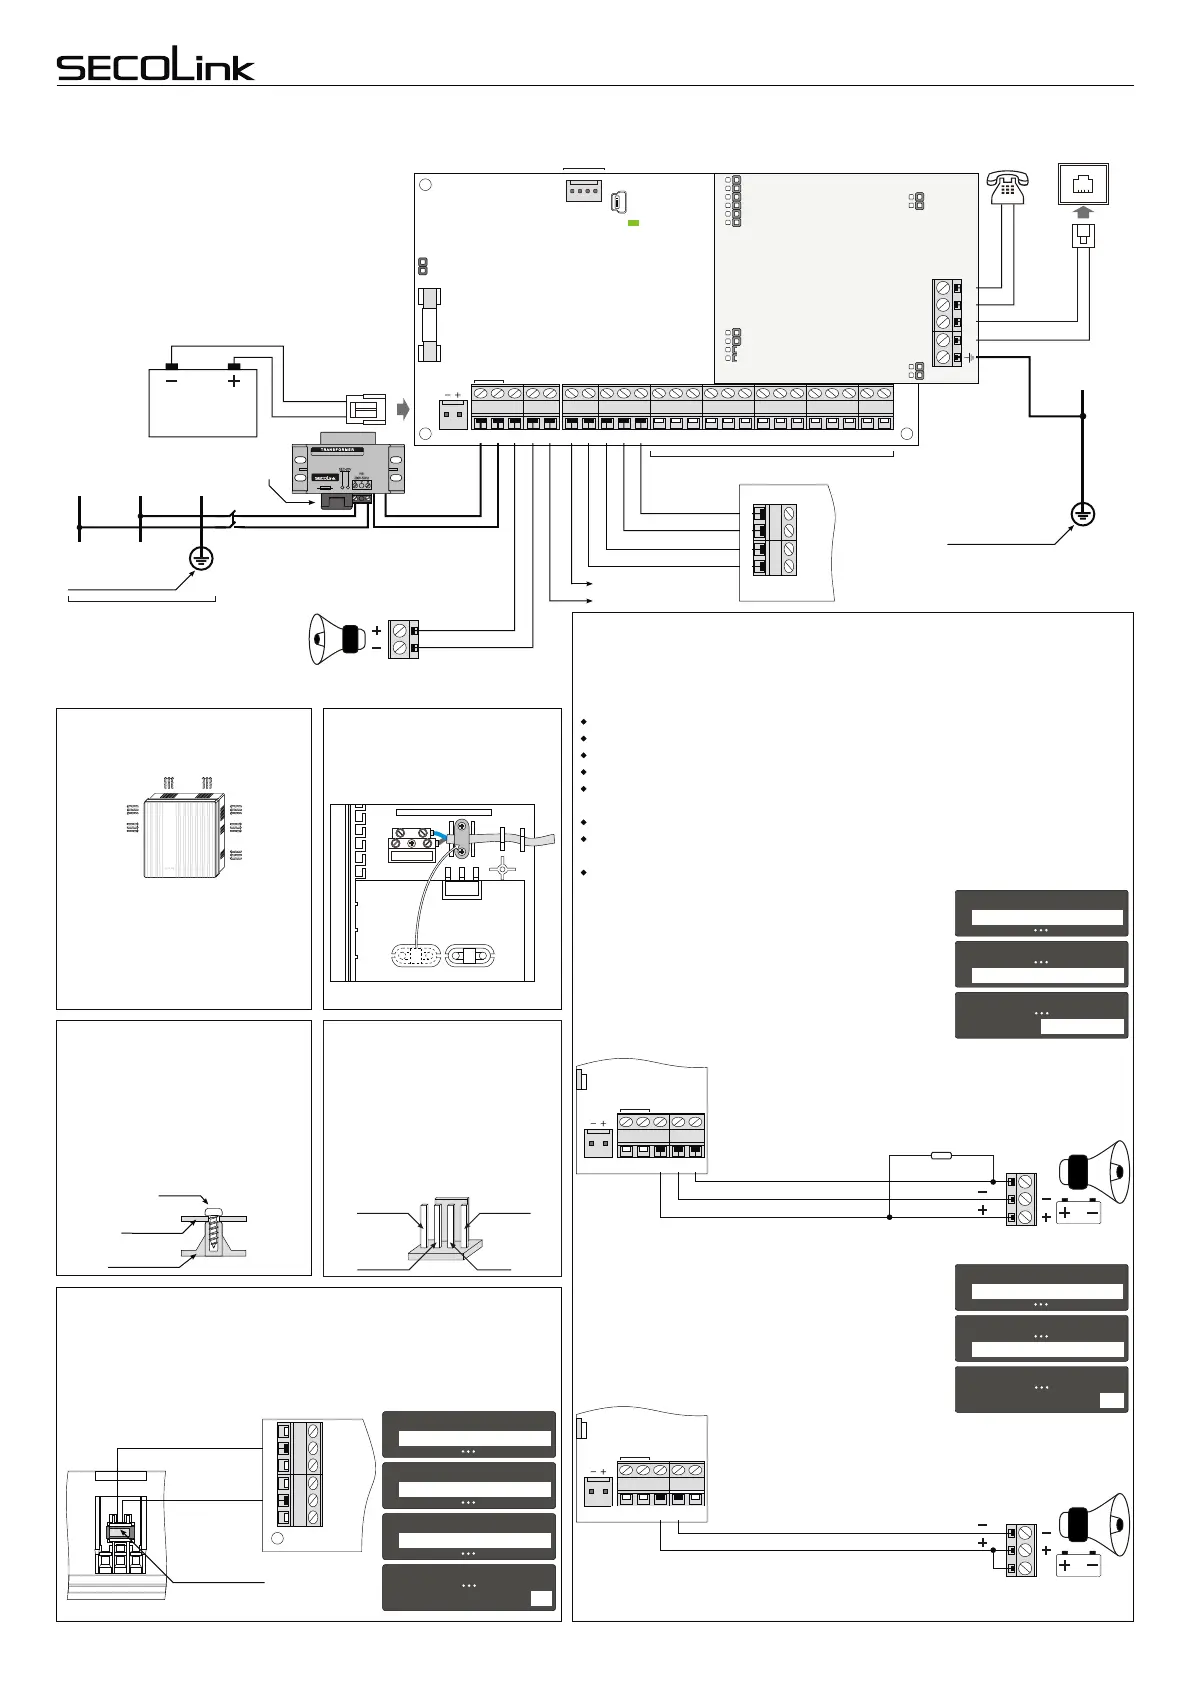
DAT
COM
+12V
CLK
3.15A
P16
P32
P64
COM
+BELL
DAT
+AUX
CLK
COM
-PGM
+PGM
COM
Z2
Z6 +AUX Z7 COM Z8
Z1
ANT
R-1
T-1
RING
TIP
PSTP
For correct operation P series control panels P16,
P32 and P64 (abbreviation: Pxx) need one 12V 7Ah
rechargeable battery. The battery is used as a back-
up power supply in case of a temporary AC loss. This
battery is also used when an alarm system
consumes more power than control panel can
supply. Excessive consumption may happen when
the system activates a siren or a radio transmitter.
Usually activation lasts only a few minutes to not
discharge the battery.
Installation of control panel
+BELL
COM
Picture 2. Wiring of the power supply, PSTN line, and a siren without the
battery
If an installation of a siren with back-up battery is done
using 2 wires (picture 4), then an installer needs to make
changes as shown to the right. This type of a siren uses a
back-up battery to sound an alarm when power supply
line (+BELL) does not provide power from the control
panel. Use Inversion of Status PGM attribute to program
the system for this operation. Programming sequence is
described on the right.
Note: in most templates +BELL is set for sirens with no
battery (picture 2). To use a siren with a back-up battery
(picture 3) you need to change +BELL (O01) definition to
Power supply. Definition changing sequence is shown on
the right.
If control panel’s PGM output -PGM direct connection to siren
triggering input S does not ensure a stable siren activation, please
connect the pull-up resistor (3-15 kOhm) between the +Bell and -
PGM as shown in the picture below.
+BELL
COM
-PGM
10kΩ
S
power supply
negative control
power supply
Picture 3. Installation of a siren with a back-up battery using 3 wires
SECOLINK security systems are supplied to customers with a pre-installed template
in the keypad memory. The template is a set of most frequently used system settings.
During First start procedure keypad sends these settings to other modules. When
First start is completed the system will be set to 1 partition and 8 zones:
Z1 is preset to be used with an entry door magnetic contact;
Z2 - with PIR motion detector in entry/exit path;
Z3, Z4 - for PIR detectors wiring;
Z5 - with a smoke detector;
Z6 - for cabinet tamper switch wiring;
PGM outputs:
+BELL (O01) is preset in the template to control a siren with no battery;
-PGM (O02) is preset to make an activation (makes “minus”) of a siren with a back-
up battery;
+PGM (O03) is preset to make +12V power supply for smoke detectors.
Template. Siren output programming
SECOLINK security systems may have different
templates for different countries. Check keypad's sticker
for a country prefix or the pre-installed template code.
Example: KM24_MY
Attention!
Do not cover ventilation
holes of the cabinet!
Mounting modules in the
cabinet
Use a tamper switch to protect the control panel
Securing power cable
to the cabinet
Zones (see "Zone wiring")
+PGM
COM
+12V CLKDAT COM
CLK
DAT
+AUX
Module
-PGM
Main Protective
Earthing terminal
Protective Earth
wire PE
Analog PSTN
line
TIP
RING
T-1
R-1
Serial port SERIAL (see "Wiring of system modules”)
+AUX Z3 COM Z4 -Z5F +Z5F
COM
+BELL
-PGM
Z3
Z4
-Z5F
+Z5F
Z6
+AUX
Z7
COM
Z8
COM
+AUX
20VAC COM -PGM +PGM COM CLK DAT +AUX Z1 COM Z2+BELL
20 VAC
20 VAC
20VAC COM -PGM+BELL
Picture 4. Installation of a siren with a back-up battery using 2 wires.
S
power supply
positive control / power supply
Note: check siren wiring manual provided by the manufacturer.
Switches or jumpers can be used to setup this type of the siren.
+BELL
COM
COM
+BELL
-PGM
20VAC COM -PGM+BELL
20 VAC
Leave minimum 10 cm of free space
between the ventilation hole and any
other surface. Increase in
temperature of control panel can
reduce the maximum current on
+AUX and PGM outputs: +BELL,
+PGM.
By default control panel zone Z6 is set for detection of alarm system's cabinet
opening. Opening the cabinet when the system is disarmed will create a
trouble event or will trigger an alarm if the system is armed. When cabinet’s
tamper is unused, input Z6 can be set as a normal zone. Tamper disabling
sequence is described in the picture below on the right.
Plastic box
Board
Pxx
Screw
Z6
AUX
Z7
COM
Z8
+Z5F
+Z5F Z6 +AUX Z7 COM Z8
SERIAL port
+13,8 V
COM
RX-DAT
TX-CLK
Use a plastic component to fasten
a power cable to the cabinet.
Boards of control panels and modules
have to be fastened in a plastic
cabinet by using screws. Module's
mounting holes should correspond to
cabinet's rear wall holes.
Attention! Short-time current
consumed by radio transmitter
should not exceed 3A. Control
panel supplies current to this
connector with partial electronic
short-circuit protection. PCB
damage is possible in case of a
long-term high current.
Page 2
11
11
11
Service ModeService Mode
System SetupSystem Setup
ModulesModules
System Setup System Setup
Modules Modules
Module settings Module settings
M00 Control panelM00 Control panel
Use module tamper Use module tamper
No
55
11
Service ModeService Mode
System Setup System Setup
O01 Power supplyO01 Power supply
Definition Definition
Power Supply
33
44
System SetupSystem Setup
PGM outputs PGM outputs
11
Service ModeService Mode
System Setup System Setup
O01 Power supplyO01 Power supply
Inversion of status Inversion of status
Yes
77
44
System SetupSystem Setup
PGM outputs PGM outputs
CAS6
Tamper switch
Intruder alarm system
Wiring manual
Control Panels P16, P32, P64
Power supply
distribution board
AC power transformer:
Primary winding: 230V AC 50Hz
Secondary winding: 20V AC 50Hz
~
~
12V battery
7Ah/20HR
Black
Red
Live
wire
L
Neutral
wire
N
Protective
Earth wire
PE
Main Protective
Earthing terminal
Fuse
250mA