Do you have a question about the Sencor SRV 9550BK and is the answer not in the manual?
Key safety precautions for using the appliance.
Guide on attaching and detaching the side brush.
Instructions for optimal placement of the charging base.
Initial battery charging procedure.
How to activate the automatic cleaning function.
How to use the along-the-walls cleaning mode.
Steps to assemble the mopping components.
Instructions for dry mopping.
Instructions for wet mopping.
How to detach the mop holder from the water tank.
How to schedule automatic cleaning times.
Procedure to cancel scheduled cleaning.
How the vacuum cleaner charges automatically.
Procedure for manually docking the vacuum cleaner.
Recommendations for battery maintenance and longevity.
Instructions for replacing the vacuum cleaner's battery.
How to clean the dust container and filter.
How to clean the water tank and its container.
Instructions for cleaning the mop and holder.
Maintenance of the main rotary brush.
How to clean the suction hole for optimal performance.
Maintenance of the side rotary brush.
General cleaning of the vacuum cleaner's exterior.
Cleaning the charging station and its contacts.
Instructions for storing the vacuum cleaner when not in use.
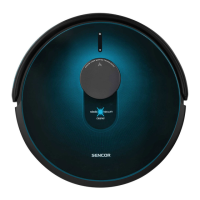
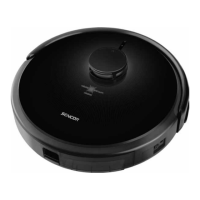
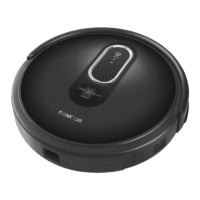
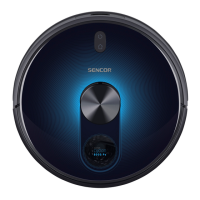
This document describes the Sencor SRV 9550BK Robotic Vacuum Cleaner, a device designed for automated floor cleaning. It combines vacuuming and mopping functions to provide comprehensive cleaning for various hard floor surfaces and low-pile carpets.
The Sencor SRV 9550BK is a robotic vacuum cleaner equipped with a Lidar-type laser sensor and GYRO MAPPING function for intelligent navigation. This allows it to map the room's geometry and plan optimal cleaning routes, ensuring thorough coverage of the entire floor area. The vacuum cleaner features a suction hole that effectively removes hair, animal fur, and other debris. A side rotary brush extends its reach to clean dirt from corners and along walls, making it effective in hard-to-reach places. Motorized rubber wheels are designed to protect sensitive floors from scratching and allow the vacuum cleaner to traverse thresholds up to 1.5 cm high and ride onto carpets up to 2 cm high. A suspended bumper helps the vacuum cleaner navigate around obstacles, while infrared sensors in the front bumper prevent collisions. Anti-stair-fall sensors on the bottom ensure safe operation in rooms with stairs.
The device also includes a mop function for both dry and wet wiping of smooth hard floor surfaces. During mopping, it simultaneously vacuums small bits of dirt and dust to prevent the mop fabric from becoming excessively soiled. An electronically-controlled water pump automatically doses water onto the fabric and stops the supply at the end of the cleaning process to prevent leaks.
For user convenience, the vacuum cleaner has a button on its cover with an indicator light that changes color to reflect various operating states. It also provides audio signals and voice messages for certain functions or error states. The device can be controlled via a smartphone or tablet application, allowing users to turn it on/off, select cleaning modes, send it to the charging station, or set scheduled cleaning times.
Preparation for Operation: Before use, the side rotary brush A11 needs to be installed if not already in place. The vacuum cleaner should be turned upside down, and the brush pushed onto its pin. When handling the vacuum cleaner upside down, care must be taken not to damage the laser sensor A3. For carpeted rooms, the side rotary brush should be removed.
The charging station B2 must be placed in a hard, horizontal, and dry location within reach of a power socket. It requires at least 0.5 m clear space on its left and right sides, and 1.5 m in front, to ensure the vacuum cleaner can find and dock successfully. The power adapter cable is connected to the charging station, and any excess cable can be wound into the storage compartment.
Charging the Battery: For first-time use, the battery must be fully charged for at least 5 hours. The vacuum cleaner is turned on by holding down button A5 for more than 3 seconds, indicated by a slow blue flash and a melody. Once fully charged, the indicator lights turn solid blue, and the vacuum cleaner is ready. Automatic charging occurs when the vacuum cleaner finishes cleaning or detects low battery voltage, at which point it seeks out the charging station. Manual charging is also possible by placing the vacuum cleaner directly onto the charging station.
Cleaning Modes:
Mopping Function: The mop holder E1 and mopping fabric E4 are attached to the water tank D1. For wet wiping, clean water is poured into the water tank through the filling hole D3, and the rubber cap D2 is secured. The assembled water tank with the mop holder is then inserted into the vacuum cleaner. For dry wiping, no water is added. The mop holder should always be attached to the water tank away from the vacuum cleaner to avoid damaging the laser sensor.
Scheduled Cleaning: The system time must be set correctly using buttons F4, F5, F6, F7, and F8 on the remote control. Once the system time is set, scheduled cleaning can be configured to automatically start cleaning at a specific time daily. This function can also be managed via the smart device application, which allows for different cleaning times on individual days.
Mobile Application Control: The vacuum cleaner can be controlled using a smartphone or tablet application, available on Apple App Store and Google Play Store. To connect the vacuum cleaner to the application, simultaneously hold down buttons A5 and A6 for more than 3 seconds to enter network configuration mode.
Dust Container and Dust Filter: The dust container C1 should be emptied and cleaned after every use. To do this, push latch C6 to slide the container out, remove the filter holder C2, and tip out debris. The HEPA filter C4 and fine filter C3 should be removed and cleaned with the cleaning brush H1. The dust container and filter holder can be washed under running water if heavily soiled, but all components must be completely dry before reassembly. The main container, dust container, and dust filter should not be washed in a dishwasher. The dust filter C4 must not be washed with water.
Water Tank with Dust Container: The dust container A5 inside the water tank D1 should be emptied and cleaned regularly. Push latch D7 to release the water tank, then latch D6 to slide out the dust container. The dust filter D4 should be removed and cleaned with the brush H1. The water tank and dust container can be washed under running water if heavily soiled, ensuring they are completely dry before reassembly.
Mop: After each dry or wet wiping session, the mop fabric E4 should be removed from the holder, hand-washed in lukewarm water with a small amount of gentle washing powder, and allowed to air dry. The mop holder can be wiped with a damp cloth or washed under running water and dried.
Central Rotary Brush: Latches G2 are pushed to remove the central rotary brush cover G1 and the brush G3. The compartment G5 and suction hole should be cleaned with a dry wiping cloth. Any dirt, hair, or animal fur should be removed from the brush G3 and bearings G4, using the blade H2 of the cleaning brush if necessary. The brush should be inspected regularly for excessive dirt to prevent damage.
Suction Hole: The suction hole, located underneath the central rotary brush, should be cleaned regularly with a soft brush to maintain maximum suction power.
Side Rotary Brush: The side rotary brush A11 is removed by pulling it upwards. Dust and dirt should be removed from the brush and its mounting location. If bristles are deformed, they can be dipped in warm water to restore their shape. The brush should be completely dry before reattaching. The side rotary brush is a wear item and should be replaced when worn out.
Complete Robotic Vacuum Cleaner: The surface of the vacuum cleaner should be regularly wiped with a soft dry cloth. The front swivel wheel A16 and motorized wheels A13 and A19 should be cleaned of coarser material, then wiped with a lightly dampened cloth. Sensors A10, A12, A17 on the underside and side sensor A7 should be wiped weekly with a soft dry cloth or cotton bud. The vents A8 on both sides of the vacuum cleaner should also be cleaned regularly.
Charging Station: The surface of the charging station B2, including the charging contacts B3, should be cleaned weekly with a soft dry wiping cloth.
Battery Care and Replacement: The battery should be kept charged, and the charging cycle should not be interrupted. The vacuum cleaner should not be left completely flat for extended periods to avoid irreparable damage to the battery. When replacing the battery, the vacuum cleaner must be turned off. The top battery cover A18 is removed, and the battery is disconnected from the control board. Only original battery types should be used.
| Type | Robot Vacuum Cleaner |
|---|---|
| Power | 30 W |
| Battery Capacity | 5200 mAh |
| Noise Level | 60 dB |
| Functions | Vacuuming, Mopping |
| Color | Black |
| Water Tank Capacity | 250 ml |
| Features | App control |
| Run Time | 200 min |