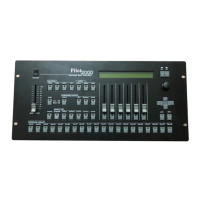
PILOT 2000 USER GUIDE
5. With the Left/Right buttons select the SET 1 field and use the fader below to choose
one of the 20 available scanning areas (SET 1 to SET 20)
6. To modify the scanning area, press the light gray button under the one of the 4 small
corner symbols, showed on the display, then move the joystick to the required new
corner.
7. To store the new mirror position, press the button again. Operating areas can be
created as required, regular or irregular scanning areas can be created.
8. Press the Setup button to store the settings and leave Working Area Menu.
To test a new Working Area
1. Press the Setup button.
2. Scroll with the up/down arrows until “Working Area” appears on the display.
3. Press the right-hand Scroll button.
4. Press the light gray button corresponding to Test writing showed on the display
5. Check the scanning area to be tested by moving the joystick
6. Press the Setup button to leave Working Area Menu.
18
SGM A/S · Ver. 2.03