On-Screen Display Menu
Power
Control
Power
control
setting
allow
s y
ou
to
save energy.
mm
• For operating the on-screen display menu,
see
page 2
0.
When
listening
to
music
from
a
music
program
, y
ou
can
turn
the
screen
off
and
enjoy
audio only.
• The screen image will return
to
normal when a button
(except those for audio adjustment, such as
VOL
,
MUTE)
is
pressed.
This function
allows
you
to
set
the
Power
Saving
level in
order
to
decrease
the
power
consumpti
on
and
increase
the
backlight
lifespan.
Standard: Optimizes
po
wer reduction based u
po
n
video content. When set
to
"Standard", "
jf
"
appears on the screen.
Advanced: Optimizes power reduction bas
ed
upon
video
co
ntent and engages OP
C.
When set to
"Advanced",
"Ifill" appears on the screen.
Off: This function does
not
work.
• "Power Saving" does not fu
nc
tion when you set AV
MODE
to
"AUTO"
or
"DYNAMIC
(Fi
xed)".
• You cannot select a different Power Saving item for
e
ac
h
AV
MODE.
When "Power
Sa
ving" is set, the "OPC" settings for a
ll
AV Modes will automatically change.
-If
you set "OPC"
to
"On" when "Power Saving" is set
to
"Standard", then the "Power Saving" setting w
ill
change
to
"Advanced".
-When
you change the "Power Saving" setting fr
om
"Advanced" to "Off"
or
to "Standard", "OPC" wi
ll
be
set to "Off".
-"AU
TO" and "DYNAMIC (Fixed)"
will
remain set
to
"Off".
• When "Power Saving"
is
set to "Standard"
or
"Advanced", the Power Saving leaf icon appears
to
the
left
of
"OPC"
in
the Picture Settings menu screen.
• "Power Saving" is not availab
le
when the
TV
is in
3D mode.
(For
the LE857U, LE757U, LE755U and
LE657U models)
®-
24
When
this
fun
ct
i
on
is enabled,
the
TV
a
ut
om
atically
shuts
down
if
no signal is received
for
more
than
15
minutes.
• When it is 5 minutes befo
re
the p
owe
r shuts down,
the remaining ti
me
will start
to
keep app
eari
ng every
minute.
• When a TV pro
gra
m finishes, this fun
ct
ion may not
operate.
When
you
enable
this function,
the
TV
au
tom
atically
shuts
d
own
if
no
op
er
ation is
pe
rfo
rmed
for m
or
e
th
an 3 ho
urs
.
• When it is
5 minutes before the
po
wer shuts down,
the remaining ti
me
w
ill
start to keep a
pp
earing every
minute.
System
Options
ED
• For operating the on-scr
een
displ
ay
m
enu
, see page 20.
These
fu
n
ctions
are
us
eful for a
dj
usting the a
ud
io
a
nd
video settings.
The
Vi
ew
Op
tion functi
on
s can
be ope
rated
with
the
r
emo
te
co
nt
rol
un
it.
Th
e
ap
pl
ic
ation
wind
ow
can be di
sp
lay
ed
by
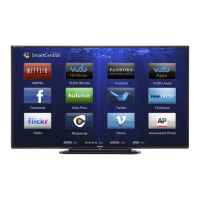
selecting "APPS" on
th
e
ME
NU screen.
• You can display the app
li
cation window by pressing
SmartCentral on the remote control unit. (See page
16.)
Th
is func
ti
on
change
s
th
e
sc
reen size.
Sel
ec
t "View
Option"
on
the
me
nu
to
displa
y the
Vi
ew Mode
me
nu
scree
n.
The View Mode menu varies depending on the input
source.
• You
ca
n select View Mode by pressing VIEW
MODE
on the remote
co
ntrol unit.
- See pages
18
and
19
for adjusting the video be
in
g
input from a TV, other
au
diovisual equipm
en
t, USB-
Video, DLNA-Video
or
Internet applications.
- S
ee
page 19 for adjusti
ng
the video be
in
g input from
a PC.
All
ow
s
yo
u
to
captur
e a
nd
freeze a
moving
i
ma
ge
th
at
yo
u are
watching.
• You can select Freeze
by
pressing FREEZE on the
remote co
nt
rol unit. See page 16 for details
of
Freeze
function.
A
ll
ows
yo
u
to
change
the
audio when
mul
tiple audio
is available for
the
pr
ogram y
ou
are
wat
chi
ng.
em
• You can change Audio by pr
es
sing AUDIO on t
he
remote control unit. See page 17 for details
of
Audio
fu
nction.
Gb
~
J'19f;JCC
A
ll
o
ws
y
ou
to chan
ge
th
e Clo
se
d
Cap
tion
di
sp
l
ay
.
Se
l
ec
t "Change
CC
" on
th
e
men
u to display the
Cl
o
sed
Capti
on
inf
orma
tion.
• The information displa
ye
d va
ri
es depend
ing
on the
pro
gr
am y
ou
are watching.
ra
• You c
an
change Closed Caption by pres
si
ng
CC
on
t
he
remote control unit. See page 18 for details of
Closed Caption function.
You can out
pu
t digital a
ud
io to
an
AV amplifier or
sim
il
ar device whose DIGITAL AUDIO
IN
P
UT
terminal is
connected to
th
e
DI
GIT
AL
AU
DI
O OUT terminal on the
TV.
Pl
ease sele
ct
an
audio output format co
mp
atible with
th
e
au
dio format of the program you are wa
tc
hing and
the equipment conn
ec
ted.
PCM: For
co
nnecting to eq
ui
pment that does not
support Dolby Digit
al
and
DT
S.
The
sa
me audio
(main, sub,
or
mai
n/
sub) as the audio of the
progr
am
being viewed is output.
2-c
han
n
el
audio with a sampl
in
g rate of
48
kHz or
less is ou
tp
ut as linear PCM audio.
Bitstream: For
co
nn
ec
ting
to
an
au
di
o sy
st
em that
suppo
rt
s Dolby Digital and DTS. Audio is ou
tp
ut
throu
gh
both the ma
in
and sub channels.
mm
• Analog ch
an
nel audio
an
d video input
au
dio are output
in
PCM mode even when "Bitstr
ea
m" is
se
l
ec
ted.
• PCM digit
al
input signals are output in
PC
M
mod
e
even when "Bitstream" is selected.
This set
ti
ng all
ows
yo
u to
sk
ip
th
e
TV
, HDMI
or
PC
IN
Inp
ut ("TV",
"P
C IN", "HDMI 1", "HDMI 2", "
HD
MI
3" a
nd
"HDMI
4"
)
on
th
e In
pu
t Sel
ec
ti
on
o
pe
ration.
• If you connect external equipment
to
an
HDMI
IN terminal which you have set to be skipped, a
notification message
ap
pears on the display when
a signal is received from the conn
ec
ted external
equipment. Press "Yes" to reset the relat
ed
ski
pp
ing
se
tt
ing so that the i
np
ut terminal becom
es
ava
il
ab
le.
 Loading...

