GB-11
BEFORE OPERATION
SETTING THE CLOCK
Plug in the oven. The oven display will display: “0:00”, an audible signal will sound once.
This model has a clock function and the oven uses less than 1.0W in stand by mode.
To set the clock, see below.
Your oven has a 24 hour clock feature.
1. Press the CLOCK button twice. The hour gure will ash and the clock indicator will illuminate.
2. Rotate the ENTRY dial until the correct hour is displayed, the input time should be within 0-23.
3. Press the CLOCK button, the minute gure will ash.
4. Set the minutes. Rotate the ENTRY dial until the correct minutes are displayed, the input time should be within 0-59.
5. Press the CLOCK button to start the clock. The icon “:” of the digital time will ash on the display and the clock indicator will disappear.
NOTES:
• If the clock is set, when cooking is complete, the display will show the correct time of day. If the clock has not been set, the display will
show "0:00".
• To check the time of day during a cooking process, press CLOCK button and the LED will display the time of day for 2-3 seconds. This does
not a ect the cooking process.
• In the process of clock setting, if the STOP/CLEAR button is pressed, the oven will go back to the former setting.
• If the electrical power supply to your microwave oven is interrupted, the display will intermittently show "0:00" after the power is
reinstated. If this occurs during cooking, the programme will be erased. As will the time of day.
KITCHEN TIMER FUNCTION
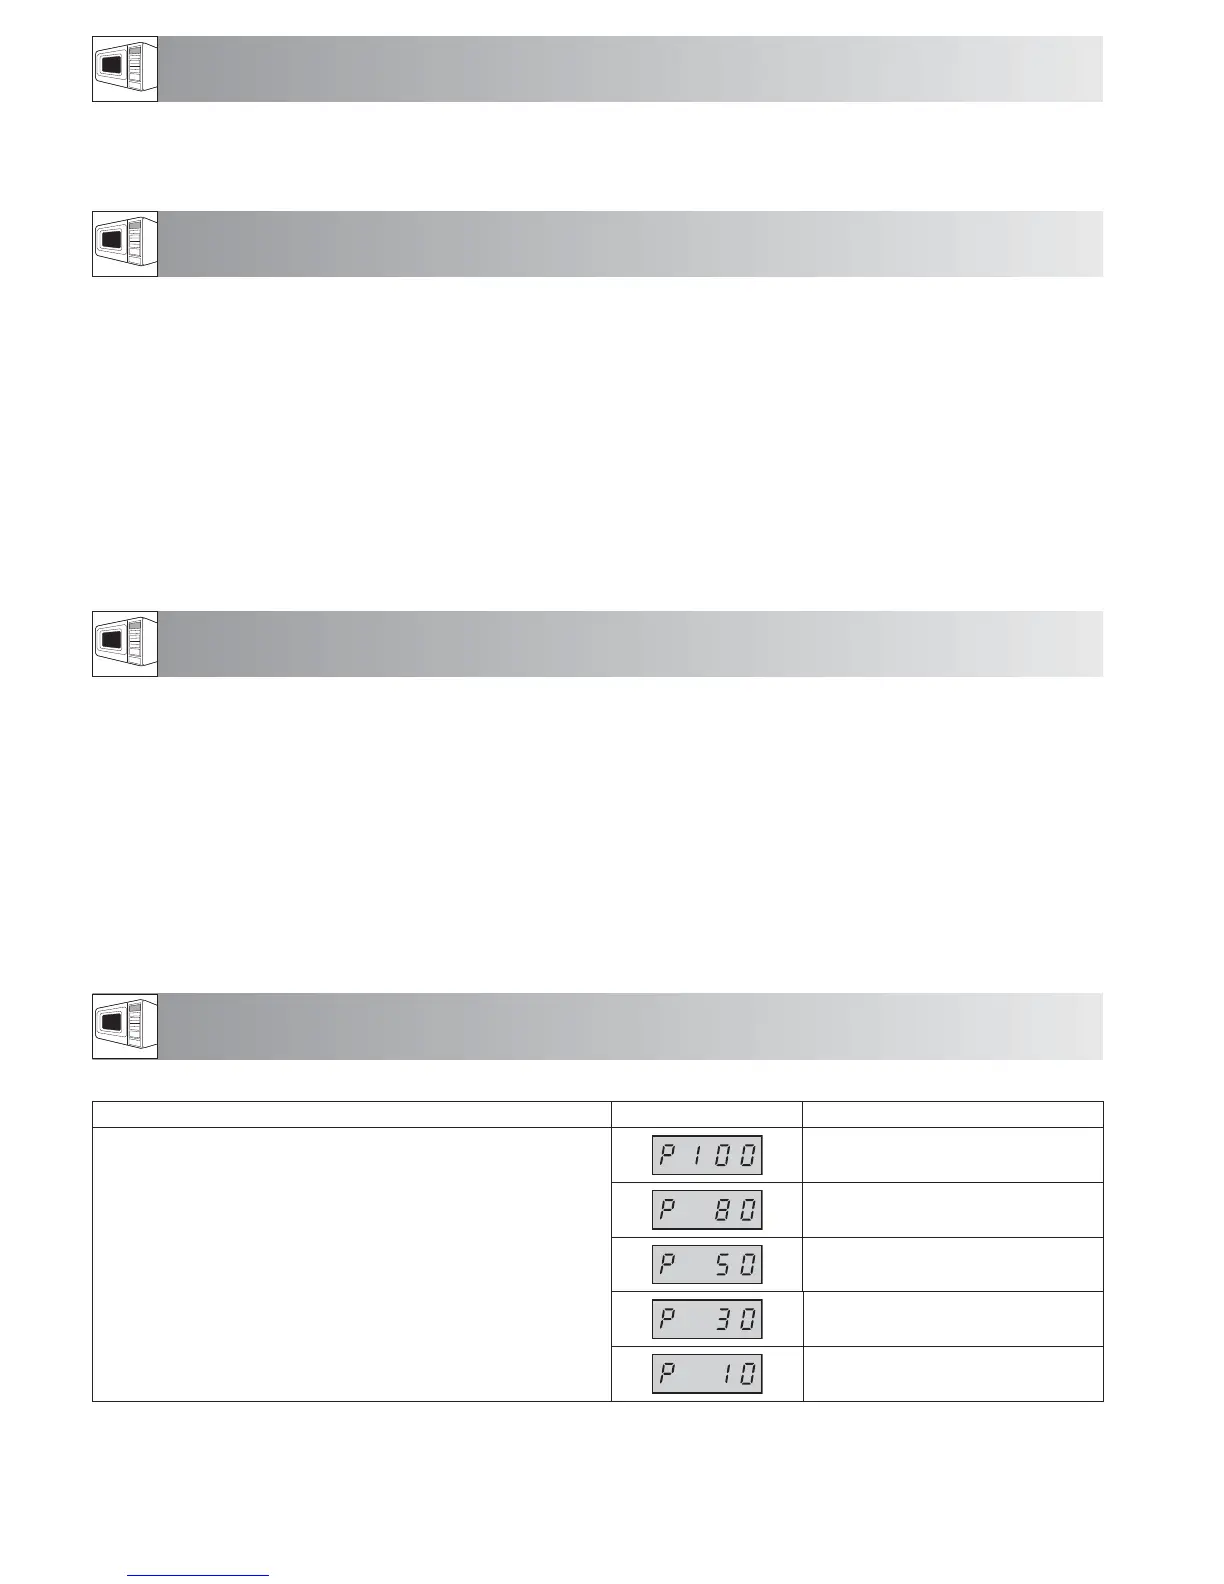
MICROWAVE POWER LEVELS
Your microwave oven has 5 power levels. To set the power level follow the instruction below.
To set the power level LED Display Microwave Power
• Press the MICRO. POWER button once, P100 will be displayed and
at the same time the microwave indicator and high heat indicator
will illuminate on the display.
• Press MICRO. POWER or rotate the ENTRY dial to change the
power level until the display indicates the desired level.
• Press the START/+30sec./ENTER button to confirm the setting,
enter the cooking time and then press the START/ +30sec./ENTER
button again to start the oven.
• To check the power level during cooking, press the MICRO. POWER
button, the current power level will be displayed for 4 seconds. The
oven will continue to count down although the display will show
the power level.
HIGH = 100 %
MEDIUM HIGH = 80 %
MEDIUM = 50 %
MEDIUM LOW = 30 %
LOW = 10 %
You can use the kitchen timer function, in instances where microwave cooking is not involved for example to time boiled eggs cooked on
conventional hob or to monitor the standing time for cooked/defrosted food.
Example:
To set the timer for 5 minutes.
1. P ress
button once.
2. Rotate ENTRY dial to select
time .
3. Press the START/+30sec/
ENTER key to start the timer.
4. Check the display.
(The display will count down
through the programmed
time.)
When the timer arrives at 0:00, an audible signal will sound 5 times and the LED will then display the time of day.
You can enter any time up to 95 minutes. To cancel the KITCHEN TIMER whilst counting down, simply press the STOP/CLEAR button.
NOTE: The KITCHEN TIMER function cannot be used whilst cooking.
KITCHEN TIMER