ENGLISH
INTRODUCTION
Thank you for purchasing this SHARP Product. We hope it will
give you many years of trouble-free enjoyment. But for the best
performance, read this Manual carefully. It will guide you in
operating your SHARP product.
CONTENTS
Page
SPECIAL NOTES 1
CAUTIONS 1
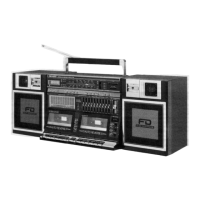
NAME OF CONTROLS 2-3
POWER SOURCE 4
• AC power 4
• Battery power 4
• Car battery power 4
SPEAKERS 5
• Mounting the speakers 5
• Removing the speakers 5
SETTING THE CLOCK 5
RADIO OPERATION 6
SOUND CONTROL 6
• Volume 6
• Graphic equalizer 6
• Spectrum analyzer 6
CASSETTE OPERATION 7
PLAYBACK 8-10
• Auto reverse 8
• Continuous playback 9
• APLD/APPS/APSS 9
• Cue and review 10
SPECIAL NOTES
Note:
Audio-visual material may consist of copyrighted works which
must not be recorded without the authority of the owner of
the copyright. Please refer to relevant law in your country.
• The last letter of the model name on the catalogue, pack-
ing case, etc. indicates the colour of the product. Operations
and Specifications are the same for all units regardless of the
cabinet colour.
• Car battery adaptor, microphone, headphones, cotton swab
and demagnetiser mentioned in this Operation Manual are not
included in this unit.
CAUTIONS
• Do not use oil, solvents, benzine, paint thinner and insecti-
cides on unit.
• Do not expose unit to moisture or temperatures higher than
60°C (140°F).
• Keep unit away from strong magnetism, excessive dust or
humidity.
• Hold AC power plug by head when removing from AC out-
let, since pulling lead can damage internal strands.
• Remove AC power lead before cleaning internals. Refer all
servicing to Sharp personnel, since removing unit's cover
presents shock hazard.
• Using non-specified AC mains voltages may damage unit.
Sharp is NOT responsible for damage from improper use.
Page
RECORDING 10-11
• Radio 10
• Dubbing 10
• To skip an undesirable programme with APLD and APPS dur-
ing dubbing 11
• Making blank spaces for APLD and APPS 11
• Erasing recorded tapes 11
• Digital tape counter 11
MIXING MICROPHONE 11
HEADPHONES 11
HOW TO USE THE BUILT-IN TIMER 12
• Listening to the radio, recording radio programmes, playing
a tape 12
• To turn off at a preset time less than 64 minutes 12
• To turn the radio off with SLEEP and on again with the
TIMER 12
USE WITH EXTERNAL AUDIO COMPONENTS 13
• Turntable or compact disc player 13
• Using an external amplifier 13
MAINTENANCE 14
• Internal care 14
• External care 14
SPECIFICATIONS 14