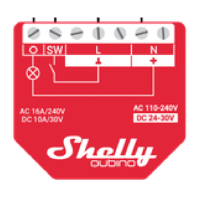
wire and the L terminal to the Device power supply circuit breaker. Connect the two
switch circuits to the S1 and S2 input terminals and the Device power supply circuit
breaker. Connect the first DC load circuit to the O1 terminal and one of the first DC
load circuit power supply wires. Connect the I1 terminal to the other first DC load
circuit power supply wire. Connect the second DC load circuit to the O2 terminal and
one of the second DC load circuit power supply wires. Connect the I2 terminal to the
other second DC load circuit power supply wire.
⚠CAUTION The DC load circuits voltage should not exceed 30 V and the current
should not exceed 12 A.
Two different voltages can be used for the two DC load circuits. If you are using 12 V
DC to power the Device, but want to switch two AC load circuits (fig. 4), connect the
positive wire to the +12 terminal and the negative wire to the L terminal. Connect the
two switch circuits to the S1 and S2 input terminals and the negative wire. Connect
the first load circuit to the O1 terminal and the Neutral wire. Connect the I1 terminal
to the first load circuit breaker. Connect the second load circuit to the O2 terminal
and the Neutral wire. Connect the I2 terminal to the second load circuit breaker. Two
different phases can be used for the two load circuits. If you are using 12 V DC to
power the Device and switch mixed DC and AC load circuits (fig.5), connect the
Device power supply positive wire to the +12 terminal and the Device power supply
negative wire to the L terminal. Connect the 2 switch circuits to the S1 and S2 input
terminals and the Device power supply negative wire. Connect the DC load circuit to
the O1 terminal and one of the DC load circuit power supply wires. Connect the I1
terminal to the other DC load circuit power supply wire.
⚠CAUTION The DC load circuit voltage should not exceed 30 V and the current
should not exceed 12 A. Connect the AC load circuit to the O2 terminal and the
Neutral wire. Connect the I2 terminal to the AC load circuit breaker. Two different
voltages can be used for the DC load circuits and for the Device power supply
circuit. If you are using 12 V DC to power the Device and switch two DC load circuits
(fig.6), connect the Device power supply positive wire to the +12 terminal and the
Device power supply negative wire to the L terminal. Connect the 2 switch circuits to
the S1 and S2 input terminals and the Device power supply negative wire. Connect
the first DC load circuit to the O1 terminal and one of the first DC load circuit power
supply wires. Connect the I1 terminal to the other first DC load circuit power supply
wire. Connect the second DC load circuit to the O2 terminal and one of the second
DC load circuit power supply wires. Connect the I2 terminal to the other second DC
load circuit power supply wire.
⚠CAUTION The DC load circuits voltage should not exceed 30 V and the current
should not exceed 12 A. Two different voltages can be used for the two DC load
circuits.
⚠RECOMMENDATION For inductive loads, which cause voltage spikes during
switching, such as electrical motors, fans, vacuum cleaners, refrigerators and similar
ones, RC snubber (0.1µF/ 100Ω / 1/2W / 600V AC) should be wired in parallel with the
load. RC snubbers can purchased at
shop.shelly.cloud/rc-snubber-wifi-smart-home-automation
 Loading...