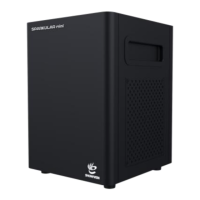
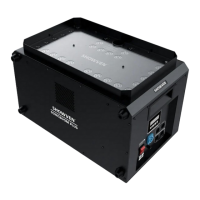
The Showven Sparkular mini (model BT06/BT07) is an affordable and versatile spark effects solution designed for various venues and stages, including weddings, parties, clubs, and cruise ships. It operates on the Sparkular platform and produces fixed spark effects at heights of approximately 2-3 meters. The device offers both wireless remote and DMX double control for flexible operation.
Technical Specifications
- Model: BT06/BT07
- Dimensions: 168 × 180 × 228 mm
- Weight: 4.5 kg
- Voltage: 220V (BT06) / 110V (BT07), 50/60Hz
- Work Power: 380W
- Effect Height:
- 2-2.5m (with HC8200 MEDIUM consumable)
- 3-3.5m (with HC8200 LARGE consumable)
- Interface: 3-pin XLR (DMX IN/OUT), POWER IN/OUT
- Control: DMX (2 channels), Wireless Remote
Usage Features
Safety Instructions:
- Unauthorized repairs are prohibited.
- Keep the Sparkular mini dry and do not use it in rain or snow.
- Ensure the feeding hopper lid is well covered during use.
- In case of accidental burning of consumables, use sand to extinguish.
- Store consumables in a dry, sealed environment, away from moisture.
- Before and after each show, check the output nozzle for consumable aggregates and clean if necessary to prevent damage or affect firing.
- When using HC8200 LARGE consumables, some sparks may drop to the ground; HC8200 MEDIUM or SMALL are suggested for indoor events.
- The maximum allowed power supply cable cascade is 6 units (BT06) / 3 units (BT07). Exceeding this limit can cause damage or fire.
- Do not block the air intake and outlet for proper heat dissipation.
- Never cover the output nozzle; inspect it before each show to ensure no objects or material block it.
- Never touch the nozzle of the Sparkular mini as it can cause burns.
- Never touch the sparks shooting out from the nozzle.
Safety Distance:
- Maintain a minimum distance of 1m between the Sparkular mini and audiences or flammable materials.
- Ensure sparks do not touch any objects and maintain a minimum 1m clearance from the maximum effect height.
- In windy conditions, increase the safety distance based on wind direction and speed.
- If the machine is tilted, adjust the safety zone accordingly, increasing distance in the direction of the tilt.
- Wear safety goggles when entering the safety zone to protect against sparks and consumables.
Operation Panel:
- LED Display Area:
- READY (Green): Flashes during preheat (approx. 5 minutes), then turns solid when ready to work.
- DMX (Flashing): Indicates DMX signal is connected; off if no signal.
- FAULT (On): Indicates a malfunction.
- HEAT (On): Indicates the machine is heating.
- Control Button Area:
- MENU: Short press to switch interfaces; press and hold for 3 seconds to enter advanced setup.
- - / +: Adjust parameters.
- ENTER: Confirm and save parameters.
- RFID Area: Swipe a disposable RFID card to identify parameters and granule types. Each card can only be used once.
Main Interface:
- Displays DMX address, inner core temperature, temperature progress bar, and remaining time.
Error Information:
- E0 System IC: Systematic error.
- E2 Temp. Sensor: Temperature sensor not connected or damaged.
- E3 P Temp. Over: Chassis over-temperature.
- E4 Time Remain: Insufficient granules or remaining time; requires swiping time card.
- E5 K Temp. Over: Heating chamber over-temperature.
- E6 Heat Fail: Heating failed.
- E7 Tip Over: Machine slant over 45 degrees.
Setting Menu:
- Set DMX Address (1-512): Sets DMX address. If set to "1++", the machine becomes a wireless host and outputs DMX.
- Wireless Control (ON/OFF): Enables wireless function for remote controller matching.
- Manual Fountain (ON/OFF): For testing purposes.
Advanced Menu:
- Set Temperature (480-620): Adjusts inner core temperature (default 550).
- Auto Heat (ON/OFF): Enables auto-preheat after power on (default ON).
- Density (70-100): Adjusts spark density (default 90).
- Mode Selection (Factory Mode/User Mode): Factory Mode is for debugging.
- DMX Channel Mode (2/4/2+3 DMX Channel): User Mode is the standard. 4 DMX Channel and 2+3 DMX Channel are for special use.
- Tip Over Error (ON/OFF): Tilt function switch.
- Standby Switch (ON/OFF): When ON, the machine fires only after heating is complete.
DMX Mode (2 Channels):
- First Channel:
- 0-15: Fountain OFF
- 16-255: Fountain ON
- Second Channel:
- 60-80: Clear Material
- 20-40: Emergency Stop
- 0-10: Pre-heat OFF
- 240-255: Pre-heat ON
- When using with HOST CONTROLLER ZK6200/6300, each Sparkular mini must have a different DMX address to avoid signal interference.
Installation:
- Horizontal installation is preferred. If angled installation is necessary, turn "Tip Over" to OFF. Maximum firing angle is 45° to the right side.
- Ensure secure installation to prevent tipping.
- Adjust safety zone for tilted installations.
- Check output nozzle for good shape and no powder aggregate.
Filling Consumables:
- Open powder bags and fill the feeding hopper (capacity: 100g).
- Choose HC8200 MEDIUM (2-2.5m effect) or HC8200 LARGE (3-3.5m effect) based on application. HC8200 LARGE may cause sparks to drop, so MEDIUM or SMALL are recommended for indoor use.
- Ensure the hopper lid is locked tight after filling.
Power and DMX Connection:
- Connect power cable to POWER IN and a grounded power source.
- For sequential connections, use power link cables from POWER OUT of one machine to POWER IN of the next.
- Maximum cascade: 6 units (220V version) / 3 units (110V version).
- Power on all Sparkular mini units.
- Assign unique DMX addresses for each unit if using a SHOWVEN host controller or FXcommander.
- For wireless control, set the machine to "wireless ON" and match with the remote controller.
- For DMX cable control, connect DMX IN of the first unit to the DMX controller, then DMX OUT of previous machines to DMX IN of subsequent machines in series.
- Suggest plugging a DMX terminator into the DMX OUT of the last unit for signal reliability. A signal amplifier is needed for long DMX signal transmission (>200m).
Activation with RFID Card:
- Swipe an RFID card to activate the machine. The Sparkular mini will display remaining time if successful.
- An "E4" error is reported when remaining time is less than 8 minutes.
- Each 50g package of HC8200 increases working time by 4 minutes per machine. Maximum recharge time is 30 minutes; cannot recharge if time already reached 30 minutes.
Programming and Firing:
- Set firing height and sequences.
- Machine preheats for about 5 minutes (varies with voltage and environment).
- Ensure the safety zone is clear.
- Clear material before firing is suggested.
- Maximum continuous firing time is 30 seconds to prevent overheating.
- Operators must have a clear view of the device to stop the show immediately if danger arises.
- Clear material for 5 seconds after the show to remove remaining particles from the heating chamber. For angled installations, extend clear material time.
Turn Off and Clean Up:
- Power off the Sparkular mini and allow it to cool down.
- Disconnect all power and DMX cables.
- Empty remaining HC8200 from the hopper and store it in a dry, sealed bottle. Never touch the output nozzle when emptying the hopper (danger of burns).
- Use a handheld vacuum cleaner to empty the feeding hopper only after the machine has cooled down. Do not use high-power vacuum cleaners to avoid hot consumables being sucked into the vacuum cleaner, which could cause fire.
- Clean the surroundings to remove powder residues.
Wireless Control Information:
- Unplug DMX cable when using wireless remote control.
- Set "Wireless Control" to ON, match the remote controller, and pull out the antenna on the remote controller.
- Remote Controller Functions:
- 1 ON/OFF, 2 ON/OFF, 3 ON/OFF: Control DMX addresses 1, 3, 5 respectively.
- SET: Match machine with remote.
- CLEAR: Clean material for 3 seconds.
- 5 S / 15 S / 30 S: All firing for 5s, 15s, or 30s.
- ALL OFF: All stop.
- Replace remote controller battery (12V23A) when indicator light is weak.
- If the machine occasionally doesn't work, press the start button again due to interference.
- For wireless control, stay as close to the machine as possible; metal shielding can interfere.
Wireless Host Sparkular mini Mode (requires communication cables):
- For strong interference environments, use the wireless host mode for stable control.
- Set the first Sparkular mini's DMX address to "1++". This machine acts as a wireless host, receiving signals from the remote controller and transferring them via communication cables to other Sparkular mini units.
Maintenance Features
- Empty the feeding hopper before shipping the machine.
- Empty the feeding hopper if not used for a long time, especially in high humidity environments, after each show.
- Clear material from the Sparkular mini both before and after each show.
- It is recommended to wash or replace the air intake filter every two months.
Warranty Instructions:
- The product warranty period is one year.
- If quality problems arise within 7 days of shipping from the factory, a brand new same model machine can be exchanged.
- Free maintenance service is offered for hardware malfunctions during the warranty period (excluding human-caused damage). Do not repair the machine without factory permission.
- Situations NOT included in warranty service:
- Damage caused by using consumables not from SHOWVEN® or an authorized distributor.
- Damage caused by improper transportation, usage, management, maintenance, or human factors.
- Disassembly, modification, or repair without permission.
- Damage caused by external reasons (lightning strike, power supply issues, etc.).
- Damage caused by improper installation or use.
- Paid service is available for product damage not covered by warranty. An invoice is required when applying for maintenance service from SHOWVEN®.